Do you have a question about the VegeBox Growlight HGLITE and is the answer not in the manual?
Steps to register the product online via the customer care section.
Details the start date and duration of the product's one-year warranty.
Lists all components included with the hydroponic unit for setup and operation.
Lists accessories sold separately to enhance the hydroponic system's functionality.
Details accessories and methods for connecting multiple hydroponic units together.
Instructions for assembling and setting up a single hydroponic unit.
Guide for connecting and powering multiple hydroponic units stacked together.
Explains how to turn the unit on and off using the power button.
Describes the meaning of different LED light patterns for unit status and water level.
Step-by-step process for draining water from the unit using the water pump.
Detailed instructions on preparing sponges and sowing seeds for germination.
Guidance on transferring sprouted seeds into the unit for initial growth.
Instructions for preparing and adding nutrient solutions to the hydroponic system.
Steps for separating sprouts, placing them in baskets, and ensuring root contact with water.
How the intelligent lighting system operates and how to set the cycle start time.
Method for setting a specific time for the unit's grow lights to turn off.
Advice on using planting hole caps, handling roots during harvest, and cleaning the unit.
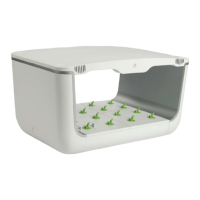
The VegeBox Hydroponic Grow Light System, model HGLITE, is an indoor gardening solution designed to facilitate the growth of plants without soil, utilizing a hydroponic method. This system is suitable for both standalone use and for stacking multiple units to expand growing capacity.
The core function of the VegeBox system is to provide an optimal environment for plant growth through hydroponics. It includes an intelligent lighting system that automatically initiates a day/night cycle, typically consisting of 14 hours of light and 10 hours of dark, to support plant development. The system also manages water and nutrient delivery to the plants, ensuring they receive the necessary resources for healthy growth.
Initial Setup (Standalone): To begin, the water pump is attached to the base panel, ensuring it is securely placed in the center. The four supporting columns are then connected to the base. The top panel, featuring the power button, is aligned and attached to the left and right side panels, which are then pushed inward to secure the structure. Finally, the 48W power supply is connected to the top panel's socket and plugged into an outlet. Planting beds are installed as shown in the manual.
Stacking Multiple Units: For expanded growing, multiple hydroponic units can be stacked. The process involves placing the first unit on a stable surface, then positioning a connecting plate on top of it. A second unit is then placed on top of the connecting plate. A 240W power supply is connected to the bottom socket of the first unit. A connecting cable is inserted into the top socket of the first unit and its other end into the bottom socket of the second unit. This step can be repeated for up to four additional units. The 240W power supply is then plugged into an outlet.
Power Button and Light Indicators: The system is operated via a power button. Pressing it once turns the unit on, indicated by a flashing green light. Pressing it again turns the unit off, and the light will extinguish. Light indicators provide status updates:
Day/Night Cycle Activation and Deactivation: The intelligent lighting system automatically starts a 14-hour light and 10-hour dark cycle. To optimize vegetable growth, it's recommended to plug in the unit between 5:00 AM and 9:00 AM. For example, if plugged in at 5:00 AM, the unit will automatically light up at 5:00 AM daily, stay lit for 14 hours, and turn back on at 5:00 AM the next morning. The deactivation time can be customized. To set a specific deactivation time, press and hold the power button for 3-5 seconds when the unit is plugged in. The green light will remain solid, even if the grow lights switch off, indicating that the deactivation time has been recorded. For instance, if the button is pressed for 3-5 seconds at 8:00 PM, the grow lights will automatically turn on after 10 hours of darkness.
Sowing: Sowing involves adding a small amount of plain water to the seed box, just enough to cover the bottom. Sponges are then placed in the seed box with their holes facing up, and more water is added until the container is half full. One seed is placed into each sponge hole using tweezers, ensuring it sits slightly below the water line. The seed box is then placed in the shade for 12-24 hours for sprouting.
Seeding: Once seeds sprout, the seed box is moved into the unit and kept lit for 5-7 days. Roots will begin to form, growing approximately 1.5 cm.
Watering and Nutrition: The water access lid or planting bed is removed. Two separate gallons of water are prepared: one mixed with 1 fl. oz. of Type A nutrition, and the other with 1 fl. oz. of Type B nutrition. The Type A mixture is poured into the base first, followed by the Type B mixture. It is crucial to ensure thorough mixing to prevent sediment buildup and to carefully follow measurements, as incorrect concentrations can harm plant roots or hinder growth.
Planting and Harvesting: Once sprouts are ready, the large sponge is gently separated into smaller pieces, with each sprout in its own sponge. Overgrown or weak sprouts are removed. The small sponges with sprouts are then inserted into the planting baskets, ensuring the sponge sits flush against the bottom of the basket for vertical root growth. It's important not to squeeze water out of the sponge to keep roots intact. The planting baskets are then placed into the planting bed holes, making sure roots contact the water. The lighting cycle is turned on until plants are fully grown.
Draining the Water: To drain water from the base, an 8mm tube (not included) is connected to the water outlet on the water pump. When the unit is powered on, pressing and holding the power button for 3-5 seconds will cause the LED light to alternate between blue and green, initiating water drainage. Drainage stops automatically when the water level falls below the pump's intake, or it can be stopped manually by pressing the power button. Any remaining water in the base can be cleaned out with a towel.
Empty Holes and Algae Prevention: If there are empty holes in the planting bed, they should be covered with planting hole caps to prevent algae growth in the water below.
Root Management during Harvest: During harvest, efforts should be made to remove all broken roots from the base. The planting basket can be reused for the next planting cycle.
Regular Cleaning: It is recommended to clean the base every 3 months. This involves completely draining the water and removing any residue and broken roots to maintain a healthy growing environment.
Warranty: The product comes with a one-year warranty, which begins on the date the item ships from the warehouse. This warranty covers all products unless otherwise specified. Product registration is encouraged by clicking on "Customer Care," then "Product Registration Form," and filling out all required fields.
| Power | 100W |
|---|---|
| Lifespan | 50, 000 hours |
| Weight | 4.4 lbs |
| LED Chips | Samsung LM301B |
| Coverage Area | 2x2 ft (Veg), 1.5x1.5 ft (Bloom) |
| Input Voltage | AC 100-240V |