10 VELUX
®
VELUX
®
11
S
u
r
f
a
c
e
C
l
e
a
n
e
r
S
a
c
h
e
t
P
o
c
h
e
t
t
e
d
e
N
e
t
t
o
y
a
g
e
R
e
i
n
i
g
u
n
g
s
t
u
c
h
O
p
p
e
r
v
l
a
k
t
e
r
e
i
n
i
g
e
r
S
a
l
v
i
e
t
t
a
D
e
t
e
r
g
e
n
t
e
S
u
r
f
a
c
e
C
l
e
a
n
e
r
S
a
c
h
e
t
P
o
c
h
e
t
t
e
d
e
N
e
t
t
o
y
a
g
e
R
e
i
n
i
g
u
n
g
s
t
u
c
h
O
p
p
e
r
v
l
a
k
t
e
r
e
i
n
i
g
e
r
S
a
l
v
i
e
t
t
a
D
e
t
e
r
g
e
n
t
e
1b
4
1
2
3
min 20 mm
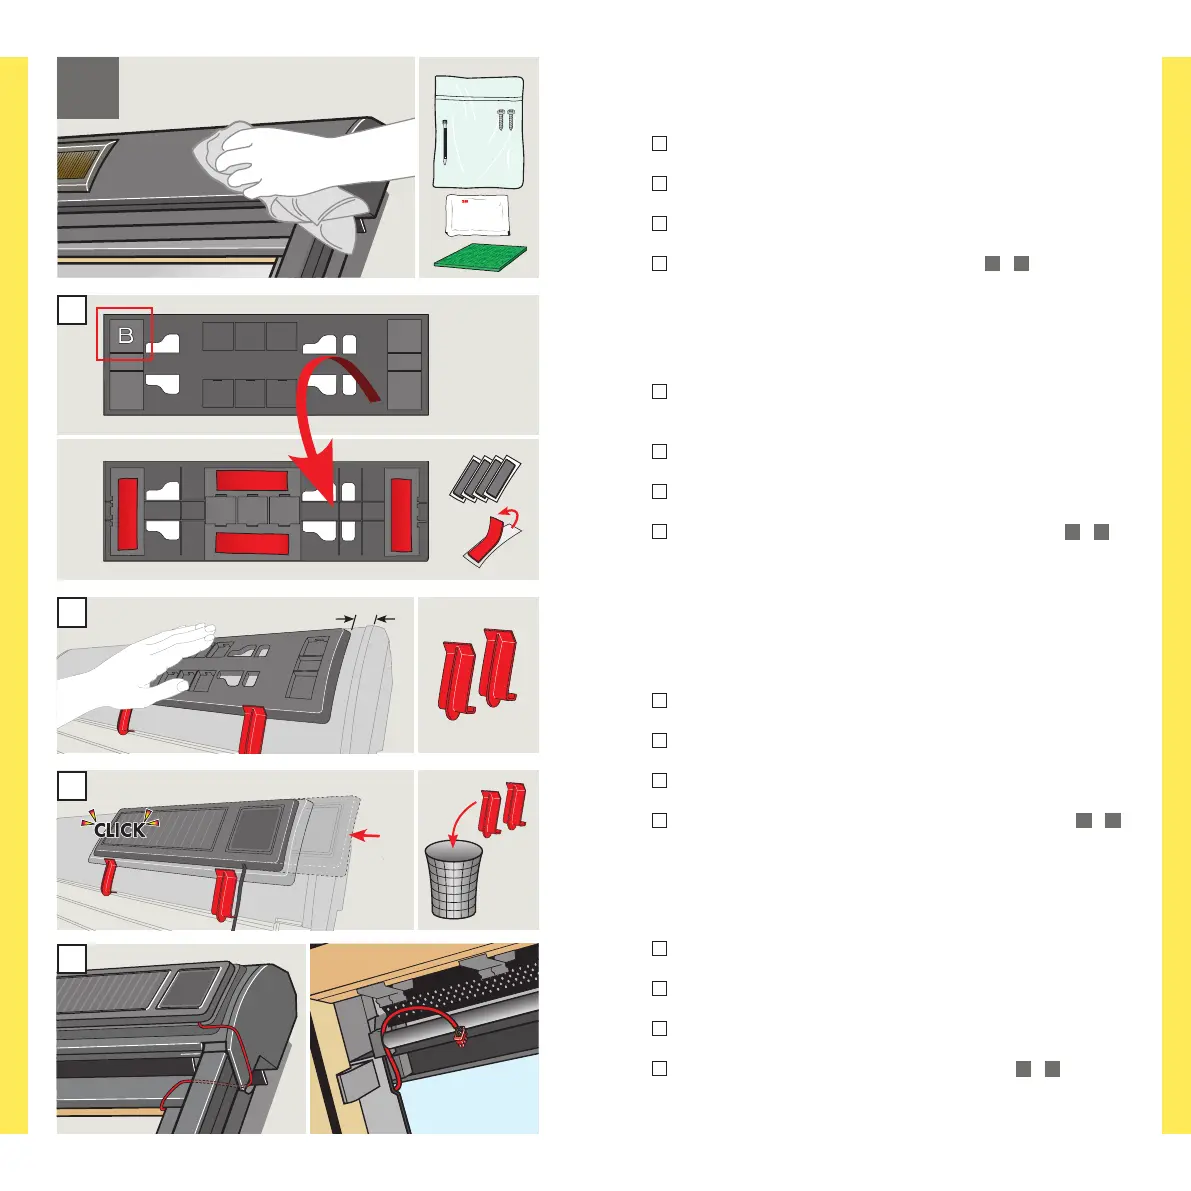
ENGLISH: Fitting solar cell to roller shutter top casing
Fit the solar cell in dry weather and at temperatures between +10°C and
+30°C. Clean the top casing with the sponge supplied and wipe with clean-
ing tissue. The surface must be completely dry and clean before fitting.
1
: Choose adaptor plate B.
Attach double-sided adhesive tape to the back and remove the foil.
2
: Position installation clips and adaptor plate as shown. Press adaptor
plate hard towards top casing.
3
: Remove installation clips. Fit solar cell by pushing it into the adaptor
plate from right to left.
4
: Lead cable as shown. Do not connect it until ill.
9a
/
9b
.
DEUTSCH: Solarzellenfeld am Rollladen-Oberteil montieren
Das Solarzellenfeld bei trockenem Wetter und bei Temperaturen zwischen
+10 °C und +30 °C montieren. Das Rollladen-Oberteil mit dem beiliegen-
den Schwamm säubern und ihn mit dem Reinigungstuch abwischen. Vor
der Montage muss die Oberfläche vollständig trocken und sauber sein.
1
: Adapterplatte B wählen.
Das doppelseitige Klebeband auf der Rückseite befestigen und die
Folie entfernen.
2
: Die Montageklammern und die Adapterplatte wie gezeigt positionie-
ren. Die Adapterplatte fest gegen das Rollladen-Oberteil drücken.
3
: Die Montageklammern entfernen. Das Solarzellenfeld montieren,
indem die Einbauplatte von rechts nach links geschoben wird.
4
: Die Leitung wie abgebildet führen. Die Leitung erst in Abb.
9a
/
9b
anschließen.
FRANÇAIS : Adaptation du panneau de cellules solaires au capot du
volet roulant
Installer le panneau de cellules solaires par temps sec et à des tempé-
ratures entre +10°C et +30°C. Nettoyer le capot avec l'éponge fournie
et essuyer avec le chiffon. La surface doit être complètement sèche et
nettoyée avant installation.
1
: Choisir la platine d'adaptation B.
Coller les adhésifs double face sur le dos et enlever le film de protection.
2
: Placer les clips et la platine d'adaptation comme indiqué et appuyer la
platine d'adaptation fortement sur le capot.
3
: Retirer les clips d'installation. Installer le panneau de cellules solaires
en le pressant dans la platine de la droite vers la gauche.
4
: Passer le câble comme indiqué. Ne pas le connecter avant la phase
9a
/
9b
.
DANSK: Solcellepanel monteres på rulleskoddens topkasse
Solcellepanelet skal monteres i tørvejr og ved temperaturer mellem
+10 °C og +30 °C. Rulleskoddens topkasse afrenses med den medleverede
svamp og tørres efter med vaskeserviet. Overfladen skal være helt ren og
tør før montering.
1
: Vælg adapterplade B.
Dobbeltklæbende tape sættes fast på undersiden, og folien fjernes.
2
: Monteringsklips og adapterplade placeres som vist. Adapterpladen
trykkes fast mod rulleskoddens topkasse.
3
: Monteringsklips fjernes. Solcellepanelet monteres ved at skyde det
ind over adapterpladen fra højre mod venstre.
4
: Ledningen føres som vist. Vent med tilslutning til ill.
9a
/
9b
.

 Loading...