11
Quick Reference Guide Ventana BenchMark GX
99. 100.
105.
109.
104.
106.
107.
107.
101.
103.
102.
104.
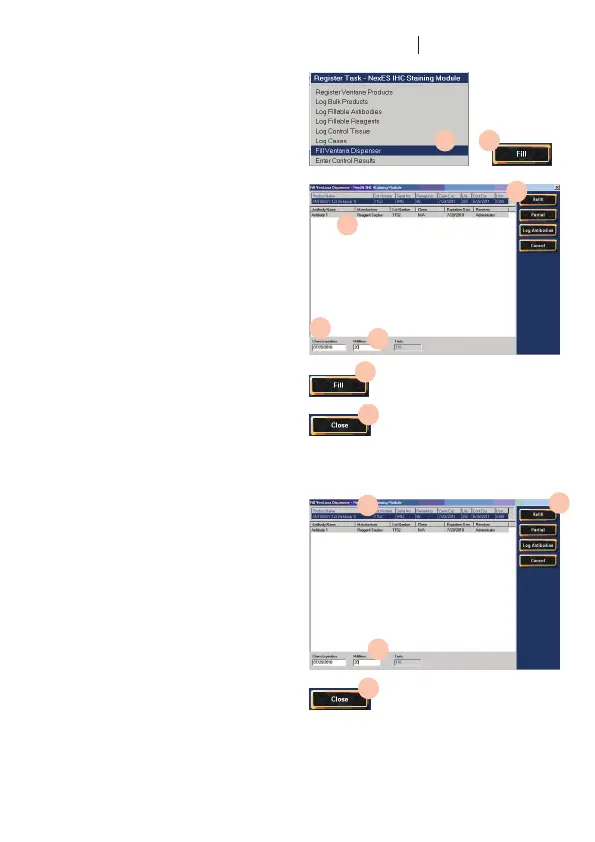
III. Fill a new Ventana dispenser
97. Make sure the product has been logged.
98. Register the dispenser using the product
registration probe.
99. In the Register Task menu, click Fill
Ventana Dispenser.
100. In the Product Name list, click the
dispensertoll,andthenclicktheFill
icon.
A list of products appears below the
dispenser record.
101. Intheproductslist,clickaproducttoll
the dispenser.
102. Enter the product expiration date in the
Chem Expiration box.
103. Type the amount of product in the
Milliliters box.
104. Click the Fill icon. The Product Name
list returns. The dispenser name and
the product name are combined in
the product record. The zero in the
Remaining column is replaced by the
number of tests remaining.
105. Click the Close icon to return to the
main screen.
IV. Rell or partially ll a dispenser
106. Follow steps 97 and 99 through 102 in
“Fill a new Ventana dispenser.”
107. Toemptyadispenserandrellit,click
theRellicon.Thefollowingmessage
appears:“Hastheoldvolumeinthis
dispenser been emptied?” Click Yes.
Make sure the dispenser is empty, then
rellitwiththevolumespeciedinthe
Milliliters box.
108. To add to a dispenser that is not empty,
click the Partial icon. If the volume
entered in the Milliliters box exceeds
the allowable volume, the following
messageappears:“Thisdispensercan
only receive ### more tests. Continue
withpartialll?”ClickYes.Theamount
is adjusted and the following message
appears:“Addthenewvolumetothat
existing in this dispenser?” Note the
amount of product to be added to the
dispenser, and then click Yes. Add
thespeciedamountofuidtothe
dispenser.
109. Click the Close icon to return to the
main screen.
 Loading...