Rental Center Guide
Operating Steps and Safety Practices
Visit Vermeer at www.vermeer.com to locate your local Vermeer dealer.
Your rental associate or technician will explain each of the following operating steps and safety practices before you use this
trencher.
WARNING: Do not use or attempt to operate the machine until you understand proper operation and
safety of the machine. Read the operator’s manual. Read safety signs attached to the machine. If
you are unsure of content or meaning of the safety messages or information regarding machine
operation, ask your rental associate or technician for more details.
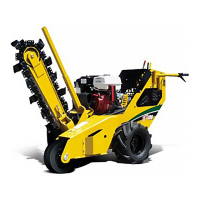
INTENDED USE: Vermeer RT200 is a pedestrian-operated self-propelled machine equipped with a front-mounted trencher or
root cutter and optional boring attachment to perform various functions such as trenching, root cutting and horizontal boring.
OPERATING STEPS
1. Trencher Start:
a. Check all machine fluid levels and condition of air cleaner before starting machine.
b. Place “Propel” and “Attachment Drive” levers in NEUTRAL/OFF position.
c. Move “Throttle” to mid-range. Fully close “Choke” (cold engine only).
d. Turn “Key Switch” clockwise to start engine. As engine warms up, gradually open “Choke” and reduce “Throttle” to idle.
2. Trencher Transport:
a. Before transporting machine on a trailer, read trailer manual for safety precautions and loading information. Ensure gross weight of
machine with attachments is within the gross weight limits of the trailer and the towing vehicle. Approximate weight of RT200 trencher is
1500 lb. (680 kg).
b. Clean machine to keep any debris off highway. If equipped with optional “Porta Bore” attachment, raise and lock it in transport position.
c. Lower trencher boom half way to increase weight on nose wheel, release “Park Brake,” position machine inline with trailer ramps and set
“Throttle” to half speed. From level ground, drive machine squarely onto trailer and stop at tie-down position.
d. Fully lower trencher boom to trailer bed and set “Park Brake.” Shut off engine and remove key.
e. Secure machine to trailer using standard tie-down procedures with front and rear tie-down points.
f. Reverse procedure for unloading machine from trailer. Ensure trailer is on level ground. Avoid unloading if ramps are slick.
3. Trencher Setup:
a. Contact the local One-Call system in your area to request location of all underground utilities near work area.
b. Operating the machine will require you to wear protective equipment. Always wear a hard hat, safety shoes, hearing protectors and eye
protection. If working near traffic, wear reflective clothing.
c. Examine work area for any obstructions, conditions, or situations which may impair machine operation or create a safety hazard for the
operator or other persons. Look for evidence or notices of underground placements, manhole covers, drop boxes and recent trenching
activity. All utilities in these areas should be marked and avoided.
d. Either the trench cleaner assembly or restraint bar must be in place on the trencher boom while digging. These are intended to help
protect against accidental personal contact with the digging chain.
e. Disengage “Attachment Drive” when driving between trenches. Never ride on machine.
4. Opening a Trench:
a. With red “Operator Presence Button” pushed, use steering and propel controls to line up machine at beginning of trench.
b. If equipped with trench cleaner, shut off machine and raise and secure trench cleaner.
c. Follow Starting Procedure and push down on red “Operator Presence Button” located on the “Propel Lever.” Move “Throttle” to full
speed. The hydraulic power clutch is engaged by depressing the “Operator Presence Button.” If the button is released during operation,
the clutch will disengage, and hydraulic power will be discontinued. If the button is not depressed within 1.5 seconds after being
released, the “Propel and Attachment Drive Levers” must be returned to NEUTRAL before the clutch will re-engage.
d. With “Attachment Drive” engaged in FORWARD, lower trencher boom slowly to the desired digging depth. Lowering boom too quickly
will result in excessive boom and machine bounce. A small amount of rearward ground travel during the plunge cut may help in reducing
boom and machine bounce. Trencher will STOP anytime the “Operator Presence Button” is released.
e. If using trench cleaner, stop “Attachment Drive” after plunge cut, raise trencher boom until chain is out of ground and shut off machine.
Release trench cleaner, restart machine, engage “Attachment Drive” in FORWARD and lower trencher boom to desired digging depth.
f. Adjust rearward ground travel speed for the best productivity when the required trench depth has been reached.
g. Use “Steering Lever” to maintain trenching direction.
5. Restarting Stalled Machine:
a. If digging chain snags material and stalls engine, place “Propel” and “Attachment Drive” levers in NEUTRAL and restart engine. Slightly
raise trencher boom and REVERSE digging chain to free obstruction.
b. Engage “Attachment Drive” in FORWARD, lower trencher boom to desired digging depth and resume trenching.
6. Shutdown Procedure:
a. Place “Propel” and “Attachment Drive” levers in NEUTRAL/OFF position and raise trencher boom.
b. Reduce engine speed to idle, turn off engine and remove key. Set "Park Brake” to prevent machine from rolling.
Operator’s manual and rental center guide are available in other languages. Contact productsafety@vermeer.com. Se dispone del manual del
operador y de la guía de centros de alquiler en otros idiomas. Póngase en contacto con productsafety@vermeer.com.
See other side for Safety Practices
04/2014 Your machine may have product improvements and features not yet contained in this guide. Part Number 105400CP9 Edition 1_00
Vermeer Corporation reserves the right to make changes at any time without notice or obligation.
© 2014 Vermeer Corporation. All Rights Reserved.
1210 Vermeer Rd. East, Pella, IA 50219 USA