-4-
AVISO: Reemplace y apriete la tapa de la válvula de
aire si ésta es removida por cualquier movo. De no
hacerlo podrá permir la pérdida de presión de aire y
eventualmente conducir al anegamiento del tanque
y falla de la celda de agua (membrana).
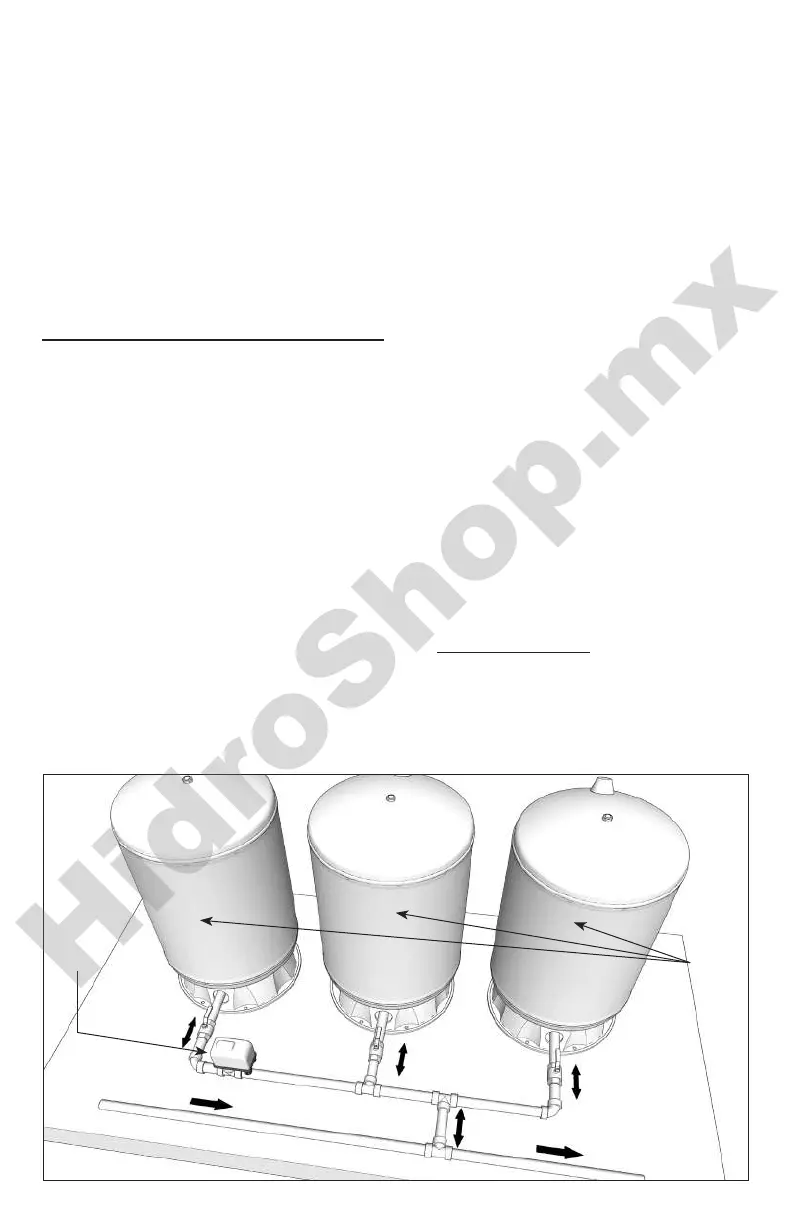
Instalaciones con múlples tanques
Se pueden conectar dos o más tanques precargados
juntos para aumentar la candad de agua aprove-
chable entre ciclos. Dos tanques del mismo tamaño
proporcionarán el doble del suministro, tres lo tri-
plicarán y así en delante. Consulte la Fig. 1 para una
referencia de instalación de este po.
CICLO DE OPERACIÓN
1. Tanque casi vacío: el aire se expande en el área
encima de la celda (membrana) de agua (Fig. 2A).
2. El agua comienza a ingresar al tanque com-
primiendo el aire encima de la membrana au-
mentando la presión a medida que se llena de
agua (Fig. 2B).
3. Ciclo de bombeo completado: aire es comprimido
hasta alcanzar la presión calibrada en el interrup-
tor de presión (Fig. 2C).
4. El agua es extraída del tanque – el aire compri-
mido del tanque fuerza el agua fuera de la celda
de agua (Fig. 2D).
5. Celda vacía – nuevo ciclo listo para comenzar (Fig.
2A).
Conecte la tubería del sistema a la salida en la bri-
da del tanque. Ulice tubería plásca, de cobre o de
acero según sea necesario. Para evitar fugas, ulice
cinta selladora para tubería en todas las conexiones
roscadas al tanque.
AVISO: Para asegurarse de que las roscas no estén
Fig. 1
Suministro de agua
(watersupply)
Al uso
(to service)
Tanques
(tanks)
Interruptor
de presión
(pressure
switch)
air forces water out of water cell (Fig.2D).
5. Water cell completely empty – new cycle ready to
begin (Fig. 2A).
Connect system pipe to tank ange. Use plasc, cop-
per or steel pipe as required. To prevent leaks, use
PTFE® pipe thread sealant tape on male threads of all
threaded connecons to tank.
NOTICE: To be sure that joint is not crossthreaded
and that threads are clean, always make connecons
by hand (without sealer) rst. Aer making sure
that threads are clean, remove pipe, add PTFE pipe
thread sealant tape, and remake connecon. Tighten
by hand rst; nish with pipe wrench for ght seal.
NOTICE: When replacing a standard tank in a sub-
mersible pump system, raise pump and discharge
pipe far enough to remove bleeder orices in dis-
charge pipe and plug tees. When replacing a stan-
dard tank in a jet pump system, remove Air Volume
Control (AVC) and plug AVC port in pump.
In areas where the temperature is high for long pe-
riods of me, the tank pre-charge pressure may in-
crease. This may reduce the tank drawdown (amount
of water available per cycle). If this occurs, reduce
the pre-charge pressure to two PSI below the pump
cut-in seng of the pressure switch.
It is necessary to ush all air out of the piping system
and water reservoir poron of the precharged tank.
This is required on new installaons, pumps requir-
ing repriming and pumps that have been disassem-
bled for service. Do this as follows:
1. Open faucets furthest from tank and allow pump
to operate.
 Loading...