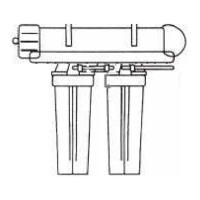
Filter change instruction
1- Shut off the water supply
2- Release the pressure from the water outlet by manually opening the float
valve or any other valve used for water shut off.
3- Use filter housing wrench to open the Canisters.
4- Replace the filters.
5- Make sure the O-Ring is in place, and turn the housing counter-clockwise
to close.
6- Make sure there are no leaks then turn the water supply on.
7- After changing the RO Membrane, dispose of the product water for half
hour.
Filters and Membrane storage
*Sediment & Carbon Block Filters do not have a shelf life.
*Reverse Osmosis Membranes could be stored in the refrigerator for up to one
year in it’s sealed original packaging. If the membrane dries out, it will not
produce water.
*DI Cartridges can be kept in a cool & dry place for at least one year in it’s
sealed original packaging.
Trouble shouting Guide
PROBLEM CAUSE SOLUTION
Milky colored
water
Air in system Air in the system is a normal occurrence with
initial startup of the Unit. This will disappear
after some times.
Slow production Low water pressure
Crimps in tubing
Clogged pre-filters
Fouled membrane
This system requires min 40 psi incoming
water pressure.
Replace pre-filters
Replace membrane
Check tubing for crimps or blockage
Offensive smell Fouled membrane
Dirty Tank/ Reservoir
Replace membrane
Drain and storage tank
No waste water Clogged flow restrictor Replace flow restrictor
Leaks Fitting not tightened
Missing o-ring
Misalignment of hole in
drain saddle
Tighten fittings as necessary.
Reinstall the O-ring
Realign drain saddle.
 Loading...