EasyManua.ls Logo

VESA MIS-D User Manual

VESA MIS-D
2 pages
To Next Page IconTo Next Page
Page #1 background imageLoading...
Page #1 background image
VESA Mount (MIS-D 75mm / 100 mm C - according VESA FDMI™)
The Cynap Pure is designed to be mounted onto a standard VESA™ mount .
To mount the Cynap Pure onto a VESA mount (or back of the monitor), the interface plate needs to be fixed securely onto the mount in
the right orientation (note the arrow).
Alternatively, the interface plate can also be used to mount Cynap Pure onto a wall or similar. Select suitable screws and anchors,
when needed, to mount the plate securely.
Place Cynap Pure onto the interface plate until the fixing screw snaps into the slot and establish your cable connections.
To remove Cynap Pure from the mount, disconnect all cables and simply lift the device and pull it off.
(75mm / 100mm)
VESA™ Mount or back of a Monitor
Printed in Austria - March 2019 www.wolfvision.com
Wall or Furniture Mount
Use the holes to suit
your mount or monitor.
75mm / 100mm
FRONT
Attach the 2 black screws with the shaft to the bottom chassis
cover of Cynap Pure.
Attach Cynap Pure to the correctly mounted VESA bracket.
To remove Cynap Pure, lift it up and pull it.
Attach the VESA bracket to the VESA mount or back of the
monitor by using the 4 mounting screws.
Attach the VESA bracked to the wall or furniture by using 4
screws and anchors, depending on wall surface.
Please note:
Consider heat output of 65 Watt!
Keep side area clear for fresh air ventilation.
Keep area at the back of Cynap Pure clear for cable connections.
Metal cabinets will decrease the possible range of wireless devices!
To select the screws, note the max. useable depth of thread.
Select the anchors and screws depending on wall surface.
included
description
qty.
yes
VESA Mount Plate
1
yes
Snap-in screw (with shaft)
2
yes
Mounting screw M4
4
no
Screw, when needed
4
no
Anchor, when needed
4
Question and Answer IconNeed help?

Do you have a question about the VESA MIS-D and is the answer not in the manual?

VESA MIS-D Specifications

General IconGeneral
BrandVESA
ModelMIS-D
CategoryRacks & Stands
LanguageEnglish

Summary

VESA Mount Installation Overview

Mounting Instructions and Notes

Details on mounting the Cynap Pure onto VESA mounts or walls, including important notes on heat, ventilation, and cable management.

Included Components

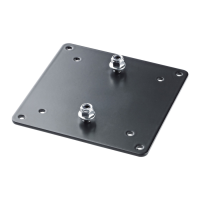
List of components included with the VESA mount, such as the VESA plate, snap-in screws, and mounting screws.

VESA Mount or Monitor Mounting

Attaching Bracket to VESA Mount

Instructions on how to attach the VESA bracket to a VESA mount or the back of a monitor using mounting screws.

Selecting Mounting Holes

Guidance on using the appropriate holes on the VESA bracket to suit your mount or monitor's VESA pattern (75mm/100mm).

Wall or Furniture Mounting

Attaching Bracket to Wall/Furniture

Steps for attaching the VESA bracket to a wall or furniture, using screws and anchors as needed for the surface.

Final Cynap Pure Attachment

Securing Cynap Pure Base

Instructions for attaching the Cynap Pure's bottom chassis cover using two black screws with shafts.

Mounting Cynap Pure to Bracket

Procedure for attaching the Cynap Pure unit to the mounted VESA bracket and how to remove it.