EasyManua.ls Logo

VEVOR E490T - User Manual

VEVOR E490T
160 pages
Go to English
Print Icon
To Next Page IconTo Next Page
Loading...
Wsparcie techniczne i certyfikat e-gwarancji https://www.vevor.com/support
NR MODELU: E490T
OBEJRZYJ WINDERA
INSTRUKCJA OBSŁUGI
„Zaoszczędź o połowę”, „o połowę ceny” lub inne podobne wyrażenia używane przez nas przedstawiają jedynie
szacunkową oszczędność, jaką możesz zyskać kupując u nas określone narzędzia w porównaniu z głównymi najlepszymi
markami, a dawki niekoniecznie obejmują wszystkie kategorie oferowanych narzędzi przez nas. Przypominamy, aby
podczas składania zamówienia u nas dokładnie sprawdzić, czy faktycznie oszczędzasz połowę w porównaniu z
czołowymi markami.
Nadal dokładamy wszelkich starań, aby zapewnić Państwu narzędzia w konkurencyjnej cenie.
Machine Translated by Google
Question and Answer IconNeed help?

Do you have a question about the VEVOR E490T and is the answer not in the manual?

Overview

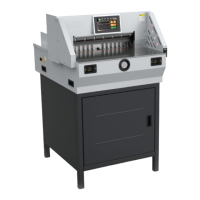
This document describes the VEVOR Electric Paper Cutter, Model E490T, a numerical-controlled machine designed for precision paper cutting.

Function Description

The VEVOR Electric Paper Cutter is designed to accurately cut printed paper, books, or soft leathers. It operates with a touch screen interface for setting cutting parameters and offers multiple modes for paper pushing and cutting. The machine features an automatic paper pusher that adjusts to the set size, ensuring precise and consistent cuts. Safety mechanisms, such as two-hand operation buttons and an infrared safety covering, are integrated to prevent accidents.

Important Technical Specifications

  • Model: E490T
  • Rating(s): AC120V, 60Hz, 1200W / AC220-240V, 50Hz, 1200W
  • Max cutting length: 490mm
  • Min cutting length: 30mm
  • Cutting thickness: 80mm
  • Product Dimensions (LxWxH): 9207701240mm
  • Packing Size (LxWxH): 8101050910mm
  • Net Weight (kg): 130
  • Gross Weight (kg): 183.5

The machine is equipped with a stepper motor for precise control of the back gauge and a robust cutting blade. It also includes an LCD screen for displaying operational information and settings.

Usage Features

  1. Basic Operation and Power-On:

    • To power on, turn on the power supply, air switch, and emergency stop knob switch.
    • The paper pusher will reset to its working state.
    • Proper operation involves standing in front of the machine, facing the paper cutter, and using both hands to control the left and right buttons for cutting.
    • Before starting, ensure no other items are on the machine and clean it.
    • The NC/LCD screen will display, the position indicator line will be on, and the paper pusher will automatically calibrate, indicating normal power supply.
  2. Manual Mode:

    • Press the "Manual" button on the touch screen to enter manual mode.
    • Size can be entered in two ways:
      • Using the electric handle wheel for fine-tuning (discouraged for speed).
      • Inputting a specific size (e.g., "360" for blown size or "2850" for 285.0mm).
    • Place books or paper correctly for cutting, ensuring they lean to the left.
    • Start cutting by pressing two "CUT" buttons simultaneously. The clamper will come down. If any error occurs, stop pressing, and the clamper and blade will return to the top. Confirm paper position and press "CUT" buttons again to finish.
  3. Segmentation Mode:

    • Click to switch to bisection mode, then click "OK." The paper pusher automatically moves to the first size.
    • To edit dimensions, click on the programming mode to access the first set of programming modes.
    • Modify data by clicking "Edit," then "divide Edit," switching the dialog box, and confirming the return.
    • The cutting process is similar to manual mode, but the paper pusher automatically pushes the book out after cutting.
  4. Auto Mode:

    • Click "Auto" to enter auto mode, which displays a list of pre-set dates/sizes.
    • Click to turn pages or change groups. To modify dates, edit them in the auto edit interface.
    • Click "Program Control" to switch to program control mode, where a data list is visible. Click "Edit" to input cutting data.
    • After inputting, click "Edit" to save data and then "change module" to switch data for different modules.
    • The paper pusher will move to the corresponding size, push in, cut the paper/book, and place it on the left, close to the ruler.
    • Confirm the size, then step on the foot switch, and the paper presser will press the paper. Press the cutting button with both hands to start cutting.
    • If an error is found, release the button; the knife and presser will return to their original position automatically.
  5. Size Correction Adjustment:

    • If the size is incorrect, turn off the machine, then press the "reset" key after starting up.
    • If problems persist, cut off power, remove the machine cover, and check for foreign bodies on the transmission screw.
    • Check the stepper motor, front cover, and pulley synchronization. Adjust the limit plate on the nut until the display size matches the ruler, then lock the fixing screw.
  6. Cutter Adjustment:

    • Adjust the cutter depth fine-tuning device (depth range of approximately 5mm) or change the cutting surface of the blade. Deepen clockwise and counterclockwise.
    • If fine-tuning doesn't cut paper, adjust the cutter depth balance screw. Remove fixing screws on the upper cover to access.
    • Loosen locking screws of the 7 M6 blades on the knife holder. Adjust blade depth at the upper end of the tool holder to adjust balance screws. Aim for a 0.5mm cut into the knife pad.
    • Tighten the locking screw on the tool holder, cover, and fix. Test with paper; re-adjust if cutting is not continuous.
  7. Blade Replacement:

    • Strictly follow blade-changing instructions. Do not re-equip the machine's construction or circuit.
    • Open the upper cover, loosen and remove locking screws. Screw two cutter screws into opening holes clockwise and secure the locking.
    • Remove other locking screws, turn the two cutter screws half a turn counterclockwise, and remove the blade downwards.
    • Wear gloves or wrap the blade in cloth and place it in the knife box to avoid scratches.
    • When installing a new blade, pay attention to safety (blade facing outward). Loosen the blade at the upper end of the knife holder, tighten and fix it with screws, then adjust according to the cutter depth adjustment method.
    • After packing the blade, take it to a professional knife sharpening unit to ensure grinding quality. A blunt knife cuts incorrectly and can damage the machine. Always have a spare blade. Handle blade replacement carefully to avoid injury.
    • The blade has 4 sides, each usable twice, for a total of 8 uses. If the blade is too deep, adjust or replace it. Semicircular concave holes on both sides allow insertion and prying out with a screwdriver.
    • Note: Blade replacement requires adjustments. If the blade protrudes too deeply, it can damage the blade holder and accelerate wear.

Maintenance Features

  1. Lubrication:

    • Open the cover monthly to check cleanliness, fasten parts, and lubricate transmission parts.
    • Be careful to avoid dripping lubricating oil onto electrical circuits or electronic components to prevent failures.
  2. General Maintenance:

    • Do not place non-cutting objects on the machine during operation to prevent hard objects from damaging the knife and cutter.
    • For bound books, avoid staples in the cutting area to prevent damage to the cutter.
    • After each day's work, wipe the machine clean, remove debris, and cut off the power supply.

VEVOR E490T Specifications

General IconGeneral
BrandVEVOR
ModelE490T
CategoryWatch
LanguageEnglish