This document describes the VEVOR Hydroponic Grow Kit, model S12C, a device designed for indoor plant cultivation without soil. It emphasizes the brand's commitment to providing competitive pricing for "tough tools."
Function Description
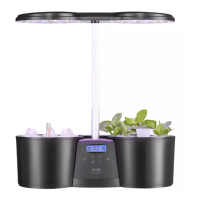
The VEVOR Hydroponic Grow Kit is an automated system for growing plants hydroponically. It provides a controlled environment with integrated lighting, water circulation, and nutrient delivery. The system is designed to simplify the process of indoor gardening, making it suitable for growing various plants from seeds. Key functions include:
- Automated Lighting Cycle: The system features an adjustable LED grow light that operates on predefined cycles (e.g., 12 hours on/12 hours off, 8 hours on/16 hours off, or 14 hours on/10 hours off) to simulate natural daylight and promote plant growth.
- Water and Nutrient Delivery: It includes a water tank and a pump system to circulate water and dissolved nutrients to the plant roots. Users are instructed to add water and A&B nutrient solutions to the tank.
- Environmental Monitoring: The device incorporates sensors to display humidity and temperature, allowing users to monitor the growing conditions.
- Planting Capacity: The kit is designed to accommodate 12 plants simultaneously, utilizing planting baskets and sponges.
- Adjustable Grow Time and Fertilization: Users can adjust planting time, growing days, and fertilization days through the control panel.
Important Technical Specifications
- Model: S12C
- Product Size: 435 × 190 × 500 mm
- Color: Black
- Input Voltage: 24Vd.c.
- Input Amperage: 1.5A
- Tank Capacity: 4.2L
- Number of Planted Plants: 12
Usage Features
The VEVOR Hydroponic Grow Kit is designed for ease of use, with several features to facilitate the planting and growing process:
- Unboxing and Setup: The unboxing guide instructs users to remove the machine from its packaging, pull up the extendable pole of the lamp surface, and then remove the water tank lid to access accessories like the adapter, planting baskets, and planting sponges.
- Water and Nutrient Addition: Users add water through a dedicated injection port, ensuring the water level indicator does not exceed the maximum line. A&B nutrient solutions are mixed and added according to instructions.
- Planting Process:
- Planting sponges are soaked in water for 5 minutes.
- Seeds are placed into the soaked sponges, with a recommendation to soak seeds in warm water for about 1 hour prior to sowing for better germination.
- The sponges with seeds are then placed into planting baskets, which are inserted into the water tank lid.
- Control Panel: The device features a control panel with several buttons and indicators:
- Fertilization Indicator: Shows the remaining days until the next fertilization.
- Time Display: Adjustable to set desired planting time.
- Humidity and Temperature Display: Intelligent sensor displays for environmental conditions.
- Plant Times: Allows changing the growing days.
- Power Button (6): Activates the 12-hour on/12-hour off automatic light cycle.
- Light Cycle Buttons (7, 8):
- " " (7): Sets the light to 8 hours on/16 hours off.
- " " (8): Sets the light to 14 hours on/10 hours off.
- Adjust Buttons ("+" (9) and "-" (10)): Used to adjust planting time, growing days, and fertilization days.
- Menu Button (11): Tapping switches between planting time, growing days, or fertilization days. Long pressing for five seconds resets growing days and fertilization days, while the time setting remains unchanged.
- Light Activation: The grow light turns on automatically upon inserting the adapter and pressing the power button. It is advised to turn on the light only after seeds have germinated.
Maintenance Features
The manual provides essential guidelines for the care and longevity of the device:
- Safety Precautions: Users are warned to read the manual carefully, turn off power before installation, and avoid using the product in places with strong acid mist. It also emphasizes checking voltage consistency and installing the device on a flat, stable surface away from fire hazards.
- Water Management: It is crucial to ensure hands are dry before plugging in the adapter after adding water. Any water splashes or spills onto electrical components must be thoroughly dried to prevent damage.
- Cord Replacement: If the supply cord is damaged, it must be replaced by the manufacturer, its service agent, or similarly qualified persons to avoid hazards.
- Child Safety: The appliance can be used by children aged 8 and above and persons with reduced capabilities if supervised and instructed on safe use. Children should not play with the appliance or perform cleaning/maintenance without supervision.
- Light Safety: The luminaire should be positioned to prevent prolonged gazing at the light.
- Professional Repair: Non-professional technicians are advised not to repair or modify the product without authorization, and to contact a qualified electrician for installation.