The WRECOIND60 is a plug & play induction hob designed for domestic use, offering efficient and economical cooking technology. It features four cooking zones and can be connected directly to a mains power outlet using a 3-pin (UK) plug, with a default maximum input power of 2800W. For permanent installations, it can be converted to a 6400W output, requiring professional electrical installation and cable replacement.
Technical Specifications:
- Model identification: WRECOIND60
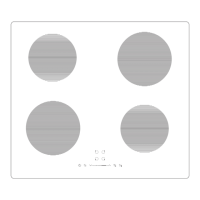
- Cooking zones: 4 Zones
- Supply voltage: 220-240V
- Installed electric power: 6400W (Preset 2800W)
- Product size L x W x H: 590 x 520 x 60 mm
- Built-in dimensions A x B: 565 x 495 mm
- Heating Zone Max. Power (220-240V~50/60Hz):
- Top-left zone: 1500/2000W (Booster)
- Bottom-left zone: 1200/1500W (Booster)
- Top-right zone: 1500/2000W (Booster)
- Bottom-right zone: 1200/1500W (Booster)
- Limit Rating Power: 2800W (with plug)
Installation:
The hob requires a work surface cutout of 565mm (A) x 495mm (B) with a minimum thickness of 18mm. A minimum of 50mm space (X) must be preserved around the hole. The work surface material and adhesive must be heat-resistant. Adequate ventilation is crucial, with air intake (D) and air exit (E) requirements of 20mm and 5mm respectively. For 13amp connections, minimum clearances for A, B, and C are 500mm, 10mm, and 20mm. For 32amp connections, A, B, and C remain the same. If no cooker hood is installed, a safety distance of at least 500mm between the hotplate and the cupboard above is required. If a cooker hood is installed, refer to its manual for specific safety distances. The hob should be placed on a stable, smooth surface during installation, and force should not be applied to the controls. The work surface must be square, level, and made of heat-resistant material. If installed above an oven, the oven must have a built-in cooling fan. The power supply cable must not be accessible through cupboard doors or drawers. A suitable isolating switch providing full disconnection from the mains power supply, with a 3mm air gap contact separation in all poles, must be incorporated into the permanent wiring and easily accessible. The cut edge of the worktop should be sealed with silicone or PTFE before fitting the hob. A supplied seal (02) should be stretched and stuck along the underside edge of the hob, ensuring the ends overlap. The hob is then positioned into the cut-out and gently pressed downwards to ensure a good seal. Adhesives should not be used to fix the hob into the worktop.
Software Configuration (for permanent wiring conversion):
- Turn on the hob (ON/OFF key); '-' will show on each cooking zone.
- Touch the front left zone key and Timer key together for 3 seconds; hob will beep and show '5' in the timer display.
- Touch the Timer key once; display changes to '5E'.
- Touch the front left zone key and Timer key again; two front zones show '2' and '8' (factory setting for 2800W).
- Touch the front left zone key to switch display to '6' and '4' (high power at 6400W).
- Touch the Timer key again to finish configuration.
The hob can be converted back to a plugged version by repeating these steps.
Usage Features:
The hob uses touch controls, responding to the ball of the finger. Controls must be clean and dry.
- User Interface:
- Zone Select Key
- On/Off Key
- Child Lock/Connectivity Key
- Power/Timer Slider Regulating Key
- Boost Control/Keep Warm Key
- Timer/Pause Key
- Induction Cooking: Works by electromagnetic vibrations heating the pan directly.
- Cookware: Only use cookware with a magnetic base suitable for induction. A magnet test can verify suitability. Cookware made of pure stainless steel, aluminium, copper without a magnetic base, glass, wood, porcelain, ceramic, and earthenware are not suitable. Pans should have a smooth, flat base, be the same size as the cooking zone, and be centered. Pans smaller than 140mm may not be detected. Always lift pans, do not slide them to avoid scratching the glass.
- Starting Cooking:
- Touch ON/OFF key for 3 seconds; all displays show '-' (standby mode).
- Place a suitable pan on the desired cooking zone.
- Select the relevant Zone Select Key.
- Adjust heat setting using the Slider Regulating Key.
- If no heat setting is chosen within 1 minute, the hob automatically switches off.
- If the display flashes '- U -' alternately with the heat setting, it indicates no pan, unsuitable pan, or improperly centered pan. Heating will not occur until a suitable pan is placed.
- Finishing Cooking:
- Touch the relevant Zone Select Key to switch off.
- Alter power output level to zero.
- 'H' indicates hot surfaces, disappearing when cooled. Can be used to heat further pans.
- Boost Control/Keep Warm Functions:
- Activate Boost Control: Select zone, touch Boost Control/Keep Warm Key; zone indicator shows 'P' (Max power).
- Cancel Boost Control: Select zone, touch Slider Regulating Key to choose new power level. Boost returns to level 9 after 5 minutes.
- Activate Keep Warm: Select zone, indicator next to key flashes. Touch and hold Boost Control/Keep Warm Key for 3 seconds; zone indicator displays 'U'.
- Cancel Keep Warm: Select zone, touch and hold Boost Control/Keep Warm Key for 3 seconds; zone becomes OFF.
- Child Lock Function:
- To lock: Touch Key Lock Control for 3 seconds; Timer indicator shows 'Lo'. All controls except OFF are disabled.
- To unlock: Turn on hob, touch and hold Key Lock Control for a while.
- Pause Function:
- To pause: When hob is on, press and hold Pause Key for 3 seconds; all burners stop, all LED indicators show '='.
- To restart: Press and hold Pause Key for 3 seconds again; all functions restart at previous setting.
- Timer/Pause Functions:
- Minute Minder (without selecting cooking zone):
- Ensure at least one cooking zone is on.
- Touch Timer Key; minder indicator flashes, '10' shows.
- Set time (1-99 minutes) using ✓ or ∧ controls (1 minute per touch, 10 minutes per hold). Touch ✓ until '00' to cancel.
- Timer counts down. Buzzer beeps for 30 seconds when expired.
- Timer to turn off cooking zone(s):
- Select relevant working cooking zone.
- Press Timer Key; minder indicator flashes, '10' shows.
- Set time (1-99 minutes) using ✓ or ∧ controls. Touch ✓ until '00' to cancel.
- Timer counts down. Red dot next to power level indicates selected zone.
- Cooking zone switches off automatically when timer expires.
- Other zones continue operating.
- If both alarm and switch-off timers are set, alarm time shows first. Press cooking zone to view switch-off timer.
- Over-Temperature Protection: Internal sensor monitors temperature; hob stops operation if excessive temperature is detected.
- Detection of Small Articles: If an unsuitable pan or small metallic object is left on the hob, it goes into standby in 1 minute. Fan cools for another minute.
- Auto Shutdown Protection: Safety function that shuts down the hob if cooking is forgotten. Default working times vary by power level:
- 1-3: 360 min
- 4-6: 180 min
- 7-8: 120 min
- 9: 90 min
- If a pan is removed, heating stops immediately, and the hob switches off after 2 minutes.
Maintenance Features:
- Always switch off electricity supply before maintenance.
- Clean the appliance after use, allowing it to cool first.
- Limescale: Apply white vinegar, wipe dry with soft cloth.
- Burnt-on stains: Clean with damp cloth, dry with soft cloth.
- Light stains: Clean with damp cloth, dry with soft cloth.
- Melted plastics: Use a scraper suitable for induction glass to remove residue.
- Cleaning materials: Special induction hob cleaner and cleaning sponge are recommended.
- Caution: Avoid rubbing with abrasives or pan bases to prevent wear on markings. Clean regularly to prevent food residue buildup.
- Never use: Undiluted washing-up liquid, dishwasher detergent, scouring agents, harsh cleaning agents (oven spray, stain remover), abrasive sponges, high-pressure cleaners, or steam jet cleaners.
Connectivity:
The hob supports RF technology for connection with other appliances (e.g., Viceroy Hood). Refer to the Viceroy Hood Manual for connection instructions. The connectivity operation must be completed within two minutes of turning on power to the cooker hood. If unsuccessful, switch off both hood and hob, wait one minute, and retry.
Troubleshooting:
The hob displays protective codes for abnormalities:
- U: No pan or unsuitable pan. Solution: Replace pan.
- ER03: Pan over controls or water on glass. Solution: Clean control panel or move pan.
- F1 E: Display board/left mainboard connection failure. Solution: Check/replace connection cable or mainboard.
- F3 E: Coil temperature sensor failure. Solution: Replace coil sensor.
- F4 E: Mainboard temperature sensor failure. Solution: Replace mainboard.
- E1 E: Ceramic glass plate temperature sensor high. Solution: Restart after hob cools.
- E2 E: IGBT temperature sensor high. Solution: Restart after hob cools.
- E3 E: Abnormal supply voltage (too high). Solution: Inspect power supply, power on after normal.
- E4 E: Abnormal supply voltage (too low). Solution: Inspect power supply, power on after normal.
- E5 E: Temperature sensor failure (cooking zone). Solution: Check connection cable or assembly.
Do not disassemble the unit; contact service department for assistance.