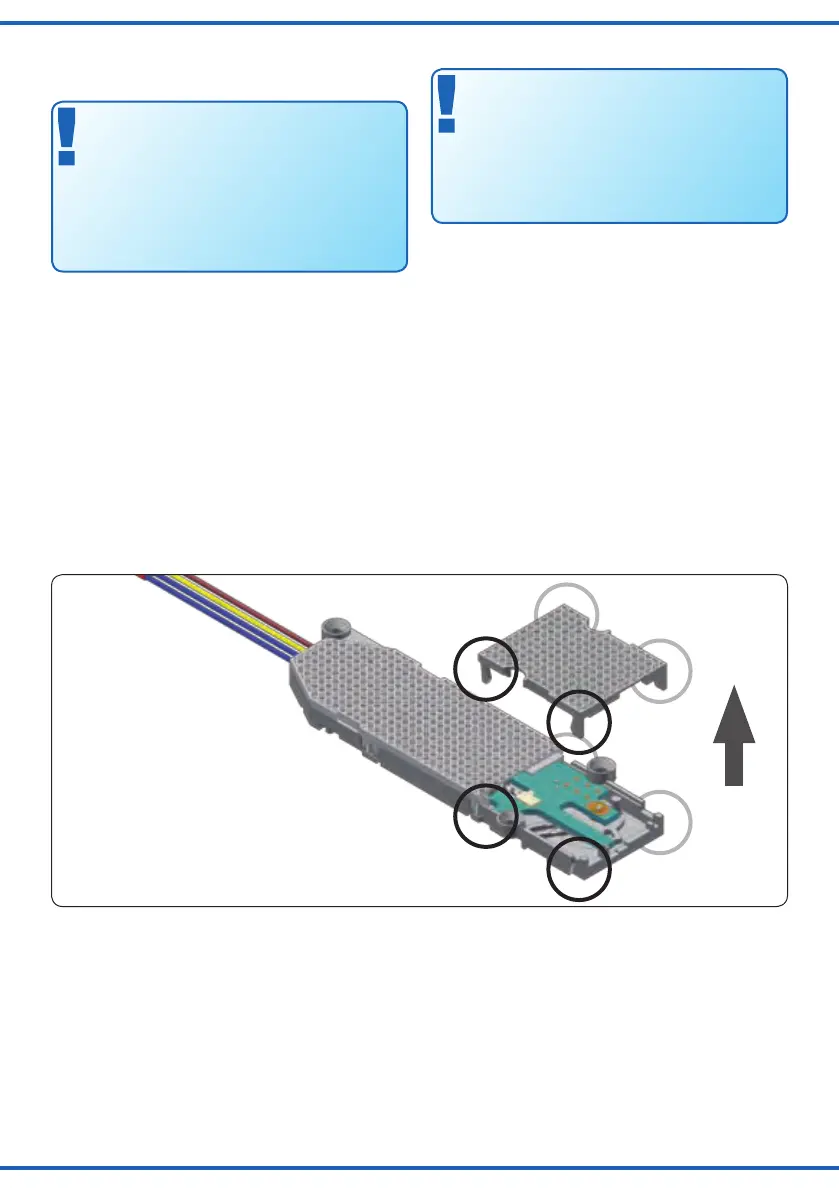
Fig. 2
Abb. 2
wie Streumaterial etc. ins Innere gelangen und den An-
trieb zerstören.
Beachten Sie daher unbedingt die folgenden Hinweise:
Achten Sie bei der Montage auf der Grundplatte
darauf,dassdieOberächeebenundsauberist.
Unter dem Weichenantrieb darf kein Streumaterial
(Steine, Schotter etc.) verwendet werden. Anson-
sten können Getriebegehäuse und Mechanik ver-
formt und zerstört werden.
Achten Sie unbedingt darauf, dass kein Streu-
material durch die Öffnungen des Gehäuses ins
Innere gelangen kann.
Weichenantrieb vorbereiten
Um den Weichenantrieb ordnungsgemäß an einer Wei-
che zu montieren, sind einige vorbereitende Arbeiten er-
forderlich. Sorgen Sie bitte als erstes für eine aufgeräum-
teundsaubereArbeitsäche.LegenSiesichaußerdem
folgendes Werkzeug bereit: eine feine Pinzette (möglichst
aus Kunststoff) sowie einen kleinen Schraubendreher
(Schlitz) zum vorsichtigen Abhebeln des Deckels.
1. Legen Sie den für Ihre Weiche passenden Hebel
bereit (aus dem Zubehörbeutel, s. a. Abb. 1).
2. Öffnen Sie vorsichtig den vorderen Deckel des
Weichenantriebs (Abb. 2) und legen Sie ihn beiseite.
Damit sind die Vorbereitungen abgeschlossen. Folgen
Sie nun den speziellen Hinweisen zu Ihrem Weichentyp
weiter unten.
1. Halterungen abspreizen
2. Deckel abheben
3. gewünschten Hebel einsetzen
4. Deckel wieder aufsetzen und einrasten
Märklin C-Gleis (einfache Weiche)
Hebel: 3
Montage: in Bettung
1. Montieren Sie Hebel 3 gemäß Abbildung 3.1 im Wei-
chenantrieb und verschließen Sie anschließend das
Gehäuse wieder mit dem Deckel.
2. Bringen Sie die Weiche in die zum Antrieb passende
Stellung (Der Hebel des Weichenantriebs muss in den
Hebel der Weiche greifen).
3. Legen Sie den Weichenantrieb gemäß Abbildung 3.2
indieBettungderWeicheundxierenSieihnmitden
passenden Schrauben 2 x Nr. 13.
Therefore pay attention to the following notices:
When mounting the switch motor, the ground plate
has to be even and clean.
Below the switch motor there must not be any ma-
terial like ballast etc. Otherwise the casing could
be deformed and the mechanical parts could be
destroyed.
Prevent small materials like e.g. ballast from get-
ting into the casing.
Preparing the switch motor
To mount the switch motor at a turnout, some prepara-
tions are necessary. At rst you need a clean workplace.
For the following work you need these tools: A small
tweezer (if possible, use some made of plastic) and a
small screwdriver to open the casing.
1. Choose the lever, which ts for your turnout / track
system (see gure 1).
2. Carefully open the front cover of the casing of the
switch (see gure 2)
Follow now the specic instructions for your turnout /
track system. You’ll nd these instructions below.
Märklin C-track (single turnout)
Lever: 3
Mounting: Into bed of ballast
1. Mount lever 3 as shown in gure 3.1 into the switch
motor. After mounting the lever, close the casing with
the cover.
2. Bring the turnout into the corresponding position of the
switch motor (the lever of the switch motor has to get
connected with the lever of the turnout).
3. Put the switch motor into the intended empty space of
the turnout as shown in gure 3.2.
Fix the switch motor with the screws 2 x nr. 13.
1. Spread off xtures
2. Take off front cover carefully
3. Put in the corresponding lever
4. Put the cover back on casing
 Loading...