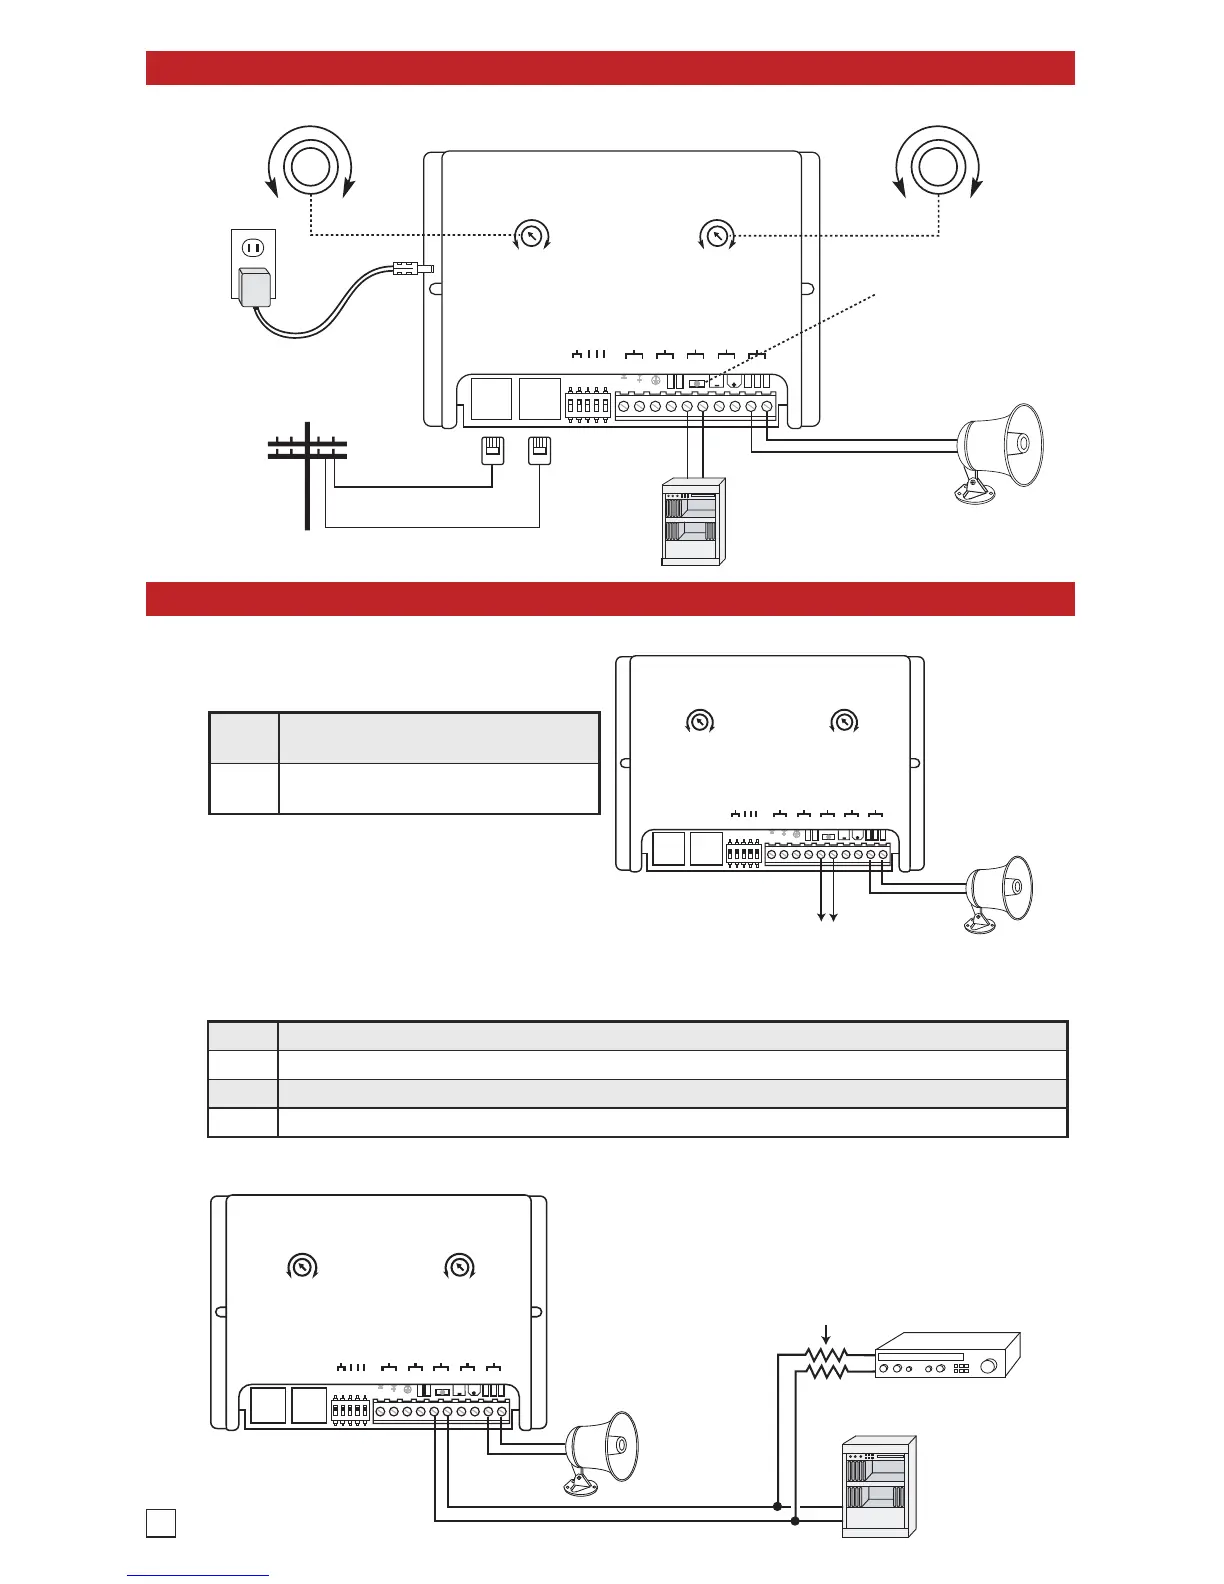
EasyManua.ls Logo

Viking PA-2A - Installation Guide; Amplified Loud Paging Setup; Trunk;Line Port Configuration

Viking PA-2A
8 pages
Print Icon
To Next Page IconTo Next Page
To Previous Page IconTo Previous Page
Loading...
To Paging Port
25AE Paging Horn
(included)
PWR
VIKING©
VIKING
ELECTRONICS
HUDSON,
WI
54016
PAGING - LOUD RINGING
AMPLIFIER SYSTEM
POWER 13.8V AC
MODEL PA-2A
PAGING
VOLUME
RINGING
VOLUME
MIN
MAX
MIN
MAX
12345678910
NIGHT
TRANSFER
PAGING
HORN
600 OHM
AUDIO OUT
TRUNK OR
PAGING PORT
LOUD RING
TRIGGER INPUT
1 - 3
4 - 6
RINGING LINES
WARBLE / CHIME
1 2 3 4 5
AUDIO LOADING
TALK BATTERY
ALERT TONE
Features Overview
Installation
C.O. Line or Analog
PABX/KSU Station
Paging Port or
Unused Telephone Line
Input (Trunk Port)
25AE Paging Horn
(included)
Lines 1, 2 and 3
Lines 4, 5 and 6
Paging Volume
MAX
MIN
Ringing Volume
MAX
MIN
PWR
Power LED
VIKING©
VIKING
ELECTRONICS
HUDSON,
WI
54016
PAGING - LOUD RINGING
AMPLIFIER SYSTEM
POWER 13.8V AC
MODEL PA-2A
PAGING
VOLUME
RINGING
VOLUME
MIN
MAX
MIN
MAX
12345678910
NIGHT
TRANSFER
PAGING
HORN
600 OHM
AUDIO OUT
TRUNK OR
PAGING PORT
LOUD RING
TRIGGER INPUT
1 - 3
4 - 6
RINGING LINES
WARBLE / CHIME
1 2 3 4 5
AUDIO LOADING
TALK BATTERY
ALERT TONE
13.8V AC
Adapter
(included)
120V AC
2
A. Amplified Loud Paging
Note: For information on speakers to use,
ambient noise levels, and speaker wiring, see
DOD 498 and 895.
Step 1
Move the TALK BATTERY DIP switch
to the OFF position (DIP switch 4).
Step 2
Connect pins 5 and 6 to the paging
port output.
1. Paging Port
25AE
Paging
Horn
(included)
Unused Telephone
Line Input
(Trunk Port)
Background
Music Source
(2) 10K
Resistors
(included)
PWR
VIKING©
VIKING
ELECTRONICS
HUDSON,
WI
54016
PAGING - LOUD RINGING
AMPLIFIER SYSTEM
POWER 13.8V AC
MODEL PA-2A
PAGING
VOLUME
RINGING
VOLUME
MIN
MAX
MIN
MAX
12345678910
NIGHT
TRANSFER
PAGING
HORN
600 OHM
AUDIO OUT
TRUNK OR
PAGING PORT
LOUD RING
TRIGGER INPUT
1 - 3
4 - 6
RINGING LINES
WARBLE / CHIME
1 2 3 4 5
AUDIO LOADING
TALK BATTERY
ALERT TONE
Note: For information on speakers to use, ambient noise levels, and speaker wiring, see DOD# 498 and 895.
2. Trunk/Line Port
Step 1 Move the TALK BATTERY DIP switch to the ON position (DIP switch 4).
Step 2 Move the AUDIO LOADING switch to the OFF position (DIP switch 5).
Step 3 Connect pins 5 and 6 to an unused telephone line input (trunk port).
Step 4 Background music may be added as shown, the music level will be greatly reduced during page.

Other manuals for Viking PA-2A

Related product manuals