Evolution (E1)
Assembly Instructions
Wine Master Cellars, LLLP • 10645 E 47th Ave, Denver, CO 80239 • phone: 866.650.1500 • fax: 866.650.1501
Please feel free to contact us regarding the assembly of this product.
2. Attach E1’s to Corners and Middle of the First Panel - Lay
one panel down on its narrow edge on a clean soft surface such
as carpeting, blanket or towel, being careful not to scratch the
panel. Insert an E1-SCREW through the hole in one of the bottom
corners. Align the end of the E1-SCREW with the threads on the
end of an E1 and fully tighten, being careful to not over tighten as
this may damage the panel, the threads in the E1 or both. Repeat
this process for the other 3 corners and the middle row.
Tip: A cordless drill with a 4mm driver tip will save considerable
time during assembly. Be sure to use a low torque setting, typically
around #3, on your drill’s clutch, if so equipped, to prevent
damaging any components from overtightening.
1. Prepare the Panels - Remove the protective paper lm from
both sides of the panels. Acrylic can scratch relatively easily, so do
not use anything sharp such as a razor blade to remove the lm.
Tip: Start peeling the top edge of the lm with a ngernail and
slowly roll the lm over the outside of an empty cardboard tube
from the E1 bottle support rods.
Required tools: 4mm Hex Wrench (included)
Recommend cordless drill with variable torque
clutch (set to low setting, typically #3) with
4mm driver tip
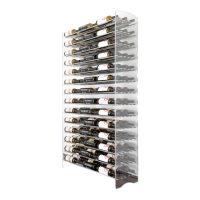
E1
Panel
E1-SCREW
E1-STUD
3. Attach E1’s to Remaining Holes in Panel – Carefully lift the
panel to stand on the unsecured ends of the E1’s, like a table. Align
the top of an E1 with a hole and pivot the rod into place and secure
with an E1-SCREW. Repeat this process for the remaining holes.