EasyManua.ls Logo

Virax Viper M2X - User Manual

Virax Viper M2X
144 pages
Go to English
Print Icon
To Next Page IconTo Next Page
Loading...
FR - Presse à sertir électro-mécanique Viper® M2X/L2X
Manuel d’utilisation
EN : Viper® M2X/L2X Battery-powered mechanical press fitting machine
User guide
IT : Pressatrice elettromeccanica Viper® M2X/L2X
Manuale d’istruzioni
ES : Máquina de prensar electromecánica Viper® M2X/L2X
Manual de instrucciones
PT : Máquina de prensar electro-mecânica Viper® M2X/L2X
Manual de instruções
NL : Elektromechanische persmachine Viper® M2X/L2X
Gebruikershandleiding
PL : Elektro-mechaniczna prasa zaciskowa Viper® M2X/L2X
Instrukcja obsługi
DE : Elektromechanische Bördelpresse Viper® M2X/L2X
Bedienungsanleitung
EL : Ηλεκτρο-μηχανική πρέσσα Viper® M2X/L2X
Οδηγίες χρήσης
CS : Kadeření elektromechanický Viper® M2X/L2X
Návod k použití
RU : Кримпер электромеханических Viper® M2X/L2X
Руководство по эксплуатации
TR : Elektromekanik Viper® M2X/L2X Crimper
Kullanım kılavuzu
SK : Elektromechanická lisovačka Viper® M2X/L2X
Návod na použitie


f. 2535XX

Table of Contents

Question and Answer IconNeed help?

Do you have a question about the Virax Viper M2X and is the answer not in the manual?

Overview

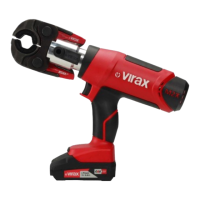
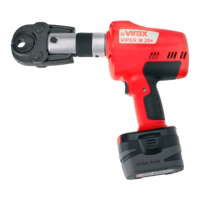
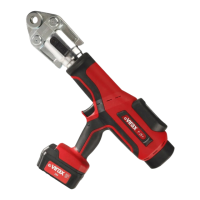
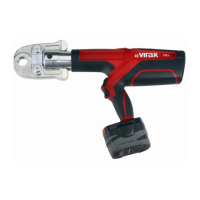
This document describes the VIRAX Viper® M2X/L2X battery-powered mechanical press fitting machine, designed for professional use in sanitary crimping applications. The tool is manufactured with precision and tested individually to ensure correct operation and high reliability.

Function Description:

The Viper® M2X/L2X is an electro-mechanical press fitting machine powered by an 18V Li-ion battery. Its primary function is to crimp couplings onto pipes, ensuring a secure and reliable connection. The tool is designed for ease of use and safety, providing significant efficiency when operated correctly and carefully. It can be used with standard or offset VIRAX main jaws and inserts, or with VIRAX mini-jaws that do not require a main jaw. The jaw rotation is 360°, allowing for versatile positioning during crimping. The machine features an LED ring that illuminates in different colors and emits beeps to indicate various operational states, such as battery charge level, cycle completion status, maintenance alerts, and error conditions.

Important Technical Specifications:

  • Model: VIPER® M2X / L2X
  • Reference: 2535XX
  • Battery power supply: 18V DC 2.0 Ah Li-ion 36 Wh
  • Power input: 400 W
  • Force delivered by the machine to ensure crimping: Max. 20 kN
  • Crimping capacity:
    • PER / PEX tubes: Ø 12 to Ø 32/40 mm
    • Multilayer tubes: Ø 12 to Ø 32/40 mm
    • Steel tubes (stainless or galvanised steel): Ø 12 to Ø 28 mm
    • Copper tubes: Ø 12 to Ø 28 mm
  • Jaw rotation: 360°
  • Weight (without battery; without jaw / with battery; with jaw):
    • M2X: 1.85 kg / 2.25 kg
    • L2X: 1.75 kg / 2.51 kg
  • Machine dimensions with battery; without jaw (length / height / width):
    • M2X: 264 / 259 / 81 mm
    • L2X: 322 / 121 / 81 mm
  • Carry case dimensions (length / height / width):
    • M2X: 590 / 390 / 140 mm
    • L2X: 590 / 390 / 140 mm
  • Sound emission:
    • Acoustic pressure level at operator's ears (LpA): 69 dB(A)
    • Peak acoustic pressure level at operator's ears (LpPeak): <130 dB(C)
    • Acoustic power level (LwA): 73 dB(A)
    • Uncertainty KpA: 3 dB (as per NF EN ISO 15744 – tests on idle work cycles)
  • Vibration emission:
    • Weighted hand-arm acceleration values (m/s²) on the trigger: 0.29 m/s²
    • Estimated uncertainty: 0.05 m/s² (as per NF EN ISO 20643 – tests on idle work cycles)

Usage Features:

The Viper® M2X/L2X is designed for straightforward operation. Before use, users must read the manual to understand its functions, safety warnings, and instructions.

  1. Battery Charging and Installation: The 18V Li-ion battery is charged using the supplied charger or a "Metabo / CAS" type charger. The charger's LED indicates charging status (flashing green for charging, solid green for fully charged). The battery should be inserted into the crimper by aligning its grooves with the handle and pushing until it clicks.
  2. Jaw/Insert Assembly: The machine can operate with standard or offset VIRAX main jaws and inserts, or with VIRAX mini-jaws. To install, disconnect the battery, unlock the locking button, align the jaw/mini-jaw with the locking system axis, and push/turn to secure. Inserts are slid into the clamp jaws.
  3. Pipe and Coupling Preparation: Before crimping, the pipe must be cut perpendicularly to its axis and deburred to remove any burrs or cutting edges. The pipe ends should be recalibrated to their nominal diameter over a length exceeding the coupling's insertion depth. The coupling must be selected to match the pipe's diameter, material, and thickness, and then slid onto the pipe with a twisting movement.
  4. Crimping Process: To start, press and hold the trigger/button for 0.5 seconds. The LED ring will light up (green, orange, or red depending on battery charge), emit two beeps, and then turn white, indicating readiness. Place the inserts or mini-jaw onto the coupling, ensuring correct positioning. Press and hold the trigger/button until the crimping cycle is complete (rollers return to home position). A green LED ring and a long beep confirm a successful crimp. If the trigger is released prematurely, the tool returns to the home position, and the LED ring flashes orange and red, indicating a non-compliant cycle. In emergencies, releasing the trigger stops the cycle.
  5. Disassembly: To remove jaws/inserts, disconnect the battery, manually open the main jaw (if applicable), and slide out the inserts or mini-jaw. The machine automatically switches off after a few minutes of inactivity, or can be forced off by removing the battery. After each crimp, a visual check is essential to ensure the coupling is properly crimped.

Maintenance Features:

Regular maintenance is crucial for the tool's longevity and safe operation.

  • General Inspection: All fastening elements should be checked regularly for tightness. A mandatory inspection is required every 20,000 cycles. Upon reaching this limit, the crimper locks, preventing further operations until it is sent to an authorized After-Sales Service for inspection and potential repair/replacement. The cycle counter is reset during this service.
  • Crimper Maintenance: The crimping rollers should be cleaned and greased regularly to prevent dust and impurities from accumulating.
  • Motor Maintenance: Ensure the machine's ventilation slots are not obstructed. Remove any accumulated dust and impurities.
  • Battery and Charger Maintenance: Do not disassemble the battery or charger. Avoid exposing them to rain, snow, direct sunlight, or flammable liquids/gases. Use the charger within 0°C to 50°C. Ensure ventilation slots are clear. Disconnect the charger when charging is complete. Replace damaged batteries immediately.
  • Inserts and Mini-Jaws Maintenance: Regularly check the condition of inserts, mini-jaws, and main jaws, ensuring proper closing. Clean their profiles without abrasive materials. Lubricate axes and springs regularly, but do not lubricate the inside of the crimping profile. Inserts and mini-jaws are consumables and should be replaced at the first signs of wear to prevent leaks.
  • Connectivity: The crimper can connect to a smartphone or tablet application via Bluetooth. This app allows users to adjust machine settings, track the number of crimps performed, monitor the remaining crimps before the next maintenance, and access other functions. The application and its user manual are available for download from www.virax.com.

Virax Viper M2X Specifications

General IconGeneral
BrandVirax
ModelViper M2X
CategoryPower Tool
LanguageEnglish

Related product manuals