Do you have a question about the vita London Trellis and is the answer not in the manual?
Lay a post down, insert the bottom rail and three vertical spindles, ensuring the longer spindle is in the middle.
Insert the seven horizontal spindles into the assembled structure as shown.
Insert the top arched rail into the post and connect it to the vertical spindles.
Connect the second post to the trellis assembly, completing the main frame.
Secure the trellis using 8 screws at specified locations, ensuring the posts and rails are square.
Push the provided post caps onto the top of the trellis posts.
Insert ground mounting extensions into the bottom of the trellis posts and secure them with screws.
Excavate 15" deep holes, position the trellis, level it, and backfill with soil.
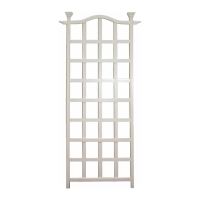
The Vita London Trellis is a decorative and functional garden structure designed to support climbing plants and add an elegant touch to outdoor spaces. This trellis is intended for ground installation, providing a stable and attractive framework for various types of flora. Its design incorporates both aesthetic appeal and practical functionality, making it a versatile addition to gardens, patios, or as a standalone feature.
The primary function of the London Trellis is to provide a vertical support system for climbing plants such. By offering a structured surface for tendrils and stems to grasp, the trellis encourages healthy vertical growth, which can be particularly beneficial for maximizing garden space and enhancing plant exposure to sunlight. The open grid pattern of the trellis allows plants to weave through its structure, creating a lush, living wall effect. Beyond plant support, the trellis also serves as an architectural element, defining garden areas, creating visual interest, and adding a sense of height and dimension to the landscape. It can be used to screen unsightly areas, create a backdrop for flowerbeds, or simply to enhance the overall aesthetic of a garden. The robust construction ensures that it can withstand the weight of mature climbing plants and various weather conditions when properly installed.
The London Trellis is designed for straightforward assembly and installation, making it accessible for most users. The assembly process involves connecting a series of rails and spindles to form the main grid, which is then secured between two posts. Key components include an arched top rail, post caps, left and right posts, vertical spindles, horizontal spindles, and a bottom rail. The design incorporates locking tabs on the horizontal rails that securely fit into routed holes in the posts, ensuring a stable and rigid structure once assembled. This interlocking mechanism simplifies the alignment of components and contributes to the overall strength of the trellis.
For assembly, users will need basic tools such as a cordless drill, hammer, tape measure, level, and shovel. The instructions emphasize the importance of reading through the manual carefully before starting and placing components on a non-abrasive surface to prevent scratching. An unobstructed assembly area of approximately 5'x 8' (1.5m x 2.4m) is recommended to facilitate the process. The design is engineered to avoid the need for excessive force during assembly, indicating a user-friendly construction.
Once the main trellis structure is assembled, screws are used to secure the connections between the posts and rails, ensuring the trellis is square and stable. Post caps are then pushed onto the top of the posts, providing a finished look and protecting the post interiors.
Installation into the ground is a critical step for the trellis's stability, especially in areas prone to high winds. The trellis includes ground mounting extensions, which are inserted into the bottom of the trellis posts and secured with screws. These extensions are designed to be embedded either directly into the ground or into a concrete footing. The installation process involves marking the trellis's final location, excavating two post holes approximately 15 inches (38 cm) deep and 6 inches (15 cm) in diameter. After carefully moving the trellis into position, it is crucial to level it both vertically and horizontally within the excavated holes. Once leveled, the holes are backfilled with excavated soil, firmly anchoring the trellis. For installations on a wall, wood deck, or concrete surface, the manual advises consulting a hardware store for appropriate galvanized bracket hardware, indicating the trellis's adaptability to various mounting scenarios beyond direct ground insertion.
The Vita London Trellis is designed with low maintenance in mind, primarily due to its construction material. While the specific material is not detailed in the provided excerpts, the "Vita" brand often implies durable, weather-resistant materials such as vinyl or PVC, which are known for their minimal upkeep requirements. These materials typically do not require painting, staining, or sealing, unlike traditional wood trellises, which can significantly reduce long-term maintenance efforts.
General maintenance would likely involve periodic cleaning to remove dirt, dust, or any accumulated plant debris. A simple wash with water and a mild detergent would typically suffice to keep the trellis looking new. The smooth surface of such materials also tends to resist mold and mildew growth, further simplifying cleaning.
The instructions highlight the importance of proper initial assembly and installation for the trellis's longevity. Ensuring all screws are securely fastened and that the trellis is level and firmly anchored in the ground or concrete footing will prevent structural issues and minimize the need for future adjustments or repairs. The use of 5/8" (16mm) self-auguring stainless steel screws suggests a resistance to corrosion, which is crucial for outdoor structures exposed to varying weather conditions, thereby contributing to the trellis's durability and reducing the need for screw replacement.
The design, with its robust components and secure locking mechanisms, aims to create a stable structure that can withstand the elements and the weight of climbing plants over time. This inherent stability, combined with the material properties, contributes to a product that requires little more than occasional cleaning to maintain its appearance and functionality. In the event of missing or defective parts, the availability of customer service indicates support for maintaining the product's integrity, ensuring that any issues can be addressed to keep the trellis in optimal condition.
| Category | Indoor Furnishing |
|---|---|
| Product Name | vita London Trellis |
| Material | Powder-coated Steel |
| Color | Black |
| Design | Trellis |