5
• To switch the horizontal rotation operation
mode on press the button (10)
« »
«SWING»
on the control panel (2) or the button (10)
« »
«SWING» on the RC (16).
Note:- press the buttons (10) « » «SWING»
again to switch the rotation mode off and direct
the air flow in the necessary direction.
• To switch the vertical operation mode on press
the button (11)
« »
«SWING» on the control
panel (2) or the button (11)
« »
«SWING» on
the RC (16).
Note:- press the buttons (11) « » «SWING»
again to switch the vertical mode off and direct
the air flow in the necessary direction.
• Press the button (12)
« »
or the buttons
(19) «Timer +/-» on the RC (16) to select the
automatic switch-off timer operation time, the
indicators (14) will be glowing.
• You can set the fan operation time from 1 hour
to 7 hours «1Н-2Н-4Н» (with 1 hour setting
step).
• The set timer operation time is shown with the
indicators (14).
• To switch the timer off repeatedly press the
button (12)
« »
«TIMER» or the buttons (19)
«Timer +/-» on the RC (16) until the indicators
(14) go out.
• To switch the fan off press the on/off button
(9)
« »
«ON/OFF» on the control panel (2) or
the button (9) «ON/OFF» on the RC (16). The
fan will switch off; then unplug it.
MAINTENANCE AND CARE
• Before cleaning the fan switch it off by press-
ing the on/off button (9)
« »
«ON/OFF» on
the control panel (2) or the button (9) «ON/
OFF on the RC (16). The fan will switch off;
then unplug it.
• Do not use abrasive cleaners or solvents to
clean the fan.
• Wipe the fan with a slightly damp cloth and
then wipe it dry.
• If you need to clean the blades, remove the
fastening screw (5), turn the front grid (6)
clockwise and remove it.
• Remove the blades clamp by turning it clock-
wise (left thread) and remove the blades.
• Clean the blades off dirt.
• You may clean the fan grids with a vacuum
cleaner using a proper attachment.
• Put the blades on the motor axis match-
ing the groove on the blades with the clamp
on the motor axis and then fix them with
the clamp rotating it counterclockwise (left
thread) and holding the blades with your free
hand.
• Install the front grid (6) and turn it counter-
clockwise until the marks matching, screw the
fastening screw (5) back to its place.
• Do not immerse the fan into water or any other
liquids. Make sure that no liquids get into the
motor unit (7) of the fan or into the base to
avoid its damage and prevent risk of electric
shock.
STORAGE
• Unplug the fan and clean it.
• Pack the fan into the original package and put
it away for storage in a dry cool place away
from children and disabled persons.
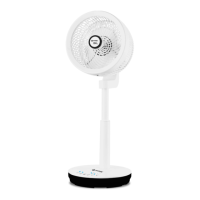
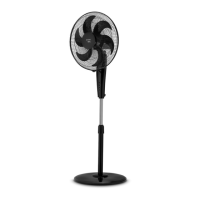
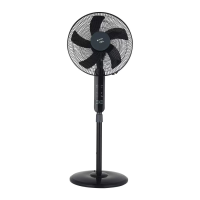
DELIVERY SET
Fan – 1 pc.
Remote control – 1 pc.
Instruction manual – 1 pc.
TECHNICAL SPECIFICATIONS
Power supply: 220-240 V ~ 50 Hz
Rated input power: 55 W
Blades diameter: 20 cm (8”)
Remote control: 3 V, «CR2025» battery (included)
RECYCLING
For environment protection do not throw out
the unit and the batteries (if included), do not
discard the unit and the batteries with usual
household waste after the service life expira-
tion; apply to specialized centers for further
recycling.
The waste generated during the disposal of the
unit is subject to mandatory collection and con-
sequent disposal in the prescribed manner.
For further information about recycling of this
product apply to a local municipal administration,
a disposal service or to the shop where you pur-
chased this product.
IM VT-1946.indd 5 1/9/20 11:15 AM