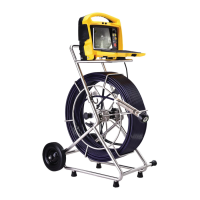
Mounting the Control Module
1.
2.
3.
Do not use the Control Module as a handle
to move the reel. Move the reel only by the
reel's handle.
vCam-6
Quick Guide V1.5
P/N: 4.04.000088
What's in the box:
- SD card
- USB thumb drive
- 12V DC power cord
- AC power cord
Refer to the user manual for detailed instructions, safety
and care information.
- Camera removal tool
- Flat screwdriver
- CD with user handbook & codecs
- Carry pouch
Fuse - Make sure the 10A-250V fuse is installed
in the fuse compartment on the back of the
unit.
Do not use pressure washers to clean the
reel, pushrod, spring assembly or camera
heads. Use low-pressure water to rinse off
the reel components.
NOTE
Video Recording/Playback Controls
1
2
3
4
5
6
7
8
Start / Stop Video Recording
JPEG Snapshot Capture
Pause Video Recording or Playback
Rewind Video Playback
Play Video
Fast Forward Video Playback
Stop Video Recording or Playback
Digital Zoom
1
2
3
4
5
6
7
8
SD Card Slot
VGA Port
HDMI Out Port
USB Port
RJ45 Ethernet Port
(for factory use)
Video In Socket
Video Out Socket
Audio Out Socket
1
2
3
4
5
6
7
8
LED Dimmer Control
Distance Counter Reset*
Internal Microphone
Battery Charging Indicator
Power On/Off
Sonde On/Off
Microphone On/Off
External Microphone
Socket
1
2
3
4
5
6
7
8
*Note that you must verify the actual
position and depth with a Sonde
Locator or Pipe & Cable Locator
before excavating pipe.
Control Module Interface
Media Ports (left side)
Main Controls (front panel)
1
2
3
4
5
6
7
8
1
2
3
4
5
6
7
8
Power/Interconnect Sockets (right side)
AC in Power Socket (bottom left side)
Data Port
Camera Head Test Port
External 12V DC Power
(IN) Socket
Reel Interconnect Cable Socket
1
2
3
4
AC Power (IN) Socket1
1
2
3
4
1
Line up the control module's mounting pins(a) to the open
slots on the reel mounting plate.
Lower the control module into the reel mounting plate(b).
Standing in front of the control module, push the bottom
of the control module backward until the control module
locks in place.