Do you have a question about the Vivitar DVR 908M and is the answer not in the manual?
Lists essential items provided with the camcorder for setup and use.
Highlights SD card requirements and software recommendation for optimal camcorder performance.
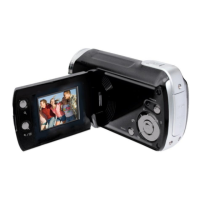
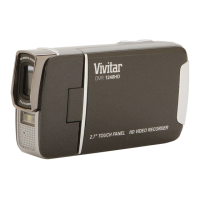
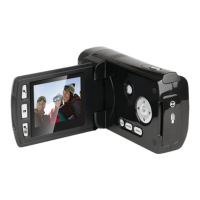
Details and labels physical parts of the camcorder for user reference and operation.
Step-by-step guide for inserting batteries into the camcorder.
Instructions for properly inserting the required SD memory card.
Initial steps to turn on the camera and start using it.
In-depth instructions for inserting AAA batteries and notes on usage.
Detailed steps and confirmation for inserting the SDHC card.
Guide to choosing the preferred language for the camcorder interface.
Steps to set the camcorder's date and time accurately.
Configure default social networks for sharing videos and photos.
Instructions for recording videos, including start, stop, and menu access.
Instructions for taking pictures, including start, stop, and menu access.
How to review, edit, and delete captured photos and videos.
Minimum configuration needed for Windows computers to use the software.
Minimum configuration needed for Mac computers to use the software.
Steps to power on the digital camcorder using the LCD screen and power button.
Instructions to safely power down the digital camcorder.
Explanation of the power-saving feature that automatically turns off the device.
Guide on using the MODE button to switch between Video, Photo, and Playback modes.
Details on using buttons like OK/SET, directional buttons, and MODE to navigate menus.
How ViviLink enables uploading photos/videos to social networks.
Instructions on how to turn the LED flash on and off for lighting.
How to aim the camera, use zoom, and view recording time.
Step-by-step instructions for recording video clips.
Explains functions of LEFT, UP, RIGHT, DOWN buttons in video mode.
Details on Shutter, OK/SET, and MODE buttons in video mode.
How to adjust scene settings for different environments.
How to select image resolution and manage memory usage.
How to choose the desired quality level for captured images.
How to use the anti-shake feature to reduce image corruption.
How to adjust coloring based on light source for accurate images.
How to add various color effects to captured images.
How to set image sharpness for clearer edges.
How to adjust light entering the lens for different lighting conditions.
How to adjust sensor sensitivity for low-light situations.
How metering affects focus and lighting adjustments.
Guide to selecting the camcorder's display language.
How to set or disable date/time stamps on images.
How to disable sound effects emitted by the camcorder during functions.
How to configure the automatic shutdown timer for power saving.
How to set frequency to prevent flickering in fluorescent lighting.
Instructions on how to erase all content from the SD card.
How to select TV output standards (NTSC/PAL).
Guide to restoring camcorder settings to their original factory state.
How to navigate and find video files on the camcorder.
Instructions for starting, pausing, and stopping video playback.
How to use thumbnail view to easily select video or photo files.
Functions of LEFT, UP, RIGHT, DOWN, Shutter, OK/SET, MODE buttons during playback.
Steps to delete one video file from the camcorder.
How to erase all media files from the SD card.
How to prevent accidental deletion or alteration of photos/videos.
How to lock/unlock all media files on the camcorder.
Instructions to add ViviLink to video files for sharing.
How to aim the camera, use zoom, and capture photos.
Step-by-step instructions for capturing still images.
Functions of LEFT, UP, RIGHT, DOWN buttons in photo mode.
Details on Shutter, OK/SET, and MODE buttons in photo mode.
How to adjust scene settings for different environments for photos.
How to select image resolution for photos.
How to choose the desired quality level for captured photos.
How to set a delay for capturing photos, allowing the user to be in the picture.
How to use the anti-shake feature for photo capture.
How to adjust white balance for photos based on lighting.
How to add color effects to still images.
How to take rapid snapshots in a row.
How to set image sharpness for photos.
How to control light for photo capture.
How to adjust ISO for photos.
How metering affects photo capture.
How to select the language for photo mode menus.
How to set or disable date/time stamps for photos.
How to disable sound effects for photo capture functions.
How to configure auto power off for photos.
How to set frequency for photos.
Instructions to erase all content from the SD card for photos.
How to select TV output standards for photos.
Guide to restoring photo settings to their original factory state.
How to navigate and find photo files on the camcorder.
Instructions for magnifying selected photos.
How to use thumbnail view to select photo files.
Functions of LEFT, UP, RIGHT, DOWN, Shutter, OK/SET, MODE buttons during photo playback.
Steps to delete one photo file from the camcorder.
How to erase all media files from the SD card.
How to rotate captured pictures to the desired orientation.
How to lock/unlock individual photos to prevent deletion.
How to lock all photo files on the camcorder.
Instructions for printing photos directly to a Pictbridge compatible printer.
How to set intervals and play photo slide shows.
Instructions to add ViviLink to photo files for sharing.
Guide on how to connect the camcorder to a TV using an AV cable.
Instructions for installing the Vivitar Experience Image Manager from the included CD.
Steps to connect the camcorder to a computer using the USB cable.
Guide on using the software to transfer photos and videos from the device.
Step-by-step manual transfer of photos/videos using Windows.
Manual transfer of files using Macintosh Finder.
Methods to import photos/videos to an iPad.
Details coverage for defects under normal usage and exclusions.
Steps required when returning the product for warranty service.
Solutions for when transferred photos are not visible on the computer.
Recommendations to avoid losing important pictures during camera power off.
How to recover accidentally deleted images using the Recycle Bin.
| Video Resolution | 1080p |
|---|---|
| Optical Sensor Resolution | 5 MP |
| Digital Zoom | 4x |
| Sensor Type | CMOS |
| Storage | MicroSD card (up to 32GB) |
| Battery Type | Lithium-ion |
| Connectivity | USB |
| Display | 2.7-inch LCD |
| Battery Life | Up to 90 minutes |