Do you have a question about the Vivitar HA-23 and is the answer not in the manual?
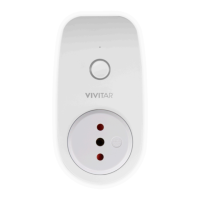
The Vivitar HA-23 Wi-Fi Smart Plug is a wireless remote plug designed for smart home integration, offering convenient control over connected appliances.
The smart plug allows for complete control of devices both inside and outside the home via the Vivitar Smart Home Security App. It provides a perfect solution for single outlet applications and enables full schedule management for connected devices. Users can easily connect to their smart phone or tablet to manage the plug. The device connects to a 2.4GHz Wi-Fi network and is compatible with Android cellphones/tablets running OS 4.4 or higher, and iPhones/iPads with iOS 9.0 or higher.
The smart plug features a Wi-Fi indicator light that provides visual feedback on its status:
To set up the device, users need to install the Vivitar Smart Home Security app, available on Google Play Store (Android) and the Apple App Store (iOS). The setup process involves:
The manual also notes that the pictures used are from an iOS interface, and the product and software are updated periodically. The application interface may change. AP mode allows a smartphone to access the camera's Wi-Fi directly without a router/internet connection, which is useful in scenarios where users want to install an IP camera but no router or internet connection is available. However, if switching the camera to AP mode, remote access to the camera won't be supported.
The manual includes standard FCC compliance statements, advising users on how to resolve potential interference issues:
The device is designed to operate without causing harmful interference and to accept any interference received, including interference that may cause undesired operation. Changes or modifications not expressly approved by the party responsible for compliance could void the user's authority to operate the equipment.
The manual also outlines Vivitar's One Year Warranty, covering products that fail due to normal usage, defects in material, or workmanship. The warranty does not cover damages or malfunctions resulting from defects in material or workmanship and damages or malfunctions from other than normal use, including but not limited to, repair by unauthorized parties, tampering, modification, or accident. For warranty service, customers are directed to contact Vivitar via phone or website. The warranty requires proof of purchase and return of the defective product. The warranty explicitly disclaims all other warranties, express or implied, including but not limited to, any implied warranties of merchantability or fitness for a particular purpose.
| Brand | Vivitar |
|---|---|
| Model | HA-23 |
| Category | Accessories |
| Language | English |