Page 14 of 16
STEP 11: KEYBOARD TRAY ASSEMBLY
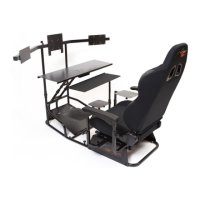
Attach keyboard tray to the keyboard support structure as shown in FIGURE 11. First, apply some of the enclosed silicon
grease between the two sliding parts of the keyboard tray and the keyboard post. Next, place the keyboard on the
keyboard support post. Insert the white Nylon Washer (No. 13) immediately underneath the M8 Self-Locking Nut (No.
12) and tighten until it is snug. Do not over-tighten the locknut as you will not be able to rotate the keyboard tray freely.
Use the plastic adjustment nut to adjust the height of the keyboard and tighten to lock in-place.
HINT: IF YOUR KEYBOARD TRAY WOBBLES AFTER ASSEMBLY, ENSURE THAT YOU ACCIDENTALLY DID NOT POSITION
THE NYLON NUT BETWEEN THE POST AND TRAY.
FIGURE 11: KEYBOARD TRAY ASSEMBLY