EasyManua.ls Logo

Von Duprin 7500 User Manual

Von Duprin 7500
2 pages
To Next Page IconTo Next Page
Page #1 background imageLoading...
Page #1 background image
*941019-00*
941019-00
1. Prepare door for device and trim (see their
instructions).
2. Prepare door for mortise lock and cylinder (see
preparation on other side of these instructions).
3. Adjust faceplate for door bevel (Figure 2):
(a) Loosen top and bottom faceplate screws.
(b) Pivot faceplate to match door bevel.
(c) Tighten top and bottom faceplate screws.
4. Install mortise lock into door with two #12-12 x 12-24 x 1”
combination screws.
5. Install trim, if required (see trim instructions).
6. If using outside cylinder (Figure 3):
(a) Back out cylinder set screws enough to clear
cylinder mounting hole.
(b) Thread cylinder into mortise lock through
hole in outside face of door.
(c) Tighten the cylinder set screw that is closest
to outside face of door. Remove the other
cylinder set screw.
7. Rotate latch bolt so flat side faces exit direction.
(Figure 4).
8. Install collar, scalp plate, and scalp plate
retaining screws (Figure 1).
Figure 4
Exit direction
Flat side of
latch bolt
Top view
#12-12 x 12-24 x 1”
combination screws
Faceplate
Faceplate screw
Faceplate screw
Figure 2
Retaining
screws
Scalp plate
Figure 1
Collar
Keyhole
position when
installed
Cylinder set
screws
Door not
shown for
clarity
Figure 3
Faceplate
Bevel on
edge of
door
}
Equal
angles
Mortise Lock
7500
Installation Instructions
Question and Answer IconNeed help?

Do you have a question about the Von Duprin 7500 and is the answer not in the manual?

Von Duprin 7500 Specifications

General IconGeneral
Device TypeExit Device
Series7500
UL ListedYes
MaterialSteel
ComplianceADA compliant
FastenersScrews included
FinishesUS3, US4, US10, US10B, US26, US26D, US28, US32D
Latch BoltStandard latch bolt
ANSIANSI A156.3
FunctionExit Only
Backset2-3/4" (70 mm)
Strike AdjustabilityAdjustable
TypeRim exit device

Summary

Mortise Lock Installation Steps

Prepare Door for Lock and Cylinder

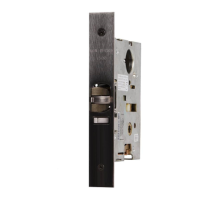
Instructions for preparing the door for mortise lock and cylinder installation, including device and trim preparation.

Adjust Faceplate for Door Bevel

Steps to adjust the faceplate to match the door bevel, involving loosening and tightening screws.

Install Mortise Lock and Trim

Guidance on installing the mortise lock and any required trim, using specific screws.

Install Outside Cylinder

Procedure for installing an outside cylinder, including adjusting set screws and threading into the lock.

Orient Latch Bolt and Install Components

Instructions to orient the latch bolt and install the collar, scalp plate, and retaining screws.

Door Preparation for Mortise Lock

Cylinder Door Preparation

Details for preparing a door for a mortise cylinder, including diameter and centerline specifications.

Metal Door Preparation

Specifications for preparing metal doors for mortise locks, including screw placements and dimensions.

Wood Door Preparation

Specifications for preparing wood doors for mortise locks, covering clearances and drill hole details.

Related product manuals