8 – Ethernet port
• ConnecttorouterwithaRJ45network
cable(optional).
9 – 3.5mm line jack
• Connecttoaudiooutputdevice(optional).
10 – micro SD card slot
11 – Online LED indicators
• Flashorangeandbluealternatelywhen
thecameraunitisinpairingmode.
• Orangeissteadyonwhenthecameraunit
isconnectingtotheInternet.
• Orangeandbluearesteadyonwhenthe
cameraunitisidle.
• Flashorangeandblueslowlyduringvideo
streaming.
• Flashorangeandbluequicklyand
alternatelywhenthecameraunitis
updatingitsfirmware.
• Youcanturnoffthecamera’sLEDsifyou
findthemtoobright.ReadtheOnline LED
indication sectionunderCamera settings
inyourhomeviewer’sappmanualfor
instructions.
12 – Volume –
• Presstodecreasethespeakervolume.
Volume +
• Presstoincreasethespeakervolume.
13 – Pair/reset button
• Pressandholdforthreesecondstoenter
pairingmode.
2 Camera Wireless Monitoring System
Installation guide
VC9312-245
Overview
HD Pan/tilt camera overview
1 – Light sensor
2 – Infrared LEDs
• Allowyoutoseeclearlyinadark
surrounding.
3 – Camera lens
4 – Microphone
5 – Antenna
• ConnecttorouterwithWi-Fi.
6 – Speaker
7 – Power jack
mic
j
WIFI MAC:0012A4A3CE4
LAN MAC:00122A4A3CE5
S/N:VM500006007
Model:VC931
Connect
Youcanchoosetosetupthecameraunits
fordesktopusage,wallmountingorceiling
mounting.
• Useonlythecamerapoweradapterssuppliedwith
thisproduct.
• Makesuretheelectricaloutletsarenotcontrolledby
wallswitches.
• Thepoweradaptersareintendedtobecorrectly
orientedinverticalorfloormountpositions.The
prongsarenotdesignedtoholdthepluginplaceif
itispluggedintoaceiling,under-the-tableorcabinet
outlet.
• Makesurethecameraunitsandthepoweradapter
cordsareoutofreachofchildren.
Connect the Camera units
Wi-Fi connection
• Beforeyouconnectthecameraunits,makesureyou
haveInternetaccessandaWi-Firouter
(IEEE 802.11 b/g/n).Datachargesapplyand
serviceplanmayvaryforInternetaccess.Routeris
notincluded.
• Donotpluginthenetworkcable.
• TomaintaincompliancewiththeFCC’sRFexposure
guidelines,placetheHDcameraatleast20cmfrom
nearbypersons.
1. Connectthepoweradaptertothecameraunit
andapowersupply.
2. Placethecameraunitatadesiredplace.
• Toturnoffthecameraunit,unplugthecamerafrom
thepowersupply.
Cable connection (optional)
Afteryouhavepairedthecameraunitswithyour
homeviewerviaWi-Fi,youcanconnectthe
cameraunitstotheInternetusingthenetwork
cablestooptimizeyourInternetconnection.Refer
totheonlineappmanualfortheinstructionson
howtopairyourcameraunitswithyourhome
viewer.
volume
-
+
micr
o SD
Go to
www.vtechphones.com
for support and the latest
VTech product news.
Congratulations
onpurchasingyournewVTechproduct.Before
usingthis2CameraWirelessMonitoringSystem,
pleasereadtheImportant safety instructions.
Forsupport,shopping,andeverythingnewat
VTech,visitourwebsiteat
www.vtechphones.com.
Operating range
TheoperatingrangeoftheIPCameraisupto
1,000feetoutdoorsor150feetindoors.The
actualoperatingrangemayvarydepending
ontheenvironmentalconditionsandother
interferencessuchaswalls,doorsandother
obstructions.
v
olum
e
-
+
mi
c
r
o
SD
vo
lu
m
e
-
+
mic
r
o
SD
Protect your privacy and online
security
VTechcaresaboutyourprivacyandpeaceof
mind.That’swhywe’veputtogetheralistof
industry-recommendedbestpracticestohelp
keepyourwirelessconnectionprivateandyour
devicesprotectedwhenonline.Werecommend
youcarefullyreviewandconsidercomplyingwith
thefollowingtips.
Ensureyourwirelessconnectionissecure.
• Beforeinstallingadevice,ensureyourrouter’s
wirelesssignalisencryptedbyselectingthe
“WPA2-PSKwithAES”settinginyourrouter’s
wirelesssecuritymenu.
Changedefaultsettings.
• Changeyourwirelessrouter’sdefaultwireless
networkname(SSID)tosomethingunique.
• Changedefaultpasswordstounique,strong
passwords.Astrongpassword:
- Isatleast10characterslong.
- Iscomplex.
- Doesnotcontaindictionarywordsor
personalinformation.
- Containsamixofuppercaseletters,
lowercaseletters,specialcharactersand
numbers.
Keepyourdevicesuptodate.
• Downloadsecuritypatchesfrom
manufacturersassoonastheybecome
available.Thiswillensureyoualwayshave
thelatestsecurityupdates.
• Ifthefeatureisavailable,enableautomatic
updatesforfuturereleases.
DisableUniversalPlugandPlay(UPnP)onyour
router.
• UPnPenabledonaroutercanlimitthe
effectivenessofyourfirewallbyallowingother
networkdevicestoopeninboundportswithout
anyinterventionorapprovalfromyou.Avirus
orothermalwareprogramcouldusethis
functiontocompromisesecurityfortheentire
network.
Formoreinformationonwirelessconnections
andprotectingyourdata,pleasereviewthe
followingresourcesfromindustryexperts:
1. FederalCommunicationsCommission:
WirelessConnectionsandBluetoothSecurity
Tips–
www.fcc.gov/consumers/guides/how-protect-
yourself-online.
2. U.S.DepartmentofHomelandSecurity:
BeforeYouConnectaNewComputertothe
Internet–
www.us-cert.gov/ncas/tips/ST15-003.
3. FederalTradeCommission:UsingIPCameras
Safely–
https://www.consumer.ftc.gov/articles/0382-
using-ip-cameras-safely.
4. Wi-FiAlliance:DiscoverWi-FiSecurity–
http://www.wi-.org/discover-wi-/security.
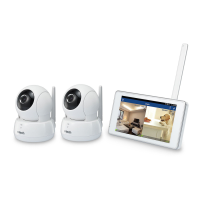
Introduction
VTech2CameraWirelessMonitoringSystem
allowsyoutokeepaneyeonyourareaswhen
youareonthemoveoraway.
ThismonitoringsystemisWi-Fienabled,which
usesyourhomewirelessnetworktostreamlive
videoandaudiothroughtheHDcameraunits
and5-inchtouchscreenhomeviewer.
Youcanalsomonitoryourareasfromyour
smartphoneandmobiletablet.
VTech2CameraWirelessMonitoringSystem
usesMyVTech Camsapptoletyouinstantlysee
andhearwhat’shappeninginyourareasfrom
anywhereintheworld.
Theappcanbe theAppStore
ortheGooglePlay
TM
Store,directlyfromyour
smartphoneormobiletablet.
What’s in the box
Your2CameraWirelessMonitoringSystem
packagecontainsthefollowingitems.Saveyour
salesreceiptandoriginalpackagingintheevent
warrantyserviceisnecessary.
B
B
mic
x4
x4
Installationguide Importantsafety
instructions
Quickstartguide
Requirements
Makesureyoursystemincludesthefollowing
components,andtheymeettheminimum
requirement.
Network Wi-Fi
Wi-Firouter 2.4GHzIEEE802.11b/g/n
Internetconnection
Atleast1.0Mbpsupload
bandwidthpercamera
microSDcard
SupportClass4orhigher,
withstoragecapacityupto
32GB
Smartphones/tablets
(forremoteaccess)
• Android
®
oriOSdevices
with3G/4Gmobile
communication.
• Android4.4orlater;or
iOS8.0orlater.
Videocodec
(forremoteaccess)
H.264
mic
Home viewer overview
1
+ / VOL / -
• Presstoincreaseordecreasethe
speakervolume.
2
• Pressandholdtopoweronoroff,
ortorebootthehomeviewer.
• Presstoturnonoroffthescreen
displaywithoutpoweringoffthe
homeviewer.Youcanstillhear
soundfromthecameraunitif
thecameraisstreamingandthe
speakervolumeofthehomeviewer
isturnedon.
3
5-inch touch screen monitor
• Whenthescreenisturnedonand
locked,swipetounlockthescreen.
4
Microphone
5
Antenna
6
Speaker
7
micro SD card slot
8
RESET
• Forcerebootthehomeviewer.
9
3.5mm audio jack
• Connecttostereoearphone.
10
Micro USB 2.0 port
• Connecttoapowersupplyfor
charging.
• Connecttoapersonalcomputeras
anexternalstoragefortransferring
manuallycapturedsnapshotsand
recordedvideosstoredinthehome
viewer.
How the system works
TheWi-Firouter(notincluded)providesInternet
connectivitytoyourwirelessmonitoringsystem.
Itservesasacommunicatingchannelbetween
yourcameraunitsandhomeviewer,allowing
youtomonitorand/orcontrolyourcameraunits
whereveryouare.
x2
x2
x2
8 – Ethernet port
• ConnecttorouterwithaRJ45network
cable(optional).
9 – 3.5mm line jack
• Connecttoaudiooutputdevice(optional).
10 – micro SD card slot
11 – Online LED indicators
• Flashorangeandbluealternatelywhen
thecameraunitisinpairingmode.
• Orangeissteadyonwhenthecameraunit
isconnectingtotheInternet.
• Orangeandbluearesteadyonwhenthe
cameraunitisidle.
• Flashorangeandblueslowlyduringvideo
streaming.
• Flashorangeandbluequicklyand
alternatelywhenthecameraunitis
updatingitsfirmware.
• Youcanturnoffthecamera’sLEDsifyou
findthemtoobright.ReadtheOnline LED
indication sectionunderCamera settings
inyourhomeviewer’sappmanualfor
instructions.
12 – Volume –
• Presstodecreasethespeakervolume.
Volume +
• Presstoincreasethespeakervolume.
13 – Pair/reset button
• Pressandholdforthreesecondstoenter
pairingmode.
2 Camera Wireless Monitoring System
Installation guide
VC9312-245
Overview
HD Pan/tilt camera overview
1 – Light sensor
2 – Infrared LEDs
• Allowyoutoseeclearlyinadark
surrounding.
3 – Camera lens
4 – Microphone
5 – Antenna
• ConnecttorouterwithWi-Fi.
6 – Speaker
7 – Power jack
mic
j
WIFI MAC:0012A4A3CE4
LAN MAC:00122A4A3CE5
S/N:VM500006007
Model:VC931
Connect
Youcanchoosetosetupthecameraunits
fordesktopusage,wallmountingorceiling
mounting.
• Useonlythecamerapoweradapterssuppliedwith
thisproduct.
• Makesuretheelectricaloutletsarenotcontrolledby
wallswitches.
• Thepoweradaptersareintendedtobecorrectly
orientedinverticalorfloormountpositions.The
prongsarenotdesignedtoholdthepluginplaceif
itispluggedintoaceiling,under-the-tableorcabinet
outlet.
• Makesurethecameraunitsandthepoweradapter
cordsareoutofreachofchildren.
Connect the Camera units
Wi-Fi connection
• Beforeyouconnectthecameraunits,makesureyou
haveInternetaccessandaWi-Firouter
(IEEE 802.11 b/g/n).Datachargesapplyand
serviceplanmayvaryforInternetaccess.Routeris
notincluded.
• Donotpluginthenetworkcable.
• TomaintaincompliancewiththeFCC’sRFexposure
guidelines,placetheHDcameraatleast20cmfrom
nearbypersons.
1. Connectthepoweradaptertothecameraunit
andapowersupply.
2. Placethecameraunitatadesiredplace.
• Toturnoffthecameraunit,unplugthecamerafrom
thepowersupply.
Cable connection (optional)
Afteryouhavepairedthecameraunitswithyour
homeviewerviaWi-Fi,youcanconnectthe
cameraunitstotheInternetusingthenetwork
cablestooptimizeyourInternetconnection.Refer
totheonlineappmanualfortheinstructionson
howtopairyourcameraunitswithyourhome
viewer.
volume
-
+
micr
o SD
Go to
www.vtechphones.com
for support and the latest
VTech product news.
Congratulations
onpurchasingyournewVTechproduct.Before
usingthis2CameraWirelessMonitoringSystem,
pleasereadtheImportant safety instructions.
Forsupport,shopping,andeverythingnewat
VTech,visitourwebsiteat
www.vtechphones.com.
Operating range
TheoperatingrangeoftheIPCameraisupto
1,000feetoutdoorsor150feetindoors.The
actualoperatingrangemayvarydepending
ontheenvironmentalconditionsandother
interferencessuchaswalls,doorsandother
obstructions.
v
olum
e
-
+
mi
c
r
o
SD
vo
lu
m
e
-
+
mic
r
o
SD
Protect your privacy and online
security
VTechcaresaboutyourprivacyandpeaceof
mind.That’swhywe’veputtogetheralistof
industry-recommendedbestpracticestohelp
keepyourwirelessconnectionprivateandyour
devicesprotectedwhenonline.Werecommend
youcarefullyreviewandconsidercomplyingwith
thefollowingtips.
Ensureyourwirelessconnectionissecure.
• Beforeinstallingadevice,ensureyourrouter’s
wirelesssignalisencryptedbyselectingthe
“WPA2-PSKwithAES”settinginyourrouter’s
wirelesssecuritymenu.
Changedefaultsettings.
• Changeyourwirelessrouter’sdefaultwireless
networkname(SSID)tosomethingunique.
• Changedefaultpasswordstounique,strong
passwords.Astrongpassword:
- Isatleast10characterslong.
- Iscomplex.
- Doesnotcontaindictionarywordsor
personalinformation.
- Containsamixofuppercaseletters,
lowercaseletters,specialcharactersand
numbers.
Keepyourdevicesuptodate.
• Downloadsecuritypatchesfrom
manufacturersassoonastheybecome
available.Thiswillensureyoualwayshave
thelatestsecurityupdates.
• Ifthefeatureisavailable,enableautomatic
updatesforfuturereleases.
DisableUniversalPlugandPlay(UPnP)onyour
router.
• UPnPenabledonaroutercanlimitthe
effectivenessofyourfirewallbyallowingother
networkdevicestoopeninboundportswithout
anyinterventionorapprovalfromyou.Avirus
orothermalwareprogramcouldusethis
functiontocompromisesecurityfortheentire
network.
Formoreinformationonwirelessconnections
andprotectingyourdata,pleasereviewthe
followingresourcesfromindustryexperts:
1. FederalCommunicationsCommission:
WirelessConnectionsandBluetoothSecurity
Tips–
www.fcc.gov/consumers/guides/how-protect-
yourself-online.
2. U.S.DepartmentofHomelandSecurity:
BeforeYouConnectaNewComputertothe
Internet–
www.us-cert.gov/ncas/tips/ST15-003.
3. FederalTradeCommission:UsingIPCameras
Safely–
https://www.consumer.ftc.gov/articles/0382-
using-ip-cameras-safely.
4. Wi-FiAlliance:DiscoverWi-FiSecurity–
http://www.wi-.org/discover-wi-/security.
Introduction
VTech2CameraWirelessMonitoringSystem
allowsyoutokeepaneyeonyourareaswhen
youareonthemoveoraway.
ThismonitoringsystemisWi-Fienabled,which
usesyourhomewirelessnetworktostreamlive
videoandaudiothroughtheHDcameraunits
and5-inchtouchscreenhomeviewer.
Youcanalsomonitoryourareasfromyour
smartphoneandmobiletablet.
VTech2CameraWirelessMonitoringSystem
usesMyVTech Camsapptoletyouinstantlysee
andhearwhat’shappeninginyourareasfrom
anywhereintheworld.
Theappcanbe theAppStore
ortheGooglePlay
TM
Store,directlyfromyour
smartphoneormobiletablet.
What’s in the box
Your2CameraWirelessMonitoringSystem
packagecontainsthefollowingitems.Saveyour
salesreceiptandoriginalpackagingintheevent
warrantyserviceisnecessary.
B
B
mic
x4
x4
Installationguide Importantsafety
instructions
Quickstartguide
Requirements
Makesureyoursystemincludesthefollowing
components,andtheymeettheminimum
requirement.
Network Wi-Fi
Wi-Firouter 2.4GHzIEEE802.11b/g/n
Internetconnection
Atleast1.0Mbpsupload
bandwidthpercamera
microSDcard
SupportClass4orhigher,
withstoragecapacityupto
32GB
Smartphones/tablets
(forremoteaccess)
• Android
®
oriOSdevices
with3G/4Gmobile
communication.
• Android4.4orlater;or
iOS8.0orlater.
Videocodec
(forremoteaccess)
H.264
mic
Home viewer overview
1
+ / VOL / -
• Presstoincreaseordecreasethe
speakervolume.
2
• Pressandholdtopoweronoroff,
ortorebootthehomeviewer.
• Presstoturnonoroffthescreen
displaywithoutpoweringoffthe
homeviewer.Youcanstillhear
soundfromthecameraunitif
thecameraisstreamingandthe
speakervolumeofthehomeviewer
isturnedon.
3
5-inch touch screen monitor
• Whenthescreenisturnedonand
locked,swipetounlockthescreen.
4
Microphone
5
Antenna
6
Speaker
7
micro SD card slot
8
RESET
• Forcerebootthehomeviewer.
9
3.5mm audio jack
• Connecttostereoearphone.
10
Micro USB 2.0 port
• Connecttoapowersupplyfor
charging.
• Connecttoapersonalcomputeras
anexternalstoragefortransferring
manuallycapturedsnapshotsand
recordedvideosstoredinthehome
viewer.
How the system works
TheWi-Firouter(notincluded)providesInternet
connectivitytoyourwirelessmonitoringsystem.
Itservesasacommunicatingchannelbetween
yourcameraunitsandhomeviewer,allowing
youtomonitorand/orcontrolyourcameraunits
whereveryouare.
x2
x2
x2