EasyManua.ls Logo

VWR Traceable Alarm Timer - User Manual

Default Icon
2 pages
Print Icon
To Next Page IconTo Next Page
Loading...
SPECIFICATIONS
Display: 1½ “ x 1¾” high screen with 3/8” LCD digits showing hours,
minutes, and seconds
Accuracy: 0.001%
Resolution: 1 second
Timing Channels: Three independent timing channels (can run simultaneously)
Timing Capacity: 1 second to 99 hours, 59 minutes, 59 seconds
Alarm: Audible and visual (distinct audible alarm for each channel)
Memory: Automatic recall of last programmed time (all three channels)
Functions: Countdown timing and count-up (stopwatch) timing
Clock: Time-of-day in 24 hour format
Size: 3” x 3¼ ” x 1”
Weight: 3 oz
BEFORE USING TIMER
Remove insulation from BATTERY COMPARTMENT. (See Battery Replacement
below). Timer will display in clock mode.
SETTING CLOCK, ALARM, AND DATE
1. To switch between
A
.
M
./
P
.
M
. time and 24-hour time, press the HRS button.
2. To switch between American (month/date) and European (day/month) formats,
the ALL TIME button.
3. Press and hold CLOCK button for 3 seconds. Time of day will flash on display.
Press HRS (hours), MIN (minutes), or SEC (seconds) button to set desired time.
Note: Press and hold HRS, MIN, or SEC to advance setting rapidly.
4. Press CLOCK button again. Time will be saved and alarm will flash on display.
Press HRS or MIN to desired alarm time.
Note: Press and hold HRS or MIN to advance setting rapidly.
5. Press CLOCK again. Alarm time will be saved and date will flash on display.
Press HRS to set desired month. Press MIN to set desired day.
Note: Press and hold HRS or MIN to advance setting rapidly.
6. Press CLOCK again to save settings.
CLOCK ALARM AND SNOOZE FEATURE
1. Press and hold CLOCK button for 3 seconds. Time of day will flash on display.
Press CLOCK button again. Alarm will flash on display. Press HRS and MIN
buttons to set desired alarm time.
2. Press ALL TIME button to activate alarm. Press CLOCK twice to save alarm
setting.
Note: A bell symbol will appear on display above alarm time.
3. When alarm sounds, press any button to silence alarm.
4. To utilize snooze feature, press CLEAR button when alarm is sounding. Alarm
will sound again in 8 minutes. Snooze feature may used as many times as
desired. To discontinue snooze feature, press any button except CLEAR.
5. To deactivate alarm, press and hold CLOCK button for 3 seconds. Time of day
will flash on display. Press CLOCK button again. Alarm will flash on display.
Press ALL TIME button. Bell symbol will no longer appear on display. Press
CLOCK button twice to save setting.
ALARM DURATION SWITCH
Alarm can be set to automatically silence after one minute or to sound continuously
until silenced manually. Changing this setting affects time of day alarm and all three
timer channel alarms. To change setting, open BATTERY COMPARTMENT DOOR on
back of unit by sliding it in direction of arrow. Slide ALARM DURATION SWITCH to 1
MIN. Alarm will sound for one minute then silence automatically. Slide ALARM
DURATION SWITCH to
. Alarm will sound continuously until manually silenced.
Replace BATTERY COMPARTMENT DOOR.
VOLUME
There are two volume settings that affect both key confirmation and alarm sounds.
VOL SWITCH is on top right-hand corner of unit. Slide VOL up for high volume. Slide
VOL down for low volume.
SWITCH TO TIMER MODE
1. Press CLOCK button once. Timer mode appears on display. Press CLOCK
again, clock mode appears on display. During timing process, toggle back and
forth to view timer or clock.
2. In clock mode, during any timing event, TIMER 1, 2, or 3 will flash on display
screen. If all three channels are timing, TIMER 1, TIMER 2, and TIMER 3 will
flash on display screen in clock mode.
COUNTDOWN ALARM TIMING
1. Press CLOCK button once to enter timer mode.
2. Press CLEAR to clear display.
Note: CLEAR only clears channels that are not timing.
3. Press and hold CHANNEL 1, 2, or 3 button for three seconds. Display will flash
00:00 00.
4. Press HRS, MIN, and SEC buttons to set desired countdown time. Each press is
confirmed with a sound.
Note: Press and hold HRS, MIN, or SEC to advance setting rapidly.
5. Press CHANNEL 1, 2, or 3 again to save desired time.
6. Press CHANNEL 1, 2, or 3 again to begin countdown timing.
7. When timer reaches 0:00 00, alarm will sound, TIME’S UP will flash in upper left
hand corner of channel display, and timer will begin counting up.
8. Press any button to turn off alarm.
9. Press CLEAR to return channel to 00:00 00. Press CHANNEL 1, 2, or 3 again
and last programmed time will appear on display.
COUNTDOWN TIMING – ALL CHANNELS
All three timing channels can be running simultaneously, follow steps 1 through 4
above to set countdown times for each channel. Press ALL TIME to begin count down
timing for all channels simultaneously.
Note: Each channel has a unique sounding alarm. CHANNEL 1 beeps once.
CHANNEL 2 beeps twice. CHANNEL 3 beeps three times.
Note: If more than one channel has reached zero and is sounding, only alarm for last
channel to reach zero will be heard. (Example: If CHANNEL 3 alarm is sounding –
three beeps – and then CHANNEL 1 begins to sound – one beep – only CHANNEL 1
alarm will be heard.)
AUTOMATIC RECALL OF LAST PROGRAMMED TIME
1. When timing is complete and after alarm has been silenced, press CLEAR to
return channel to 00:00 00.
2. Press CHANNEL 1, 2, or 3 again and last programmed time will appear on
display.
3. To completely clear last programmed time on any channel
a. press and hold CHANNEL 1,2, or 3 button. Channel 1,2, or 3 display
will flash.
b. press CLEAR.
c. press CHANNEL 1,2, or 3 again, display will stop flashing and read
00:00 00.
COUNT UP TIMING
1. Press CLOCK button once to enter timer mode.
2. To completely clear last programmed time on any channel, follow instructions in
#8 under Count Down Alarm Timing.
3. Press CHANNEL 1, 2, or 3 to begin count up timing.
Note: Press ALL TIME to start all channels at same time.
Note: During any Count Up Timing event, TIME’S UP will flash on display for
each channel in use.
SIMULTANEOUSLY COUNT UP AND DOWN
1. Press CLOCK button once to enter timer mode.
2. Choose CHANNEL 1,2, or 3. Make sure to delete any previous set times on this
channel. (See #8 under Count Down Alarm Timing.) Do not set one channel.
This channel will count up.
3. Choose one or two channels to count down. Make sure to delete any previous
set times on channels. (See #8 under Count Down Alarm Timing.)
4. Set timing. (Follow steps 2 through 4 under Countdown Timing.)
5. Press ALL TIME. One channel will count up. Other channel(s) will count down.
TRACEABLE
®
THREE-CHANNEL TIMER INSTRUCTIONS
Question and Answer IconNeed help?

Do you have a question about the VWR Traceable Alarm Timer and is the answer not in the manual?

Summary

Timer Setup and Basic Functions

Before Using the Timer

Remove battery compartment insulation before initial use. Timer defaults to clock mode.

Setting Clock, Alarm, and Date

Instructions for setting time format, date format, time of day, alarm time, and date.

Clock Alarm and Snooze Feature

Guides on setting, activating, using snooze, and deactivating the clock alarm.

Alarm Duration and Volume Settings

Configure alarm silence duration (1 min or continuous) and adjust device volume.

Timer Operation Modes

Switching to Timer Mode

How to toggle between clock and timer modes for viewing.

Countdown Alarm Timing

Steps to set, start, and manage countdown timers with alarms.

Countdown Timing for All Channels

Simultaneously set and start countdown timers on all three channels.

Automatic Recall of Last Programmed Time

Recalling and clearing previously set timer durations.

Count Up Timing

Instructions for initiating and using count-up (stopwatch) timing.

Simultaneous Count Up and Down

Setting up timers to count up and count down concurrently.

Timeout Functionality

How to pause and resume timing for individual channels.

Troubleshooting and Maintenance

Operational Difficulties

Guidance on resolving issues, primarily by replacing the battery.

Battery Replacement

Procedure for opening the battery compartment and replacing AAA batteries.

Overview

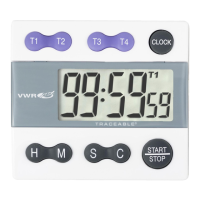
The Traceable® Three-Channel Timer is a versatile timing device designed for precision and ease of use, featuring a clear 1½" x 1¾" high screen with 3/8" LCD digits that display hours, minutes, and seconds. It boasts an accuracy of 0.001% and a resolution of 1 second, making it suitable for applications requiring precise timing.

Function Description:

This timer offers three independent timing channels that can run simultaneously, each with a timing capacity from 1 second up to 99 hours, 59 minutes, and 59 seconds. It supports both countdown timing and count-up (stopwatch) timing. Each channel is equipped with a unique audible and visual alarm to differentiate between timing events. A key feature is the automatic recall of the last programmed time for all three channels, simplifying repetitive tasks. The device also includes a 24-hour format clock function.

Important Technical Specifications:

  • Display: 1½" x 1¾" high screen, 3/8" LCD digits (hours, minutes, seconds).
  • Accuracy: 0.001%.
  • Resolution: 1 second.
  • Timing Channels: Three independent, simultaneous.
  • Timing Capacity: 1 second to 99 hours, 59 minutes, 59 seconds.
  • Alarm: Audible and visual, distinct for each channel.
  • Memory: Automatic recall of last programmed time for all channels.
  • Functions: Countdown timing, count-up (stopwatch) timing.
  • Clock: Time-of-day in 24-hour format.
  • Size: 3" x 3" x 1".
  • Weight: 3 oz.
  • Battery: One AAA alkaline battery (Cat. No. 1105).

Usage Features:

Switching to Timer Mode:

To enter timer mode, press the CLOCK button once. Pressing it again toggles back to clock mode. During timing, you can switch between timer and clock views. In clock mode, active timers (1, 2, or 3) will flash on the display.

Countdown Alarm Timing:

  1. Enter timer mode by pressing CLOCK once.
  2. Clear the display by pressing CLEAR (only clears non-timing channels).
  3. To set a countdown time, press and hold CHANNEL 1, 2, or 3 for three seconds until "00:00 00" flashes.
  4. Use the HRS, MIN, and SEC buttons to set the desired time. Holding these buttons advances the setting rapidly. Each press is confirmed with a sound.
  5. Press CHANNEL 1, 2, or 3 again to save the time.
  6. Press CHANNEL 1, 2, or 3 again to start the countdown.
  7. When the timer reaches "0:00 00," an alarm sounds, "TIME'S UP" flashes, and the timer begins counting up.
  8. Press any button to silence the alarm.
  9. Press CLEAR to reset the channel to "00:00 00." Pressing CHANNEL 1, 2, or 3 again will recall the last programmed time.

Countdown Timing - All Channels:

All three channels can run simultaneously. Follow the steps for setting individual countdown times for each channel. To start all channels simultaneously, press ALL TIME. Each channel has a unique alarm sound: CHANNEL 1 beeps once, CHANNEL 2 twice, and CHANNEL 3 three times. If multiple alarms reach zero, only the alarm for the last channel to reach zero will be heard.

Automatic Recall of Last Programmed Time:

  1. After timing is complete and the alarm is silenced, press CLEAR to reset the channel to "00:00 00."
  2. Press CHANNEL 1, 2, or 3 again to display the last programmed time.
  3. To completely clear the last programmed time: press and hold CHANNEL 1, 2, or 3 until it flashes, then press CLEAR. Pressing CHANNEL 1, 2, or 3 again will stop flashing and display "00:00 00."

Count Up Timing:

  1. Enter timer mode by pressing CLOCK once.
  2. Clear any previous set times on the desired channel (refer to countdown alarm timing instructions).
  3. Press CHANNEL 1, 2, or 3 to begin count-up timing.
  4. Press ALL TIME to start all channels counting up simultaneously. During count-up, "TIME'S UP" will flash on the display for each active channel.

Simultaneously Count Up and Down:

  1. Enter timer mode by pressing CLOCK once.
  2. Choose a channel (1, 2, or 3) to count up. Ensure no previous set times are on this channel by deleting them.
  3. Choose one or two other channels to count down. Delete any previous set times on these channels.
  4. Set the countdown times for the chosen channels.
  5. Press ALL TIME. One channel will count up, while the others will count down.

Timing Options:

The timer supports various combinations of count-up and count-down across its three channels:

  1. One channel counts up, two channels count down.
  2. Two channels count up, one channel counts down.
  3. All three channels count down.
  4. All three channels count up.

Timeout:

Any running channel can be stopped by pressing its corresponding CHANNEL button (1, 2, or 3). Pressing the button again resumes timing. Multiple timeouts can be taken during any timing event.

Setting Clock, Alarm, and Date:

  1. To switch between A.M./P.M. and 24-hour time, press the HRS button.
  2. To switch between American (month/date) and European (day/month) formats, press the ALL TIME button.
  3. To set the time: Press and hold CLOCK for 3 seconds until the time flashes. Use HRS, MIN, or SEC buttons to set the desired time (hold for rapid advance).
  4. Press CLOCK again to save the time and make the alarm time flash. Use HRS or MIN to set the desired alarm time (hold for rapid advance).
  5. Press CLOCK again to save the alarm time and make the date flash. Use HRS to set the month and MIN to set the day (hold for rapid advance).
  6. Press CLOCK again to save all settings.

Clock Alarm and Snooze Feature:

  1. To set the clock alarm: Press and hold CLOCK for 3 seconds until the time flashes. Press CLOCK again until the alarm flashes. Use HRS and MIN to set the desired alarm time.
  2. Press ALL TIME to activate the alarm. Press CLOCK twice to save the alarm setting. A bell symbol will appear on the display.
  3. When the alarm sounds, press any button to silence it.
  4. To use the snooze feature, press CLEAR when the alarm is sounding. The alarm will sound again in 8 minutes. This can be repeated as desired. To deactivate snooze, press any button except CLEAR.
  5. To deactivate the alarm: Press and hold CLOCK for 3 seconds until the time flashes. Press CLOCK again until the alarm flashes. Press ALL TIME. The bell symbol will disappear. Press CLOCK twice to save the setting.

Alarm Duration Switch:

The alarm can be set to automatically silence after one minute or to sound continuously until manually silenced. This setting affects both the time-of-day alarm and all three timer channel alarms. To change this, open the BATTERY COMPARTMENT DOOR (slide in direction of arrow). Slide the ALARM DURATION SWITCH to "1 MIN" for a one-minute alarm or to "∞" for continuous alarm. Replace the BATTERY COMPARTMENT DOOR.

Volume:

The device has two volume settings for key confirmation and alarm sounds. The VOL SWITCH is on the top right-hand corner. Slide VOL up for high volume or down for low volume.

Maintenance Features:

Battery Replacement:

An incorrect display, no display, or operational difficulties indicate that the battery should be replaced. To open the BATTERY COMPARTMENT, slide the door on the back of the unit in the direction of the arrow. Remove the depleted battery and insert one fresh AAA alkaline battery, ensuring correct polarity (+ and -). Replace the BATTERY COMPARTMENT DOOR. The recommended replacement battery is Cat. No. 1105.

All Operational Difficulties:

If the timer does not function properly, replace the battery with a fresh, high-quality AAA alkaline battery. Low battery power can cause various "apparent" operational difficulties, which a fresh battery will resolve.

VWR Traceable Alarm Timer Specifications

General IconGeneral
BrandVWR
ModelTraceable Alarm Timer
CategoryTimer
LanguageEnglish

Related product manuals