Do you have a question about the WAGNER Furno-300 and is the answer not in the manual?
General hazard warning about property damage or severe injury.
Key safety steps including disconnecting power, work area safety, and proper ladder use.
Warning about chemicals in paint, especially lead-based paint, and exposure reduction.
Requirements for extension cords, including gauge and condition for safe use.
Explanation of the polarized plug and fitting instructions to reduce shock risk.
Describes the heat gun as a power tool and emphasizes safe operation by adults.
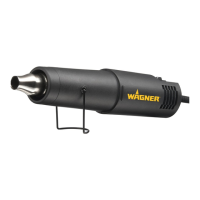
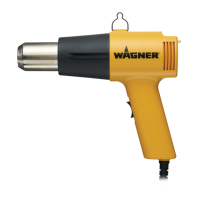
Details on housing material, wattage, heat output, and weight of the heat gun.
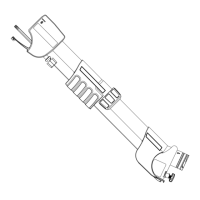
Identifies and describes the main parts of the heat gun with reference to Figure 1.
Instructions on how to properly attach the power cord to the heat gun.
Details on using the integrated stand for hands-free applications and cool down.
Steps for starting up the heat gun, including plugging in and checking the fan.
Guidance on heat settings and nozzle tips for various DIY projects like stripping paint and wall repair.
Recommendations for heat settings and nozzle tips for tasks like loosening fittings and unfreezing pipes.
Guidance on heat settings and nozzle tips for crafts like candle making and shrink wrapping.
Recommendations for heat settings and nozzle tips for automotive tasks like removing stickers and dents.
Guidance on heat settings and nozzle tips for electronics repair, such as smartphones and game consoles.
This document describes a heat gun, a versatile power tool designed for a wide range of DIY, small repair, arts & crafts, automotive, and electronics projects. It functions by generating a stream of hot air, which can be used for tasks such as stripping paint, softening adhesives, bending plastics, thawing pipes, and more.
The heat gun operates by heating air and expelling it through a nozzle. It features a 2-speed switch (0 = OFF, 1 = LOW, 2 = HIGH) to control the heat output and fan speed, allowing users to select the appropriate setting for various applications. The motor-driven fan ensures that the heating element is cooled, preventing burnout. The device is designed for both handheld and hands-free operation, thanks to an integrated stand that allows for bench-top use and a cool-down mode.
This heat gun is presented as a robust and versatile tool, emphasizing user safety, proper operation, and awareness of potential hazards, particularly concerning lead paint.
| Brand | WAGNER |
|---|---|
| Model | Furno-300 |
| Category | Power Tool |
| Language | English |