TOOLS REQUIRED
BOX CONTENTS continued
G. SPACER
1 right / 1 le
#1 & #2 Phillips Screwdriver
H. SCREW PACKET
Base plate screws (6x)
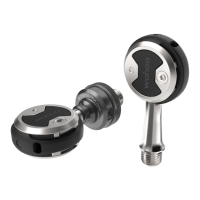
K. POWRLINK ZERO PEDALS
8mm Allen Wrench
J. CHARGER
I. 1MM
WASHERS
Protector Plate Screws (8x),
Extra Long/Black (8x)
PEDAL INSTALLATION
1. CLEAN CRANK ARM THREADS AND APPLY A SMALL AMOUNT OF GREASE
Use a cloth or brush to remove old grease before applying new grease.
Right pedals install clockwise and le pedals install counterclockwise.
Improper installation or cross threading can cause damage to your pedals
or crank arms.
CAUTION
Use the provided washers to allow for at least 1mm space between the
POWRLINK ZERO power pod and your crank arm. Repeat on the opposite side.
2. IDENTIFY THE LEFT AND RIGHT PEDALS
The “Wahoo” logo reads le-to-right to help identify each pedal (shown-below)
Le Pedal
Right Pedal