TEXTURE-PRO® 200 OPERATING INSTRUCTIONS
Item No. 52-020
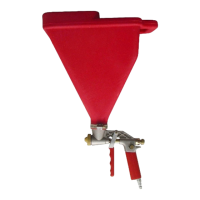
Included in box
Gun Body
Heavy Duty Large Capacity Hopper
Small, Medium & Large Spray Tips
Quick Disconnect
Hopper Clamp
CAUTION: ALWAYS WEAR APPROPRIATE PROTECTIVE DEVICES, INCLUDING EYE PROTECTION.
ASSEMBLY & SET UP – TEXTURE-PRO® 200 :
STEP 1: You will need to attach the hopper to the gun body by placing the hopper upside down on the floor or a table. Place the
hopper clamp over the neck of the hopper. Position the gun body so the handle is facing toward the rear of the hopper and
push down firmly until it is seated. Tighten the hopper clamp.
STEP 2:Thread the quick disconnect (P/N 50-025) into the thread on the bottom of the gun handle.
PREPARATION & TEXTURING – TEXTURE PRO® 200
STEP1: Mask off any ceilings, walls, floors, doorways, windows, moldings, furniture etc you don’t want textured. Use a heavy drop
cloth to protect floor covering
STEP 2: Before attempting any texturing with the TEXTURE-PRO® 200 familiarize yourself with the hopper gun by reviewing the
“OPERATIONAL FEATURES” and “SPRAY PROCEDURES” sections on this page.
STEP 3 Test spray onto a piece of scrap drywall, cardboard, etc. to verify the TEXTURE-PRO® 200 is producing your desired texture.
Make any final adjustments to the set up (if necessary).
STEP 4: Using the techniques listed in the “SPRAY PROCEDURES” section begin the texturing process.
TEXTURE TABLE: This table shows the basic parameters in preparation for spraying. We recommend that you spray test
panels using drywall, plywood or cardboard. The air supply must be consistent or the texture pattern will change
accordingly.
OPERATIONAL FEATURES – TEXTURE-PRO® 200
Mixture Thickness: If you are using one of the commercially available wall or ceiling texture mixes, follow the manufacturer’s instructions
for mixing. If you are going to use all purpose joint compound or lightweight topping compound, thin by adding approximately 1/3
rd
gallon of
water for each gallon of joint or topping compound. After mixing, your texture material should have a viscosity of a thick paint or a thin
pancake batter.
Spray Tips: The smaller the spray tip - the finer the texture pattern and the larger the spray tip - the larger the texture pattern. You should
always use a large spray tip with acoustic material.
Atomizing Pressure (PSI): If the regulator of your compressor is set to supply a low Atomizing Pressure (PSI) the TEXTURE-PRO® 200
will produce a heavier texture pattern. Increasing the Atomizing Pressure will produce a finer texture pattern. Most texture patterns use an
Atomizing Pressure between 10-40 PSI.
Trigger Pull Distance: Once you have attached the Nozzle and set the Atomizing Pressure for your desired texture pattern to the
TEXTURE-PRO® 200 you will need to adjust the Trigger Pull Distance. Turning the Adjustable Stop (knurled knob) on the back of the
TEXTURE PRO® 200 clockwise shortens the trigger pull distance. Turning the Adjustable Stop counter-clockwise increases the trigger pull
distance.
Air Control Valve: The TEXTURE-PRO® 200 has an internal air control valve. Pull the trigger to start the airflow. Release the trigger and
the air flow stops.
Flow Control Valve: Located on the side of the TEXTURE-PRO® 200, it allows finite control of the pressurized air flow through the
TEXTURE-PRO® 200.
SPRAY PROCEDURES
The TEXTURE-PRO® 200 requires a compressor that is rated at or above 2.4 CFM @ 90 PSI or 5.3CFM @ 40 PSI
Texture Pattern Mixture Thickness Spray Tip Pressure (PSI) Trigger Pull Flow Control Valve
Light Splatter Thick Paint Small 23 – 25 1/3 Open completely
Orange Peel Thick Paint Medium 20 – 23 1/2 Open completely
Medium Splatter Thick Paint Medium 17 - 20 2/3 1/3 closed
Heavy Splatter Thin Pancake Batter Large 10 - 15 Full 2/3 closed
Acoustic Manufacturer’s Spec Large 17 - 20 Full Open Completely
1
Horizontal (flat ceilings) Surfaces
1. Start your compressor and allow the tank to fill and compressor to shut off.
2. Fill the Hopper of your TEXTURE-PRO® 200 2/3 to 3/4 full with texture material.
3. Starting in a corner along an edge, orient the TEXTURE-PRO® 200 so the Spray Tip is 18” below and pitched at a 45 degree angle
to the surface being textured.
4. Pull the trigger and move sideways until you reach the opposite corner or edge.
5. Without stopping, move backwards and start sideways in the opposite direction until you reach your starting corner or edge.
6. Repeat these procedures until you have textured the entire surface or are nearing an opposing vertical surface.
7. If you are approaching an opposing vertical surface, stop approximately 6 feet from the surface, turn around and repeat steps 3, 4
and 5.