Householder Information
IMPORTANT!
Your boiler must be commissioned in order to:
- Validate your warranty
- Ensure the boiler has been installed correctly and avoid premature failure
- Set the boiler to its optimum efficiency. Operating conditions for the boiler will vary from site to site, your
commissioning engineer has specialised equipment to check the oil pressure and analyse the exhaust gases for
temperature, smoke and carbon dioxide content.
Your installer will organise the commissioning of your boiler. Should you experience any difficulty locating an
engineer, our service department may be able to provide you with details of an engineer in your area.
“Benchmark” Installation, Commissioning and Service Record Log Book
Please ensure that your installer has completed all sections of the log book (found at the back of this manual).
The log book will be required in the event of any warranty work. Ensure that the service record is completed.
Warranty
Your HRM boiler is under warranty for 2 years from the date of installation.
Warranty Conditions
- The boiler must be installed and commissioned in accordance with our handbook
- The boiler must not be repaired, modified or tampered with by any person not authorised by HRM
Extended Warranty
The “Benchmark” and warranty registration document at the end of this manual should be completed as
appropriate by your installer / engineer. This is your record that the boiler has been correctly installed in accordance
with our recommendations. Return the warranty registration document to HRM in order to qualify for a further 3 year
warranty of the heat exchanger – a total of 5 years.
Extended Warranty Conditions
- The boiler must be serviced annually and maintained in accordance with this handbook. The
“Benchmark” service log is located at the back of this manual
- This warranty is in addition to your statutory and other legal rights
After Sales Service
- If your boiler fails during the warranty period contact your installer, who will be able to identify the
cause of the problem. If appropriate, your installer will contact us.
- Under no circumstances should “in warranty” work be undertaken without authorisation from the HRM
service department
- If you are unable to contact your installer please contact our service department. Quoting your boiler’s
serial number when phoning – this can be found on the cover of this manual.
Standard X-ternal & System X-ternal
Handbook
Contents Page
DESCRIPTION PAGE
Householder Information
Warranty Registration Document End Of Manual
Warranty 3
Extended Warranty 3
After Sales Service 3
Boiler Controls: Wallstar 4
System Wallstar 5
Wallstar Combi 6-7
Burner Lockout 8
Technical Specifications
Boiler Dimensions: Wallstar 9
Boiler Dimensions: System Wallstar 10
Boiler Dimensions: Wallstar Combi 11
Technical Specifications 12
Burner Settings 13
Boiler Installation
Regulations 14
Boiler Sizing 14
Refurbishing An Old System 14
System Protection 14
Boiler Location 15
Wall Construction 15
Flue Terminating Positions 16
Fuel Supply System 17
Oil Supply 17
Installation Procedure
Wallstar 18-23
System Wallstar 24-31
Wallstar Combi 32-40
Condensate Drain 41
Wiring Diagrams
Wallstar 42
System Wallstar 42
Wallstar Combi 43
Boiler Maintenance
Baffle Removal 44
Fault Diagnosis
Wallstar Combi 45
Wallstar Combi Components 46
Contacts
Tel No: 01953 455400
Fax No: 01953 454483
Email: info@hrmboilers.co.uk or technical@hrmboilers.co.uk
1
Standard Wallstar, System Wallstar &
Wallstar Combi Manual
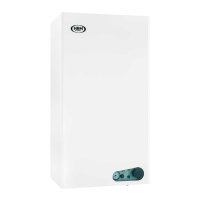
Installation Procedure Continued – Wallstar Combi
16. Pump Connection
Connect the 3 pin socket coming from the control panel to the
corresponding lead attached to the pump.
17. Micro Switch Connection
Connect the 6 pin socket coming from the control panel to
the corresponding lead attached to the micro switch.
18. Thermostats
Uncoil the three thermostat capillaries marked A, B and C and
place the phials into the appropriate pockets as shown.
Thermostats A and C must be routed up the side of the heat
exchanger in order to reach their corresponding pockets.
IMPORTANT: Part L1 of the Building Regulations requires
the installation of a room thermostat.
19. Installation Of A Room Thermostat
To install the room thermostat, connect it to terminals 5A
and 6A and discard the link wire.
36
Standard Wallstar, System Wallstar &
Wallstar Combi Manual
Installation Procedure Continued – Wallstar Combi
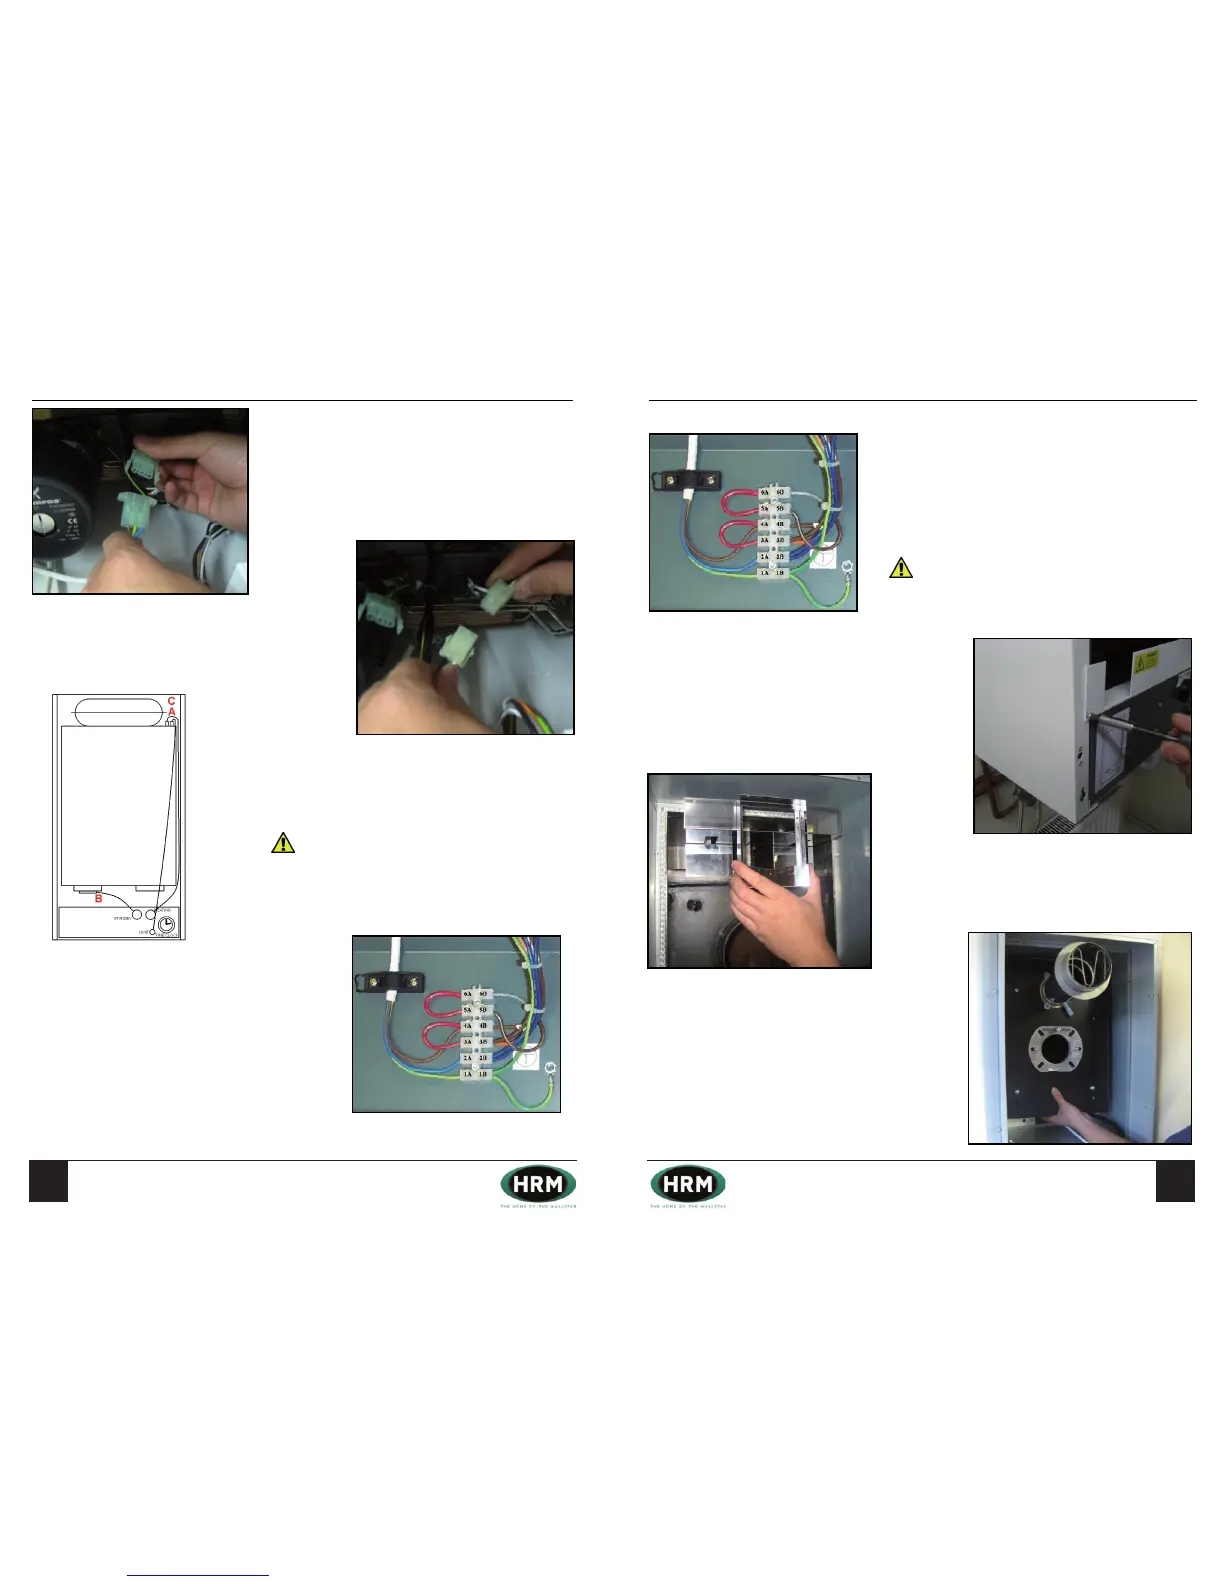
20. Installation Of A Programmable
Room Thermostat or Time Clock
Connect a remote programmable room thermostat or time clock
to terminals 5A and 6A, discard the link wire. The integral time
clock should be switched to ‘On’ (Position 1, see page 7).
The integral time clock can be used to time the domestic hot
water function. To achieve this, move the link wire from terminal
3A to terminal 5A and move the wire from terminal 5B to terminal
3A.
IMPORTANT: If the domestic hot water function is to be
timed, a frost protection thermostat must be fitted.
Note: The heating system will not function when the domestic hot
water function is timed to be off.
21. Secure Control Panel
Pivot the control panel into its upright position and secure it
to the side panels using the two screws provided.
22. Top Baffles
Firstly place the two separate top baffle boxes into the flue
chamber and then slide the single piece of the baffle on top of
these.
23. Silencer Box
Slide the silencer box over the 4 mounting pins located on
the heat exchanger.
37
Standard Wallstar, System Wallstar &
Wallstar Combi Manual
 Loading...