Householder Information
IMPORTANT!
Your boiler must be commissioned in order to:
- Validate your warranty
- Ensure the boiler has been installed correctly and avoid premature failure
- Set the boiler to its optimum efficiency. Operating conditions for the boiler will vary from site to site, your
commissioning engineer has specialised equipment to check the oil pressure and analyse the exhaust gases for
temperature, smoke and carbon dioxide content.
Your installer will organise the commissioning of your boiler. Should you experience any difficulty locating an
engineer, our service department may be able to provide you with details of an engineer in your area.
“Benchmark” Installation, Commissioning and Service Record Log Book
Please ensure that your installer has completed all sections of the log book (found at the back of this manual).
The log book will be required in the event of any warranty work. Ensure that the service record is completed.
Warranty
Your HRM boiler is under warranty for 2 years from the date of installation.
Warranty Conditions
- The boiler must be installed and commissioned in accordance with our handbook
- The boiler must not be repaired, modified or tampered with by any person not authorised by HRM
Extended Warranty
The “Benchmark” and warranty registration document at the end of this manual should be completed as
appropriate by your installer / engineer. This is your record that the boiler has been correctly installed in accordance
with our recommendations. Return the warranty registration document to HRM in order to qualify for a further 3 year
warranty of the heat exchanger – a total of 5 years.
Extended Warranty Conditions
- The boiler must be serviced annually and maintained in accordance with this handbook. The
“Benchmark” service log is located at the back of this manual
- This warranty is in addition to your statutory and other legal rights
After Sales Service
- If your boiler fails during the warranty period contact your installer, who will be able to identify the
cause of the problem. If appropriate, your installer will contact us.
- Under no circumstances should “in warranty” work be undertaken without authorisation from the HRM
service department
- If you are unable to contact your installer please contact our service department. Quoting your boiler’s
serial number when phoning – this can be found on the cover of this manual.
Standard X-ternal & System X-ternal
Handbook
Contents Page
DESCRIPTION PAGE
Householder Information
Warranty Registration Document End Of Manual
Warranty 3
Extended Warranty 3
After Sales Service 3
Boiler Controls: Wallstar 4
System Wallstar 5
Wallstar Combi 6-7
Burner Lockout 8
Technical Specifications
Boiler Dimensions: Wallstar 9
Boiler Dimensions: System Wallstar 10
Boiler Dimensions: Wallstar Combi 11
Technical Specifications 12
Burner Settings 13
Boiler Installation
Regulations 14
Boiler Sizing 14
Refurbishing An Old System 14
System Protection 14
Boiler Location 15
Wall Construction 15
Flue Terminating Positions 16
Fuel Supply System 17
Oil Supply 17
Installation Procedure
Wallstar 18-23
System Wallstar 24-31
Wallstar Combi 32-40
Condensate Drain 41
Wiring Diagrams
Wallstar 42
System Wallstar 42
Wallstar Combi 43
Boiler Maintenance
Baffle Removal 44
Fault Diagnosis
Wallstar Combi 45
Wallstar Combi Components 46
Contacts
Tel No: 01953 455400
Fax No: 01953 454483
Email: info@hrmboilers.co.uk or technical@hrmboilers.co.uk
1
Standard Wallstar, System Wallstar &
Wallstar Combi Manual
Boiler Maintenance
Servicing
The boiler should be serviced annually. Should you experience any difficulty in locating an engineer, our service
department may be able to provide you with the contact details of an engineer in your area.
IMPORTANT: Isolate the power supply before servicing the boiler.
Servicing Steps
1. Remove the burner and combustion chamber baffles/insulation, clean the internal heat exchanger surfaces and
components. Replace the combustion chamber baffles and insulation with new items.
2. Check and replace seals, gaskets and flexible oil lines as appropriate.
3. Clean or replace filter elements and de-sludge the oil tank.
4. Dismantle the burner assembly and clean. Fit a new nozzle. For instructions on how to carry this out please read
the separate burner instructions supplied with your boiler.
5. Check the oil pressure and flue gas analysis. Adjust the burner settings as appropriate.
IMPORTANT: Do not use a wire brush to clean flue ways.
Baffle Replacement
(
Priming the Burner
Ensure both power and fuel supplies to the boiler are switched on. Press the reset button. The burner will start it’s
firing sequence. To release air from the oil line slacken the vent plug during this sequence. If ignition fails the burner
will go to lock out. Wait 60 seconds and repeat the procedure.
44
Standard Wallstar, System Wallstar &
Wallstar Combi Manual
Wallstar Combi Fault Diagnosis
No heating or domestic hot water (DHW)
- If the heating and DHW works when the test switch is in the “test” position, check the plug and socket
connection from the micro switch.
- Is the circulation pump working?
Cold DHW, heating functions satisfactorily
- Pipe work for the “mains in” and DHW have been connected the wrong way round.
Warm DHW, heating functions satisfactorily
- Is the system pressure set to one bar (when cold)?
- Is the black plastic plug in the automatic air vent open?
- Is there a combustion problem/faulty nozzle?
- Is the mains water temperature low? The boiler will raise the mains water temperature by 35
°C at a
flow rate of 10.5 litres per minute.
- Check the operation of the mixing valve – is the “hot water” (right hand) inlet to the valve excessively
hot indicating that water is not flowing through the valve?
- If the “hot water” inlet to the mixing valve is cool, the plate heat exchanger may be
blocked/contaminated.
No heating, DHW functions satisfactorily
- Has the plunger on diverter valve stuck in the out position? Press the plunger a few times to free, or
dismantle the diverter valve assembly and clean.
DHW flow is less than 10.5 litres
- Is the mains water pressure sufficient? It should be greater than 1.5bar or 15 litres per minute.
- Is the mains water filter blocked?
Heating runs constantly
- Has the switch under the burner been left in the test position?
- Has the heating time clock been left in the permanently “on” position?
The boiler overheat thermostat needs resetting frequently
- Has the boiler lost system pressure?
System pressure is low
- Recharge system pressure by opening the filling loop valve and increasing pressure to the jet point
indicator on the pressure gauge (approximately 1 bar).
45
Standard Wallstar, System Wallstar &
Wallstar Combi Manual
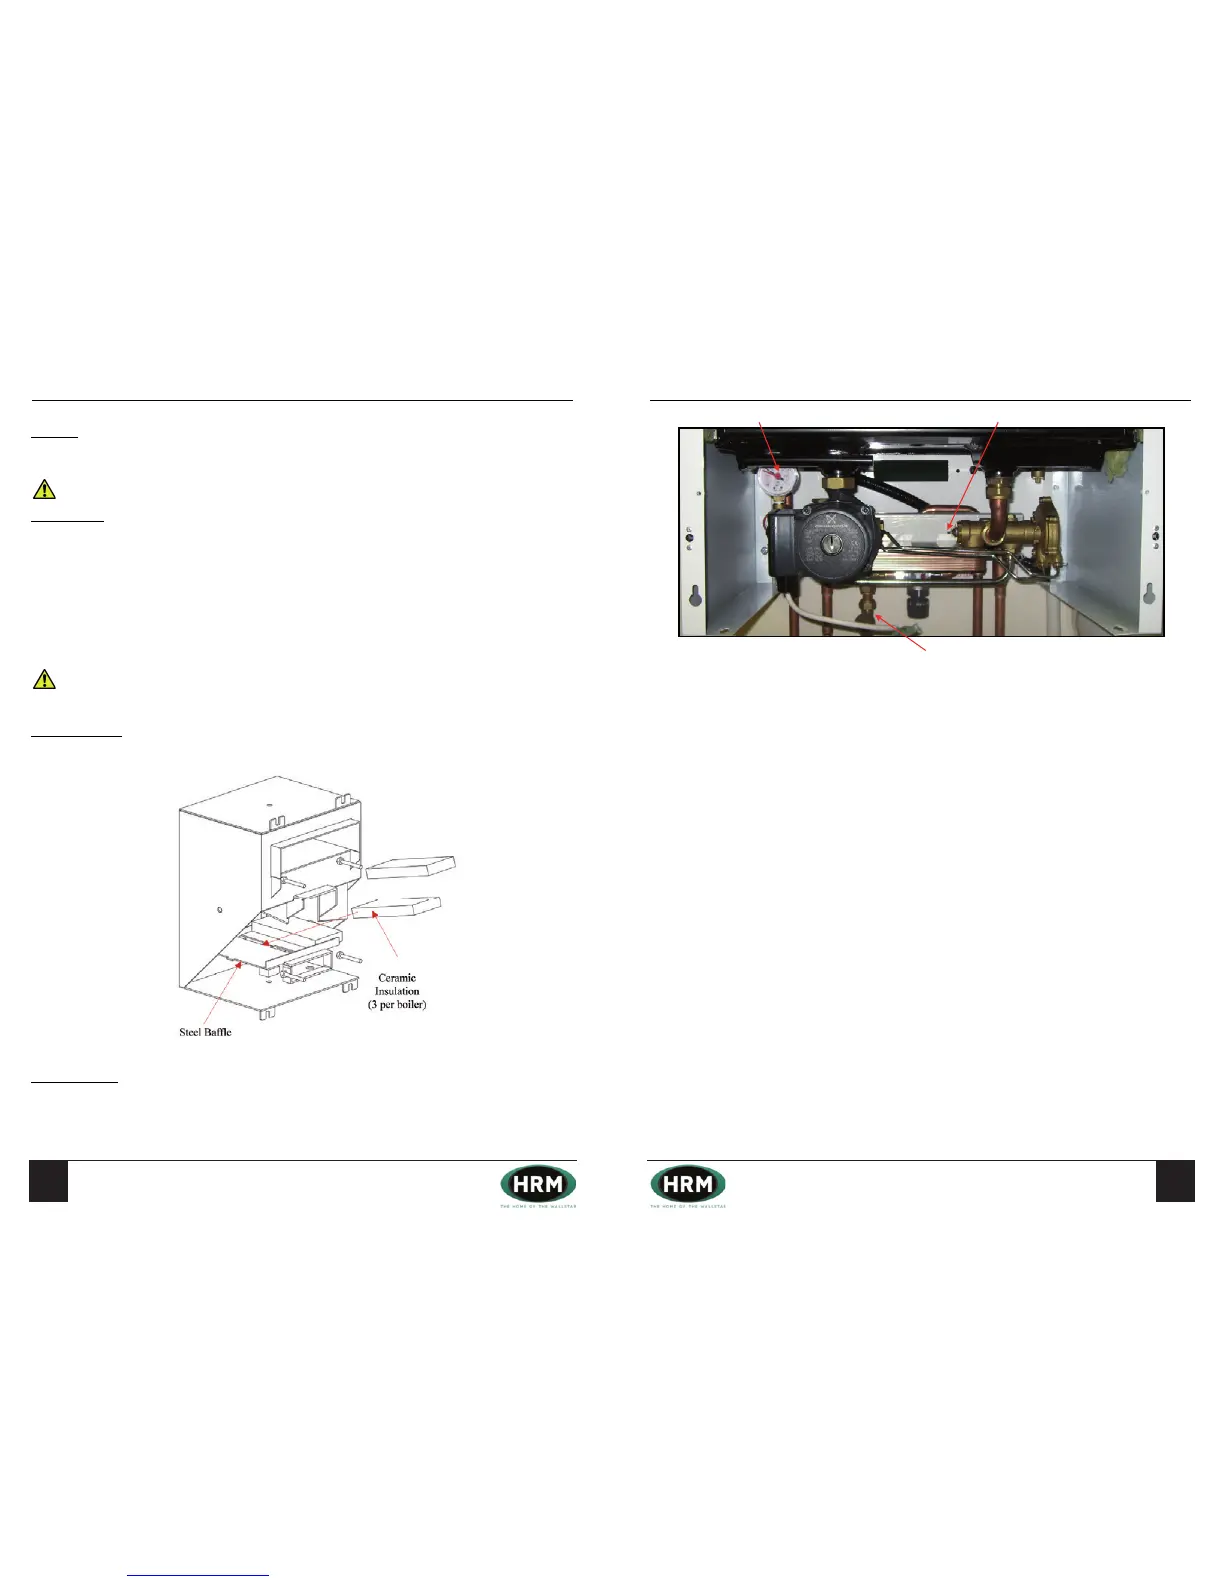
Mains Filter
Pressure Gauge Diverter Valve Plunger
Ensure both power and fuel supplies to the boiler are switched on. Press the reset button. The burner will start it’s
ring sequence. To release air from the oil line remove the vent plug during this sequence.
 Loading...