INSTALLATION
INSTRUCTIONS
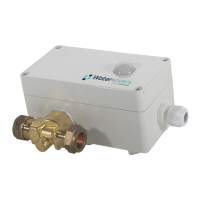
Autosave M01 240v Mains operated
Urinal Flush Control with built-in
Infrared PIR Sensor
PLUMBING EMPTY CISTERN then turn off water supply to cistern. Remove any existing trickle cock or restrictor from
supply pipe. Locate unit on supply pipe in suitable position for detection by PIR lens. Fit the Autosave valve into urinal
supply pipe using compression fittings. Ensure water supply is connected to valve inlet (marked IN on underside).
Valve may be rotated through 180 degrees if required. Fit isolating valve (supplied) on inlet side of Autosave valve, leave in
fully open position. Fix unit to wall using screws and plugs provided, fit plastic caps over screws.
COMMISSIONING Turn on water supply to Autosave. Turn on electricity supply to Autosave.
LED behind lens will flash twice, Autosave is now in SETUP mode.
After approx 30 seconds settling time, LED will flash each time it detects movement within it's range in the toilet area.
POWER INTERRUPTIONS When power is restored after an interruption, the Autosave will always start with a
fill and flush cycle. TIP turn power off then on again to check fill and flush operation.
TO RESET AUTOSAVE Turn off power for a few seconds, turn power on again, valve opens.
Press & hold down blue FILL button, release when valve closes. Autosave is now in setup mode again.
please read carefully
FOR TECHNICAL SUPPORT
Earl Road Rackheath Industrial Estate
Norwich NR13 6NT
Watersavers
TM
Tel 01603 720999 Fax 01603 721499
email technical@watersavers.co.uk
website www.watersavers.co.uk
M01a Rev 1.1
Press and release blue FILL button inside lid, valve opens after a few seconds, LED flashes continuously while cistern fills.
When cistern starts to flush (normally takes around 5 to 10 minutes according to supply pressure) press and release blue
FILL button again. Valve closes immediately and setup is complete. TIP to abort 'setting cistern fill time', turn off electricity
while the cistern is filling.
SETTING CISTERN FILL TIME IT IS IMPORTANT THAT THE CISTERN IS EMPTY BEFORE PROCEEDING!
(See simple step by step guide overleaf)
SETTING FLUSH PROGRAMME
Once the cistern fill time has
been set as above, select flushing interval and hygiene flush times on the
blue dipswitch according to the table opposite. The default (factory) settings
are 20 minute flush interval and 24 hour hygiene flush as shown below.
FLUSH INTERVAL is the time delay between detecting someone entering the
toilet area and the flushing cycle that follows.
HYGIENE FLUSH is a flush cycle following a period of either 12 or 24 hours
of non-detection.
5 Mins
10 Mins
15 Mins
20 Mins
25 Mins
30 Mins
35 Mins
X
X
X
X
X
X
X
UP DWN DWN
DWN UP DWN
UP UP DWN
DWN DWN UP
UP DWN UP
DWN UP UP
UP UP UP
X = not applicable
X DWN DWN DWNTEST
(5 secs)
SW1 SW2 SW3 SW4TIME
12 Hour
24 Hour
UP X X X
DWN X X X
FLUSH INTERVAL
HYGIENE FLUSH
1234
ON
20MINS
12-24HRS
5MINS
10MINS
(HYGIENE)
MAGI-TEST Using magnetic
test wand, just touch square above
lens as shown here
Autosave will do an immediate fill
and flush cycle, LED will confirm
detection.
Or touch again with wand to abort
fill cycle and close valve.
This will test 240v supply, sensor, valve, water
supply and correct cistern fill time.
ELECTRICAL Fit cable gland (supplied) into Autosave enclosure. Connect L,N & E terminals of Autosave using 0.75mm
or 1mm 3 core cable to a convenient 240v supply, with a 3 amp fuse (in a spur box) or a 5 amp fuse (in a consumer unit).
Observe current and local wiring regulations. The Autosave MUST be earthed. Internal fuse is 250mA 20 x 5mm.