3
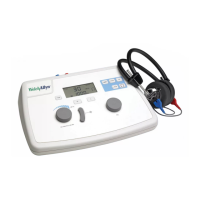
1.3.1 The Front Panel Controls and Indicators (Figure 1-1)
F1 Power switch and indicator for ON and OFF
F2 Range extension push-button allows operator to increase the
stimulus intensity 10 dB above the standard maximum HL at
any frequency. When in use, a “+” appears on the LCD.
F3 HL control for setting stimulus intensity level. Level is indicated
on LCD.
F4 Present bar for stimulus presentation.
F5 Stimulus being presented via earphone. Presentation indicated
by illuminated green LED.
F6 Subject response indicator shows the operator when the test
subject has pressed the handswitch button by an illuminated
green LED (with optional handswitch only).
F7 Control for setting stimulus frequency. Frequency is indicated
in window adjacent to control.
F8 Routing switch for stimulus presentation to the earphone. Left
or right indicated by illustration of subject.
F9 Switch for setting the stimulus tone type.
FM = warble tone
= steady tone
= pulsed tone
F10 Low battery indicator to alert the operator of a limited oper-
ating time. Recharge or replace batteries (dependent on
whether NiCad or Alkaline batteries are used).
1.3.2 Rear Panel Connectors and Indicators (Figure 1-1)
R1 Power input jack (5-pin DIN Connector) with front panel illus-
tration showing its location and a rear panel label giving the
input power specifications.
R2 Earphone output jacks (standard phone jacks). Front panel
illustration shows left and right phone.
R3 Response handswitch input jack (standard phone jack) with
front panel illustration showing location.
1.3.3 Symbols
Attention, consult accompanying document for instructions or
warnings pertaining to these parts.
Entry by qualified service personnel only.
This symbol is located inside the storage compartment.
It denotes a Type B, Class II product per IEC 878 as refer-
enced in IEC 601 Standard.
 Loading...