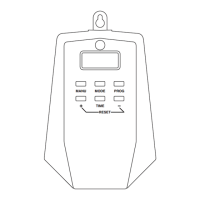
2-Outlet Mechanical Timer
2 grounded outlets and plug
Can be set in 30 minute intervals
Program repeats daily
Slide pin construction prevents lost pins
Manual override switch
Perfect for controlling holiday decorations & christmas lighting
Convenient, easy to use and energy saving
INSTRUCTIONS:
Locate an electrical outlet that is close to the device you want to control.
Put the “ON/TIMER” switch located adjacent to the dial to the “TIMER”
position and plug the timer into the outlet.
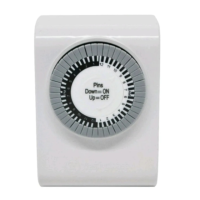
Set the current time - turning clockwise, align the Arrowhead (See diagram)
on the dial of the timer to the present time (lines above the numbers are
in increments of 30 minutes). There is no need to touch the pins to set the
current time.
NOTE: Dial is based on AM/PM.
Determine your desired start time and push down all pins until desired
OFF time. The timer pins are factory preset in the “pushed down” or “ON”
position. Pull up all of the pins before pushing down pins for your desired
“ON” time.
NOTE: The “pins” are grey slices around the dial. For example: to turn the
timer ON at 5pm and OFF at 10pm, push down all the pins between 5pm and
10pm.
Plug your electrical device directly into the timer. The electrical device must
be set to “ON” position for the timer control to work properly.
The “ON/TIMER” switch on the timer must be set to the TIMER position for
the timer function to work.
You may override operation of the timer by setting the “ON/TIMER” switch
(located adjacent to the dial) to ON (top position). Be sure to set switch back to
the TIMER (bottom position) for proper timer function
In case of power failure, reset the time of day as indicated in steps 3 above.
LIMITATIONS OF TIMING DEVICES:
Timing devices require power to function properly. If AC power to the timer is cut
off, a light or other device plugged into the timer will not work.
NOTES:
The unit you are plugging into the timer has to be ON.
Make sure AM and PM are correct on the current time and in the program
settings.
Specifi cations:
125VAC/60Hz/8A/1000W Resistive
8A/1000W Tungsten (Incandescent)
500VA Electronic Ballast
1/2HP Motor Load
6in AWG 18/3 SJTW Vinyl Cord
WARNING:
When used outdoors this timer must be plugged into a GFCI protected outlet
to provent shock hazard. Let the switch hang downward so moisture doesn’t
accumulate in the outlet. Install cord and unit above ground level with the
receptacle pointed downward a minimum of 5ft (1.5m) above ground. Suitable
for damp locations. Not for water immersion or for use where directly exposed to
water. Store indoors when not in use.
CAUTION:
• Do not plug this timer into an extension cord or other electrical adapter.
Plug directly into an electrical outlet.
• Do not connect this timer to appliances that contain heating elements
(cooking appliances, heaters, irons, etc.) Failure of the timer to shut off such
devices may lead to overheating and a potential fi re.
• Do not plug in this timer if it is wet.
• Do not clean this timer when it is plugged in.
• Do not exceed the maximum ratings of the timer.
• Potential shock hazard: Keep out of reach of children.
and WESTINGHOUSE are trademarks of Westinghouse Electric Corporation. Used under license. All rights reserved.
Manufactured and distributed by: The NCC, Brooklyn, NY 11220 • www.thencc.com • © 2014 The NCC Made in China
SAVE THESE INSTRUCTIONS!
Customer Service Assistance: Toll Free 1-855-350-6868
Hours of Operation – 10AM to 6PM, EST, Monday - Friday
Item #T26433
Timer pins are factory preset in the “pushed down” (‘ON’)
position. Pull pins up for timers ‘OFF’ intervals.
Pins Down = ON Light/Device
Pins Up = OFF Light/Device
1
2
1
1
1
0
9
8
7
6
5
4
3
2
1
1
9
3
1
2
1
1
1
0
8
7
6
5
4
2
Pins
Down=ON
Up=OFF
ON
TIMER
ARROWHEAD