TECH SHEET - DO NOT DISCARD PAGE 4
FOR SERVICE TECHNICIAN'S USE ONLY PART NO. 3979119
a. If there is continuity to Ground for
Yellow/Red (Y/R) wire with no
load, look for a short in the Sen
-
sor or Y/R wire. Verify harness
connections both at the Sensor
and the Even Heat control.
b. If the Sensor and Y/R wire are
good, replace the Even Heat
Control Assembly.
2. If Factory Test is passed, verify
thermistor by performing test proce-
dures outlined in “Thermistor Test”.
3. If problem persists after replacing
Moisture Sensor and thermistor,
replace the Even Heat Control
Assembly.
PROBLEM: Timer
Continuously Advances
(Refer to Timer Drawing, page 5,
and Motor Strip Circuit, page 6)
If the dryer continues to advance past
the OFF position, check the following:
– HARNESS/CONNECTION
– TIMER
IMPORTANT: Electrostatic (static
electricity) discharge may cause
damage to electronic control assem
-
blies. See page 1 for details.
Procedure:
1. Verify the Blue wire and the Black L1
wires are in the correct positions:
The Black wire goes next to the Red
wire, and the Blue wire is located on
the three terminals that are close to
each other.
2. Test the Timer by following the proce
-
dure outlined in “Factory Test”, be
-
ginning on page 1.
3. If the Timer continues to advance
past OFF, then replace the Timer.
COMPONENT
PART NUMBER
MODEL NO.
72972
72982
72992
(White)
MODEL NO.
72974
72994
(Bisque)
MODEL NO.
72996
(Graphite)
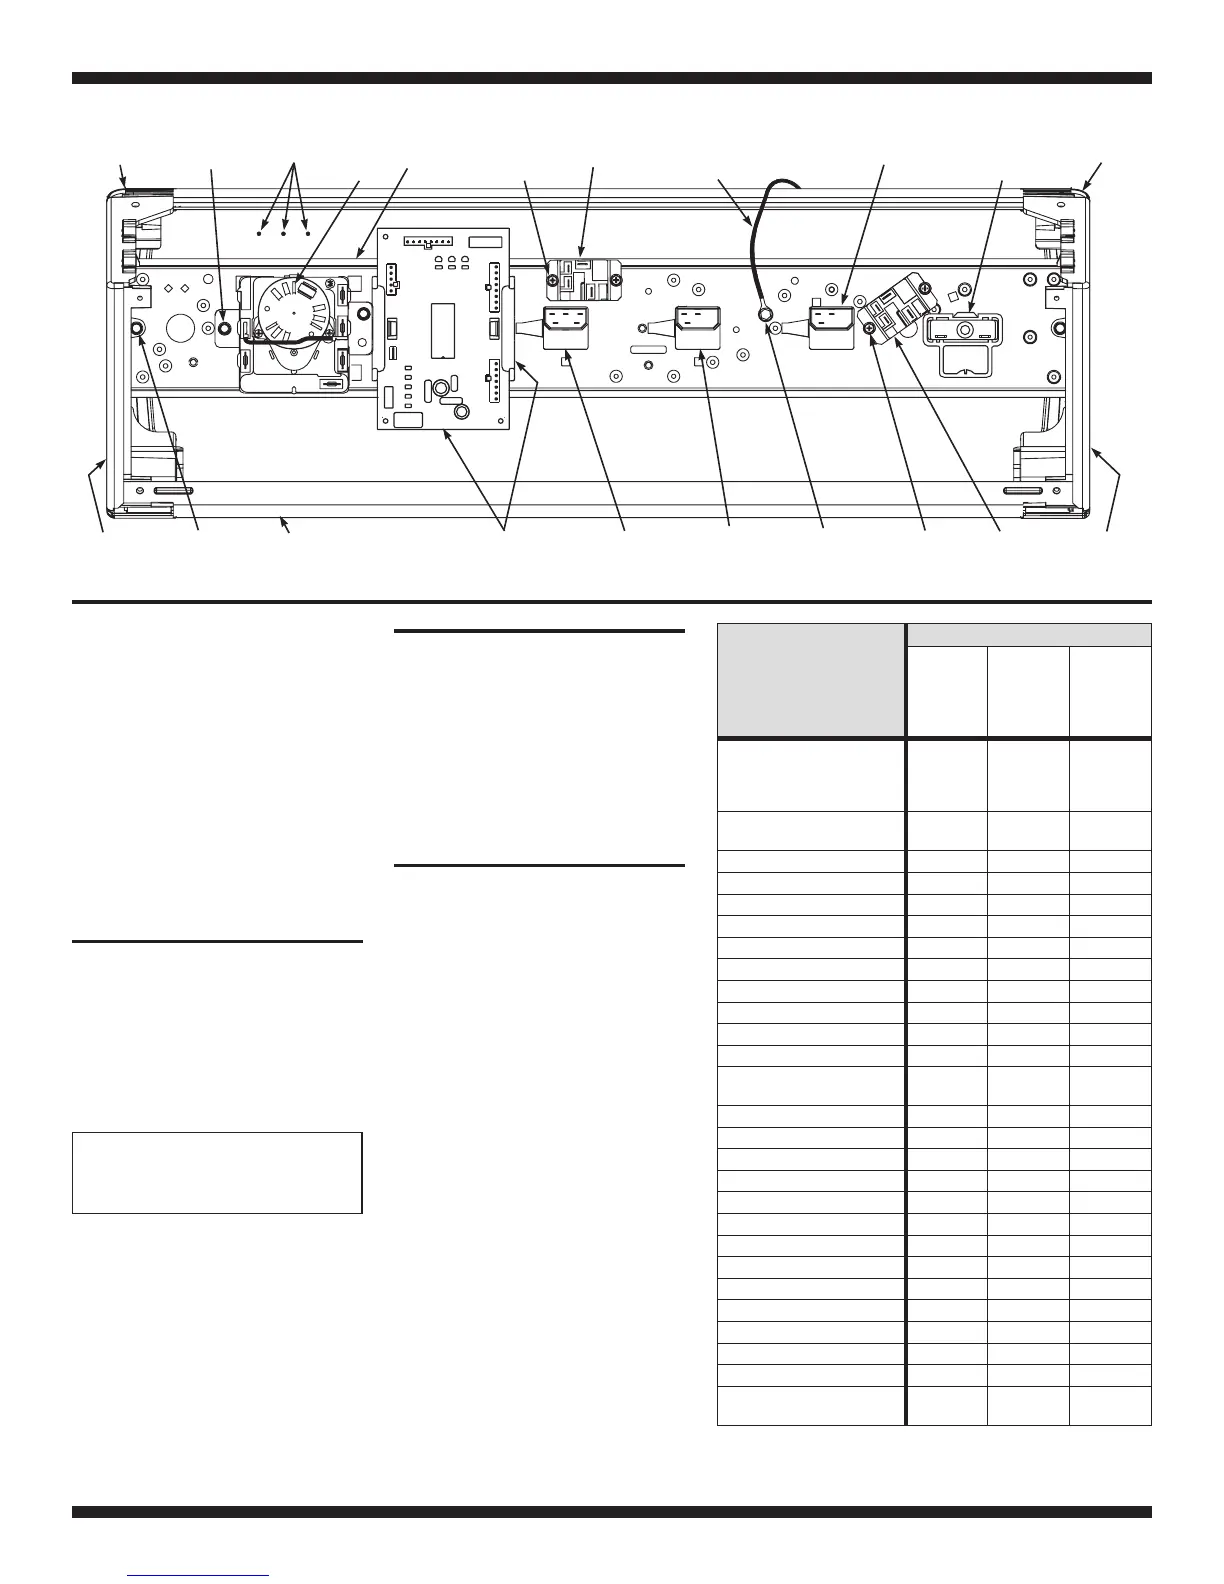
Console Panel
for White Models: 72972
72982
72992
8528013
8528014
8528015
–
–
–
–
–
–
for Bisque Models: 72974
72994
–
–
3979177
8528016
–
–
For Graphite Model: 72996
– – 3979156
End Cap - R. H. 3949274 3949278 3949277
End Cap Trim - R. H. 3951009 3977759 3953667
End Cap - L. H. 3949280 3949284 3949283
End Cap Trim - L. H. 3951013 3977760 3953668
P.T.S. Switch 3977456 3977456 3977456
P.T.S. Knob * 3402570 3402569 3402567
Control Knob * 3402576 (3) 3402575 (3) 3402573 (3)
Signal Switch 3405151 3405151 3405151
Wrinkle Guard Switch 3405152 3405152 3405152
Fabric Care/Temperature
Switch
3399643 3399643 3399643
Motor Relay 3405281 3405281 3405281
Heater Relay 3405281 3405281
3405281
Even Heat Control Assembly 3976627 3976627 3976627
Timer Knob and Skirt * 3402598 3402597 3402595
Console Harness * 3976590 3976590 3976590
Main Harness * 8299935 8299935 8299935
Door Switch * 3392266 3392266 3392266
Thermal Fuse * 3390719 3390719 3390719
Gas Burner Assembly * 8318276 8318276 8318276
High Limit Thermostat * 3390291 3390291 3390291
Drive Motor * 3395654 3395654 3395654
Thermistor - NTC 10K Ohms * 3976615 3976615 3976615
Timer 3976585 3976585 3976585
Moisture Monitor Light
Assembly *
3976610 3976610 3976610
* not shown
3390646
Ground Screw
Console
Panel
3388228 (2)
Motor Relay
Screws
R.H.
End Cap
Tr im
R.H.
End Cap
3390646 (2)
End Cap
Screws
Push To Start
(PTS)
Switch
Signal
Switch
Fabric Care/
Temp Switch
3388228 (2)
Heater Relay
Screws
Heater
Relay
Even Heat
Control Asm
(Includes 2 Retainers)
Timer
L.H.
End Cap
Tr im
L.H.
End Cap
3390646 (2)
Timer Screws
Control Bracket
Ground Wire
in Main Harness
Motor
Relay
Control
Bracket
Moisture
Monitor
BB
B
R
UK
K
W
V
NC
NO
COM
Wrinkle
Guard
Switch
Component Location
Moisture Monitor Lights
The Moisture Monitor Lights give an indi
-
cation of which stage the dryer is in.
To test the lights, begin the factory test
procedure described on page 1. In fac-
tory test mode, touching or removing a
moist towel or finger on the moisture
strips will cause the lights to single step
through each stage (Wet
→Damp→
Cool Down→Off→Wet, etc.).
PROBLEMS:
A Moisture Monitor Light
Does Not Come On
1. If a light does not come on, then
check the terminals in the PS-04 con
-
nector on the Even Heat control.
2. Replace the Moisture Light assembly
(3976610)
3. Replace the Even Heat control
assembly.
A Moisture Monitor Light
Stays On All the Time
1. Check the terminals in the PS-04
connector on the Even Heat control.
2. Replace the Even Heat control
assembly.
All the Moisture Monitor
Lights Stay On or Off
1. Check the terminals in the PS-04
connector on the Even Heat control.
2. Replace the Even Heat control
assembly.
 Loading...