Do you have a question about the Whirlpool ARC 4020 and is the answer not in the manual?
Steps to activate the refrigerator compartment and its internal light.
General guidance for operating the refrigerator compartment.
How to set the desired temperature using the thermostat knob.
Explanation of the thermostat knob for temperature control.
How to manage humidity for fruit and vegetables.
Details on the control panel for adjusting freezer temperature and functions.
Explanation of the electronic system, alarms, and auto-check function.
Step-by-step guide for freezing fresh food and using fast freeze.
Instructions on how to make ice cubes using trays or Twist-Ice.
Instructions for maintaining the appliance during extended periods of non-use.
Guidelines for connecting the appliance to the electrical supply safely.
Instructions for replacing the fuse in the appliance's plug.
Advice on plug compatibility and when to seek professional help.
Specific electrical connection information for Ireland.
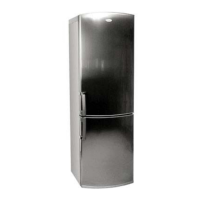
This document provides instructions for the use, maintenance, and installation of a combined ventilated, no-frost fridge-freezer designed for domestic use. The appliance features separate refrigerator and freezer compartments, both ventilated to prevent ice or frost formation on the walls. This is achieved through a system where cold air is produced by an evaporator and distributed by a fan. Air circulating in the compartments is reabsorbed by the evaporator, which retains humidity, preventing frost and eliminating the need for manual defrosting. The absorbed humidity is transformed into water, which is automatically routed to a container on the compressor, where it evaporates. This ventilated refrigeration system aims to ensure optimal food storage and preserve food characteristics longer.
Before using the refrigerator, it is important to read the user handbook thoroughly for a complete description of the appliance and useful food storage tips. After unpacking, check for any damage and ensure the doors close properly. Any damage should be reported to the dealer within 24 hours. It is recommended to wait at least two hours after delivery before switching on the appliance to allow the refrigerant circuit to settle and operate efficiently. Installation and electrical connections must be performed by a qualified electrician, adhering to manufacturer's instructions and local regulations.
The appliance's packaging materials are entirely recyclable and marked with the recycling symbol. Users should follow local regulations for scrapping and keep packaging materials out of reach of children due to potential hazards. The appliance itself is made from recyclable materials, and its disposal should comply with local environmental regulations for waste disposal. To render the appliance unusable before disposal, the power cord should be cut, and the appliance delivered to an authorized collection center for refrigerant gas recovery. This appliance does not contain CFCs (replaced with R134a) or HFCs (replaced with R600a-Isobutane). Further information can be found on the identification data plate.
The refrigerator compartment is intended for storing fresh food and beverages, while the freezer compartment is for storing frozen food, freezing fresh food, and making ice cubes. It is crucial not to cover or obstruct the air vents. Liquids in glass containers should not be stored in the freezer compartment to avoid bursting. Ice cubes or lollies should not be consumed immediately after removal from the freezer to prevent "cold" burns. Children should not be allowed to play or hide inside the appliance to prevent entrapment and suffocation. The contents of ice packs (if provided) are non-toxic but should not be ingested. Before servicing or cleaning, the appliance must be unplugged from the mains or disconnected from the electrical power supply. The power cable should only be replaced by an authorized person. After installation, ensure the refrigerator is not standing on the power supply cable. This appliance is designed to come into contact with foodstuffs and complies with relevant European Directives. Appliances using Isobutane (R600a) require caution as isobutane is flammable, and it is essential to ensure that refrigerant pipelines are not damaged.
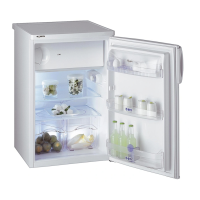
The refrigerator compartment is designed for storing fresh food and beverages. Defrosting is completely automatic. The refrigerator operates optimally at ambient temperatures between +18°C and +43°C, though it can function between +16°C and +43°C. To switch on the appliance, simply plug it in; it will switch on automatically. The inside light illuminates when the door is opened. Temperature adjustment for both refrigerator and freezer compartments is separate. The refrigerator thermostat knob controls the temperature in the refrigerator compartment.
Some foods, like fruits and vegetables, lose moisture in cold, dry conditions. The crisper drawer maintains the right temperature and moisture level for these items. A control device allows adjustment of the airflow inside the crisper drawer. It is recommended to keep the control device closed when storing vegetables and open when storing fruit.
To preserve vitamins, aroma, substance, and freshness, food should be wrapped in aluminum foil, cling film, or placed in special freezer containers with lids to prevent odor mixing. The refrigerator includes an anti-odor system with a filter located in the cool air duct. Thanks to the "MULTI-FLOW" ventilated system, the internal temperature is uniform, allowing food to be arranged on any shelf. However, care must be taken not to obstruct air vents. Hot food should not be placed in the refrigerator. The anti-odor filter (if provided) helps eliminate strong odors.
This compartment maintains a constant temperature colder than other parts of the refrigerator, making it ideal for storing dairy products longer and chilling drinks more rapidly. It can also be used for cold meats and meat. To remove the extra-cold compartment, first remove all food, pull the drawer out fully, then lift it up and out with both hands. It is not advisable to remove the tilting door from this compartment.
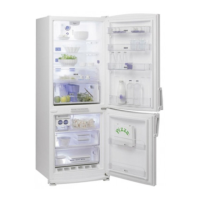
The freezer compartment can be used for freezing fresh and cooked food, making ice cubes, and storing frozen food. The freezer control panel allows temperature adjustment using a button.
This appliance features an electronic control system that constantly monitors its operation. In case of a malfunction, an acoustic alarm will activate, and the LEDs on the control panel will blink. The system also monitors door closure; if a door is open, the acoustic alarm will sound and deactivate when closed. The system also monitors internal temperature; if it increases, an acoustic alarm will sound (do not place hot food in the appliance). To mute the acoustic alarm, press the "Alarm" button. The LEDs will blink until the ideal internal temperature is reached. The auto-check function immediately signals any malfunction, allowing prompt contact with After-sales Service. If LEDs blink, the appliance should not be used for a prolonged period. After approximately two hours, the acoustic alarm will signal the malfunction again; press the "Alarm" button and unplug the appliance until the problem is resolved by After-sales Service.
After switching on, the freezer compartment takes about 3 hours to reach a suitable temperature for frozen food storage. The amount of fresh food that can be frozen in 24 hours at an ambient temperature of +25°C is indicated on the data plate. To freeze fresh food:
Ensure packaging is not damaged. If swollen or damp, the food may have deteriorated or begun defrosting. When shopping, leave frozen food purchases until last and transport them in a thermally insulated cool bag. Place items in the freezer compartment immediately upon returning home. Do not place hot food in the freezer. Wrap foods in aluminum foil or cling film or place them in specific containers. Label all packs with the freezing date and content. If food has defrosted, do not refreeze it; consume within 24 hours. Avoid or reduce temperature variations. Observe the best-before date and storage information on the package.
Bend ice trays slightly to remove cubes. If the appliance has the "Twist-Ice" feature:
Some noises are normal during appliance operation:
Before cleaning, unplug the appliance.
Before contacting After-Sales Service:
The appliance must be disconnectable by unplugging or by a two-pole switch fitted upline of the socket.
If the mains lead has a BS 1363A 13amp fused plug, use an A.S.T.A. approved fuse to BS 1362 type.
If the fitted plug is not suitable for your socket outlet, contact Whirlpool Service for further instruction. Do not attempt to change the plug yourself; this procedure must be carried out by a qualified Whirlpool technician in compliance with safety regulations.
Information for Great Britain often applies. For the 2-pin, side earth type plug, the GREEN AND YELLOW wire must be connected to the EARTH contact, and the other two wires to the two pins, irrespective of color. The socket supply must be fitted with a 16 amp fuse.
| Model | ARC 4020 |
|---|---|
| Category | Refrigerator |
| Appliance placement | Freestanding |
| Compressor Type | Standard |
| Fridge interior light | Yes |
| Defrost System | Manual |
| Door Lock | No |
| Star Rating | 4 |
| Width | 595 mm |