EasyManua.ls Logo

Whirlpool LTE5243DQ8 - User Manual

Whirlpool LTE5243DQ8
16 pages
Print Icon
To Next Page IconTo Next Page
Loading...
24" (69 CM) ELECTRIC WASHER/DRYER
INSTALLATION INSTRUCTIONS
WASHER/DRYER SAFETY
Table of Contents
WASHER/DRYER SAFETY.............................. 1
INSTALLATION INSTRUCTIONS.................... 2
Tools and Parts ............................................. 2
Alternate Parts............................................... 2
Location Requirements ................................ 2
Drain System ................................................. 3
Electrical Requirements ................................ 4
Electrical Connection .................................... 5
Venting Requirements................................. 10
Install Leveling Legs.................................... 11
Remove Foam Packing............................... 11
Connect
Drain Hose.................................... 11
Connect Inlet Hoses.................................... 12
Secure Drain Hose ...................................... 13
Plan Vent System ........................................ 13
Install Vent System...................................... 15
Level Washer/Dryer..................................... 15
Connect Vent............................................... 15
Complete Installation .................................. 15
You can be killed or seriously injured if you don't immediately
You
can be killed or seriously injured if you don't
follow
All safety messages will tell you what the potential hazard is, tell you how to reduce the chance of injury, and tell you what can
happen if the instructions are not followed.
Your safety and the safety of others are very important.
We have provided many important safety messages in this manual and on your appliance. Always read and obey all safety
messages.
This is the safety alert symbol.
This symbol alerts you to potential hazards that can kill or hurt you and others.
All safety messages will follow the safety alert symbol and either the word “DANGER” or “WARNING.”
These words mean:
follow instructions.
instructions.
DANGER
WARNING
W10222387A
Question and Answer IconNeed help?

Do you have a question about the Whirlpool LTE5243DQ8 and is the answer not in the manual?

Summary

WASHER;DRYER SAFETY

Safety Alert Symbols and Words

Explains the safety alert symbol and the DANGER/WARNING words.

Risk of Fire Warning

Details installation risks and requirements to prevent fire.

INSTALLATION INSTRUCTIONS

Electrical Connection and Grounding

Guides on connecting electrical supply and safety grounding.

Installation Hazards and Needs

Highlights explosion hazard and essential installation requirements.

Electrical Connection Procedures

4-Wire Direct Wire Connection

Detailed steps for a 4-wire direct wire electrical connection.

3-Wire Power Supply Cord Connection

Steps for a 3-wire power supply cord electrical connection.

3-Wire Direct Wire Connection

Steps for a 3-wire direct wire electrical connection.

Venting Requirements

Drain Hose Connection

Detailed steps for securely connecting the drain hose.

Drain Hose Connection

Inlet Hose Connection Procedures

Steps for clearing lines and connecting inlet hoses to washer and faucets.

Inlet Hose Connection and Drain Hose Securing

Install Vent System

Appliance Testing and Troubleshooting

Guides on testing washer/dryer and troubleshooting common issues.

Overview

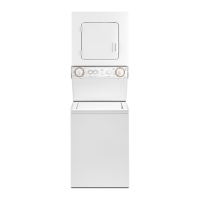
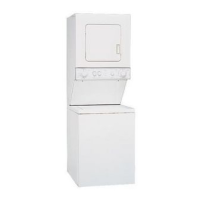
This document provides installation instructions for a 24" (69 cm) electric washer/dryer.

Function Description

This appliance combines the functions of a clothes washer and a clothes dryer in a single unit. The washer section is designed to clean clothes using water and detergent, while the dryer section is designed to remove moisture from clothes using heat and airflow. The unit is intended for residential use and requires proper electrical, drain, and venting connections for safe and efficient operation.

Important Technical Specifications

Dimensions:

  • Overall Height: 71 3/4" (1822 mm)
  • Width: 23 7/8" (606 mm)
  • Depth: 27 1/4" (692 mm)
  • Washer/Dryer Weight (with water and load): 500 lbs (226.8 kg)

Electrical Requirements:

  • Voltage: 120/240 volt or 120/208 volt, 60 Hz, AC only.
  • Circuit: Separate 30-amp circuit, fused on both sides of the line. A time-delay fuse or circuit breaker is recommended.
  • Wiring:
    • 4-wire connection (recommended): Requires a UL listed 30-amp power supply cord (type SRD or SRDT, at least 4 ft (1.22 m) long) with four 10-gauge copper wires and ring or spade terminals, matching a NEMA Type 14-30R receptacle. The ground wire can be green or bare, and the neutral conductor must be white. For direct wire, flexible armored or nonmetallic sheathed copper cable (with ground wire) or 10-gauge solid copper wire (not aluminum), at least 5 ft (1.52 m) long, is required.
    • 3-wire connection (if 4-wire is unavailable): Requires a UL listed 30-amp power supply cord (at least 4 ft (1.22 m) long) with three 10-gauge copper wires and ring or spade terminals, matching a NEMA Type 10-30R receptacle. For direct wire, flexible armored or nonmetallic sheathed copper cable (with ground wire) or 10-gauge solid copper wire (not aluminum), at least 5 ft (1.52 m) long, is required.
  • Grounding: The appliance must be grounded. For cord-connected units, it uses a cord with an equipment-grounding conductor and a grounding plug. For permanently connected units, it must be connected to a grounded metal, permanent wiring system, or an equipment-grounding conductor run with the circuit conductors.

Water Requirements:

  • Water Heater Setting: 120°F (49°C) for the washer.
  • Faucets: Hot and cold water faucets located within 4 ft (1.2 m) of the fill valves.
  • Water Pressure: 5-100 psi (34.5-689.6 kPa).
  • Inlet Hoses: New inlet hoses (not provided) are required. Replace after 5 years of use.

Drain System:

  • Standpipe Drain System (wall or floor): Minimum diameter of 2" (51 mm). Minimum carry-away capacity of 17 gal. (64 L) per minute. Top of standpipe must be 39" (991 mm) to 96" (2.4 m) from the bottom of the washer. A 2" (51 mm) to 1" (25 mm) standpipe adapter kit (Part Number 3363920) may be needed.
  • Laundry Tub Drain System: Minimum 20 gal. (76 L) capacity. Top of laundry tub must be 34" (864 mm) to 96" (2.4 m) from the bottom of the washer.
  • Floor Drain System: Requires a siphon break (minimum 28" (711 mm) from the bottom of the washer), which may be purchased separately. Additional hoses may be needed.
  • Drain Hose: Supplied with the unit. Ensure proper length and secure connection to prevent leaks.

Venting Requirements:

  • Exhaust: MUST BE EXHAUSTED OUTDOORS.
  • Vent Material: Heavy metal vent (4" (102 mm) diameter) and clamps are required. Plastic or metal foil vents are NOT permitted. DURASAFE™ venting products are recommended.
  • Rigid Metal Vent: Recommended for best drying performance, avoids crushing and kinking.
  • Flexible Metal Vent: Acceptable only if accessible for cleaning, fully extended and supported, and not installed in enclosed walls, ceilings, or floors. Total length should not exceed 7 3/4 ft (2.4 m).
  • Elbows: 45° elbows provide better airflow than 90° elbows.
  • Joints: Use clamps to seal all joints. Do not use screws or fastening devices that extend into the interior of the duct.
  • Exhaust Hood: Must cap the vent to keep rodents and insects out. Must be at least 12" (305 mm) from the ground or any obstructions. Angled and box hood styles are acceptable.
  • Vent System Chart: Provides maximum exhaust length based on the number of 90° turns/elbows and hood type (e.g., 0 turns with rigid metal and box/louvered hood: 43 ft (13.1 m); 2 turns with rigid metal and angled hood: 16 ft (4.9 m)). Side exhaust installations add one 90° turn to the chart.
  • Mobile Home Installations: Require metal exhaust system hardware and special provisions for introducing outside air (opening at least twice as large as the dryer exhaust opening). Exhaust vent must be securely fastened to a noncombustible portion of the mobile home structure and not terminate beneath it.

Usage Features

  • Combined Appliance: Offers the convenience of washing and drying clothes in a single unit, saving space.
  • Door Opening: The location must allow for the dryer door to open fully.
  • Cycle Control: Features a Cycle Control knob for selecting wash cycles and a start button for initiating operation.
  • Automatic Sensor Cycles: Designed to operate correctly when the washer/dryer is level.
  • Temperature Operation: Do not operate the washer below 32°F (0°C) or the dryer below 45°F (7°C) to prevent damage or inefficient drying.

Maintenance Features

  • Hose Replacement: Inlet hoses should be replaced after 5 years of use to reduce the risk of failure. Periodically inspect hoses for bulges, kinks, cuts, wear, or leaks.
  • Lint Cleaning: For existing vent systems, clean lint from the entire length of the system and ensure the exhaust hood is not plugged.
  • Leveling: The washer/dryer must be properly leveled to avoid excessive noise and vibration. Front leveling legs are adjustable.
  • Foam Packing: The foam packing ring should be kept for use when transporting the washer/dryer to stabilize the tub.
  • Drum Cleaning: Wipe the dryer drum interior thoroughly with a damp cloth to remove any dust before first use.
  • Troubleshooting: If the dryer does not start, check controls, start button, power supply, fuses/circuit breakers, and the dryer door. If no heat is felt, check both household fuses/circuit breakers.
  • Odor: A new dryer may produce an odor when first heated, which is normal and will dissipate.

Whirlpool LTE5243DQ8 Specifications

General IconGeneral
BrandWhirlpool
ModelLTE5243DQ8
CategoryWasher/Dryer
LanguageEnglish

Related product manuals