MADE IN CHINA
The product hu have just acquired is a Remote Controller compable with Nintendo® Wii™.
It can be used together with the Nunchuk™, Wii™ MoonPlus™, Classic Controller™
and with the wired Nunchaku controller from Ardistel. (Baeries not included).
WARNING: Please retain the instrucons manual in a safe place for future references.
Voltage: 2.2V ~ 3.2V
Current: 30mA
Wide range: 3-6 metres aprox. (up to 7-8 m. on different environments).
Size: 30 x 145 x 35 mm
The Remote Controller has a moon sensor built in compable with the Wii™
sensor bar, at a working distance of 3-6 metres aproximately.
This Remote Controller has also included a vibraon motor and speaker for a
beer & realisc gaming experience, also with baery status.
The Remote Controller works with 2 AA LR6 1.5V type baeries (not included).
To replace them, open the baeries cover in the back side of the Remote
Controller. Do not mix different baeries brands or different types of baeries.
The Remote Controller can be used with any kind of baeries or baery pack
as long as they are high quality brand.
Please, read carefully this manual before first use of the device.
Avoid falling off the controller in hard surfaces.
Keep the Remote Controller away from any kind of liquid.
Avoid high temperatures, direct sun light and moisture or humid places.
If you are not able to connect the Controller, turn it off and on, and then press
the SYNC buon again to sync with the console.
Insert the handstrap in the Remote Controller (included in some packs).
Open the baeries cover and place 2 AA LR6 1.5V type baeries. Inside you can
see the diagram with the correct polarity. Make sure you place them correctly.
Press the red SYNC buon in your Wii™ console.
Then, press the red SYN buon from your Remote Controller. All the blue LEDs will
start flashing during the synchronizaon process.
Once the sync process has finished, the LED will stop flashing and the indicator
remaining sll will indicate the player number (1 to 4). Depending on the number
of controllers connected simultaneously, will remain sll one LED or another.
Place again the baeries cover carefully and you are ready to use it.
TECHNICAL SPECS
SETUP
FUNCTIONS
BATTERIES REPLACEMENT
Wii, WiiMote, Nunchuk, WiiMoon Plus are registered trademarks of Nintendo.
Product pictures are not contractual. Final product may vary.
Product specs valid unless typographic mistake.
This product is not approved, licensed or endorsed by Nintendo.
REMOTE CONTROLLER
WARNINGS
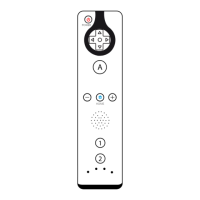
Remote Controller
INSTRUCTIONS MANUAL v2.0
LR6(AA)1.5V X2
Speaker
LED
Indicators
B Buon
Baeries
Cover
SYNC Buon
FABRICADO EN CHINA
El producto que acaba de adquirir es un Mando Remote compable con Nintendo® Wii™.
Puede ser ulizado junto con el Mando Nunchuk™, Wii™ MoonPlus™, Classic Controller™
y con el Mando Nunchaku con cable Ardistel. (Pilas no incluidas).
ATENCIÓN: Conserve el manual en un lugar seguro para consultas posteriores.
Voltaje: 2.2V ~ 3.2V
Corriente: 30mA
Rango de alcance: 3-6 metros aprox. (hasta 7-8 m. dependiendo del entorno).
Dimensiones: 30 x 145 x 35 mm
El Mando Remote ene un sensor compable con la Barra Sensora Wii™, a una
distancia de alcance de unos 3-6 metros aproximadamente.
Este Mando Remote ene integrado motor de vibración y altavoz para una
experiencia de juego más realista, así como estado de las pilas.
El Mando Remote funciona con dos pilas po AA LR6 1.5V (no incluidas).
Para reemplazarlas, abra el comparmiento de las pilas en la parte posterior del
mando. No mezcle varias marcas ni pos de pilas diferentes.
El Mando Remote puede ser ulizado junto con cualquier po de pila o batería
recargable siempre y cuando ésta sea de buena calidad y no se mezclen entre sí.
Por favor, lea atentamente este manual antes de ulizar el disposivo.
Evite que el mando caiga sobre superficies duras.
Mantenga alejado el Mando Remote de cualquier po de líquido.
Evite las altas temperaturas, luz directa del sol y los lugares húmedos.
Si no logra conectar el mando, apáguelo y vuélvalo a encender, y a connuación
pulse el botón SYNC de nuevo para realizar el enlace.
Inserte la correa de mano en el Mando Remote (incluida en algunos packs).
Abra el comparmento de las pilas y coloque 2 del po AA LR6 1.5V. En el interior
figura el diagrama para colocarlas correctamente. Respete la polaridad indicada.
Pulse el botón rojo SYNC de su consola Wii™.
Luego, pulse el botón rojo SYNC de su Mando Remote. Todos los LED azules
empezarán a parpadear durante el proceso de sincronización.
Una vez terminada la sincronización, los LED dejarán de parpadear y el indicador
que quede fijo indicará el número de jugador (de 1 a 4). Dependiendo del número
de mandos conectados a la vez, permanecerá uno u otro indicador.
Coloque la tapa de las pilas cuidadosamente y ya está listo para usar.
ESPECIFICACIONES
INSTALACIÓN
FUNCIONES
SUSTITUCIÓN DE LAS PILAS
Wii, WiiMote, Nunchuk, WiiMoon Plus son marcas registradas por Nintendo.
Las imágenes del producto no son contractuales. El producto final puede variar.
Especificaciones del producto válidas salvo error pográfico.
Este producto no está aprobado, licenciado ni patrocinado por Nintendo.
MANDO REMOTE
PRECAUCIONES
Mando Remote
MANUAL DE INSTRUCCIONES v2.0
LR6(AA)1.5V X2
Altavoz
Indicadores
LED
Botón B
Cubierta
de las pilas
Botón SYNC