Attaching the F-9 Bracket to the Wimberley Head Version II:
The F-9 bracket is designed to attach to the swing arm of the Wimberley Head Version II™
(WH-200). It is a beneficial telephoto bracket to use with the WH-200 because mounting it
will not affect the balance point of your lens, If you were using the F-1 Telephoto bracket,
you would need to rebalance the lens once the bracket was attached to the lens plate. The
F-9 bracket also stays on the Head when swapping out lenses, which can be very handy in
the field.
NOTE: The F-9 will not fit the swing arm of the vintage Wimberley Heads (WH-100/101)
because the swing arm of the original Wimberley Head is not narrow enough to fit within
the clamping jaw of the M-9 Module (the WH-100 and 101 Head swing arms do not have
machined, Arca-Swiss style grooves to which the bracket can be connected).
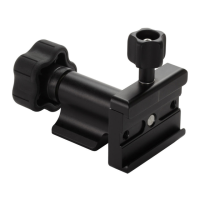
The M-9 module has an innovative pivoting, low-profile quick-release clamp, which
eliminates loose screws and the need for tools (Fig. 1). The pivoting jaw allows for
flexibility in positioning of the bracket on the Head.
Instructions (Continued)
The swing arm of the WH-200 has an Arca-Swiss
style, double dovetail along each side of it’s length,
and it is to this that the F-9 bracket attaches.
TIP: It makes it easier to mount the bracket if the
swing arm of the Head is tightened down first.
1. Using the bottom knob on the M-9 quick-release,
open the M-9 module jaws until you meet some
resistance. The knob is captive and should not
come off.
2. Pivot the moving jaw with the knob to either side,
perpendicular to the upright portion of the M-9
module (Fig. 2).
3. Place the bracket above the swing arm. Choose
the configuration that feels best to you
and allows you to comfortably access
the focusing ring on your lens
(Fig. 2, Option 1 & 2).
4. Adjust the width of the clamp jaws so that they
are a just bit wider than the width of the swing
arm grooves. Make sure that the bracket jaws
are completely parallel with the dovetail groove
on the swing arm.
5. Slide the bracket down the swing arm from the
top. Position it above the lens mounting
platform.
6. Once the bracket is in a good position, turn the
M-9 screw knob to tighten the clamp jaws and
secure the bracket on the swing arm.
7. Adjust the bracket height as desired by
loosening the M-9 knob slightly. Re-tighten after
any up or down adjustment is made.
Bottom
Knob
 Loading...