Function key:
Used for host’s power on, off, arm or disarm when powered
by battery, and canceling the alarm when an alarm occurs.
Power on: Short press to power on in power off state;
Note: When the host turned off and connected to a power
outlet, the host will automatically turn on when it is powered
on.
Shut down: When the battery is powered on, press and
hold for 5 seconds to a beep, release the button, the
indicator light goes out, and the host shuts down;
Note: When the host is disconnected from the power
outlet, the user should turn off the host to prevent the
backup battery’s power running out.
Arm or disarm: When away arm, or home arm states,
short press the key "beep" 2 times, the system is disarmed;
in disarm state, short press "beep" 1 time, the system is
away armed.
Cancel alarm: When the system alarms, short press to
cancel the alarm;
Setting Key
Accessory Code: long press for 0.5 ~ 2s, then release the
button after 1 beep sound, the indicator light flashes green,
and enters the coding state; in coding state, short press 1
time, the host beeps 1 time to exit the code state.
WiFi Network Fast Mode: long press for 3 ~ 5s, then
releases the button after 2 beeps sound, the indicator light
flashes cyan quickly, and enters the WiFi network fast
mode.
Note: When the fast mode is unsuccessful, the host
automatically enters wifi hotspot network mode (the
indicator light flashes cyan slowly).
WiFi Hotspot Network Mode: Long Press the function key
and the setting key for 3s at the same time, the indicator
light flashes cyan slowly, and enter the WiFi hotspot
network mode.
Factory reset: long press for 10s, then release the button
after 3 beeps sound, the host enters factory reset state.
STEP1: APP Download
●In APP Store or Google Play, search "Smart Life" and
download; or scan the below QR code.
●After the software starts, click [Create a new account],
use your mobile phone number or email address to register
for an account following the software interface.
SETP2: Alarm Panel WiFi Connection
① Make sure your mobile phone is connected to a Wi-Fi
router (for a dual-band router, please select a 2.4G
connection)
② Open the app, click [+] in the top right corner of the main
page; select [Security & Sensor]→ [Alarm System (WiFi)]
③ The host enters the WiFi fast configuration mode: First,
after the host is powered on, long press the [setting key] for
3 ~ 5s, after beeps 2 sounds and releases the button. The
indicator light flashes cyan quickly, entering the fast
configuration mode.
④ Click the confirm button on APP interface, select the
WiFi to be connected and enter WiFi password, and click
[OK] to make the WiFi configuration. The cyan indicator
light on the host will light on to indicate that the host is
connected successfully.
Note: The host is best installed near the wireless router
(5GHz WiFi band is not supported currently).
Hotspot Mode:
If the default fast network connection is unsuccessful, you
can select "hotspot mode" to make network connection.
①Make sure that the mobile phone is connected to a Wi-Fi
router (dual-band router, please select 2.4G connection)
②Open the APP, click [+] in the top right corner of the
interface; select [Security Sensor]→ [Alarm system (WiFi)],
click "Other Modes" in the top right corner of the interface,
and then select "Hotspot Configuration (Compatible Mode)"
③The host enters the WiFi hotspot network mode: first,
when the host is powered on, long press the function key
and the setting key for 3s at the same time, the indicator
light flashes slowly in cyan, and enter the WiFi hotspot
network mode.
④Click "Confirm indicator flashing slowly" on APP interface
→select the wifi to be connected and enter password→
confirm→connect.
⑤Find "SmartLife-xxxx" in the mobile phone’s WiFi list and
click Connect. After successful connection, return to the
"SmartLife" APP to operate the WiFi configuration process.
If the host indicator light is lighting on in cyan, it indicates
that the host is successfully connected.
SETP3: Add detector
For the products purchased in a kit, detectors have been
added, no need for this step.
When you need to add detectors, please choose to add in
any of the following ways.
Method one (APP): Open APP, enter the host interface,
select [Accessories]→ [+] in below, the host enters the
code matching state (the indicator flashes green quickly),
at this time trigger the device to be added, such as door
and window sensor, PIR motion detector, remote control
and etc; only one accessory can be added at one time.
After the addition is successful, the APP interface will pop
up a window to remind, and the host will exit the code
matching state.
Method two (add the host directly): long press the setting
key for 0.5 ~ 2s, release the button after the host beeps
one sound, the indicator light flashes green quickly, enter
the code matching state, and trigger the device to be
added at this time.
Note: If the detector are added successfully, the host will
sound 1 time. When the device is added repeatedly, the
host will sound 2 times.
The detectors in the kit have been added when leaving the
factory;
Trigger PIR: PIR detects human movement;
Trigger door sensor: separate the launch box and the
magnetic strip box for more than 10mm;
Trigger remote controller: press any key in the remote
controller.
Device Control:
Home Arm: This mode is suitable for people at home.
Trigger the normal defense zone sensors will not alarm;
Trigger the other defense zone sensors will alarm.
Away Arm: This mode is for people not at home. Any
defense zone sensor is triggered will cause alarm.
Disarm: This mode for system disarm, only the sensors in
the emergency zone are triggered will cause the alarm.
Trigger Alarm: APP control the host alarm.
History Record:
Display user’s operation records and alarm records.
Accessory Attribute Editing: Setting:
①Set timing arm and disarm.
②Set the alarm volume, low, medium, high, mute 4 levels
optional, the default is "high".
③On: when the alarm is on, the red light flashes; Off: when
the alarm is on, the light does not flash (the default is on).
④Alarm duration APP 6-step adjustment: 1min, 2min,
3min, 4min, 5min, 6min (3min by default).
⑤Open: APP operation or setting, the host will have a
prompt sound feedback; Off: APP operation or setting, no
sound feedback from the host (On by default).
⑥Turn on: the working indicator of the host is turned on;
Off: The working indicator of the host is off (On by default).
⑦Open: receive alarm push; Close: do not receive alarm
push (open by default).
⑧Control the host to restore the factory, clear the
accessory data and WiFi distribution network data.
⑨Set the host language version, please set the
corresponding language version according to the region.
Timing Arm/Disarm Settings:
Select [Settings]→ [Timing Settings] to add timing. Can be
set timing away arm, timing home arm, timing disarm and
etc.
Doorbell Settings:
①Add the doorbell button or other accessories to the smart
alarm, please see [Add accessories]
②Find the added detector device in [Accessories] on the
main interface of the APP device, change its device type to
[doorbell], and rename and save it.
③At this time, when the doorbell button or other accessory
device is triggered, the smart alarm will sound the doorbell
prompt tone and push the information of someone's visit to
the mobile phone APP.
Note:
1. The doorbell button included in the package is added to
the alarm, the default name displayed on the [Accessories]
interface is "door magnet XX", and the device type is "door
magnet" by default name.
2. The device type is door magnet, infrared detector and
other accessories can be set as doorbell trigger, remote
control and emergency button do not support setting as
doorbell trigger.
Extended Wireless Siren:
Set the wireless siren to the code matching state, and use
the remote control or APP to trigger the smart alarm.
Smart Alarm Host
Method 1: Host control
Long press the [Setting] key for 10s, then release the
button after the host sounds 3 times, the host will enter the
factory reset state.
Note: factory restore will clear the coded sensors and
restore all settings to the initial state. Please operate with
caution.
Method 2: Make the factory restore by APP. Enter the APP
host interface, select [Settings]→ [Restore Factory].
Smart Alarm Panel Installation:
Please note that when installing the distance between the
host and the wireless router should not be too far, It is best
to keep distance 2 ~ 5m around.
PIR detector:
1. Install on the wall, about 1.8-2.2m above the floor.
Use screws to fix the bracket to the wall; this installation
method is suitable for most solid walls.
2. Installation Suggestions:
Note: The detection range of this detector is fan-shaped
(detection distance ≈7m, detection angle ≈90 °)
Precautions:
Door Sensor:
Use double side tape to fix the door sensor on door or
window.
When the battery needs to be replaced: Please use a
screwdriver to separate the A rear cover, you can replace
the battery.
Smart Alarm Panel:
Power supply: AC 100~240V
Power consumption: ≤0.2W
Wireless standard: IEEE 802.11 b/g/n, 433.92MHz(trans-
mitter and receiver)
RF distance: 70m(for free space)
Modulation mode: AM
Sound pressure level: low (80dB), medium (85dB), high
(90dB) at a distance of 1 meter
Working environment: Temperature -10 ℃ ~ + 50 ℃,
humidity<90%RH
Device dimension: 81.6 * 81.6 * 74.2mm
Door sensor:
Battery model: 3V DC, CR2450 lithium battery
Static current: ≤3uA
Alarm current: ≤15mA
Wireless standard: ASK 433.92MHz
Wireless distance: ≥80m
Working environment: -20 ℃ ~ + 55 ℃
Product size: launch box 66mm * 33mm * 16mm
Magnetic stripe box 55mm * 12mm * 13mm
PIR Motion detector:
Battery type: 3V DC, 2 AAA batteries
Static current: ≤15uA
Alarm current: ≤20mA
Wireless standard: ASK 433.92MHz
Wireless distance: ≥80m
Detection distance / angle: 110 °
Working environment: -10 ℃ ~ + 55 ℃
Product size: 107mm * 51mm * 40mm (without mounting
bracket)
Remote controller:
Battery model: 3V DC, CR2032 lithium battery
Static current: ≤1uA
Alarm current: ≤10mA
Wireless standard: ASK433.92MHz
Wireless distance: ≥80m
Working environment: -20 ℃ ~ + 55 ℃
Product size: 70mm * 36mm * 11mm
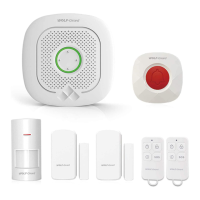
1. Smart Alarm Panel * 1
2. PIR motion detector * 1
3. Door sensor * 2
4. Remote controller * 1
5. Manual * 1
6. Installation accessories * 1
7. Certificate of conformity * 1
Note: If the standard sensors can not meet your needs,
please contact the dealer to purchase your required
sensors.
●After the host is disconnected from the power outlet, long
press the function key for 5 seconds until a "beep" sound,
release the key, the indicator light goes out, turn off the
host;
●Try to shorten the distance between the sensors and the
host;
●Try to avoid reinforced concrete and electrical devices
between sensors and the host;
●Do not press the host function key with excessive force;
●Do not use in a humid environment;
●Do not use in flammable and explosive environments;
●Please keep the product surface clean and dry.
Q1: What should I do if the host can not connect to the
network?
A: Please check if WiFi is normal.
Q2: What should I do if my mobile phone can not receive
the message push?
A: Please check whether the phone is setted not to accept
push.
Q3: What should I do if the APP shows that the sensors
are offline (not online)?
A: Please check whether the corresponding device has
sufficient power or working normally.
Version No.:WS-03-EN-V1.0-202004-18414
We own the right of final interpretation