Your purchase of a WOLO horn is a perfect choice to compliment your vehicle. Our horns are manufactured
with the finest of materials. Each horn is bench tested before it is packaged to assure workmanship and quali-
ty, so you will have many years of reliable service.
IMPORTANT: THIS HORN SHOULD NOT BE USED AS A REPLACEMENT FOR VEHICLE ORIGINAL
EQUIPMENT HORN. ADDITIONALLY, IT IS NOT TO BE USED AS A WARNING DEVICE. MODEL 336 JUKE
BOX IS FOR OFF THE ROAD AND SHOW USE.
MOUNTING CONTROL KEYBOARD
1. Select a mounting location that will not interfere with air bags or drivers vision.
2. Using the double-sided foam adhesive tape provided, mount the keyboard to selected location. Make sure
that mounting surface is free from dust, wax etc. A clean surface is necessary so that double-sided tape will
hold properly. IMPORTANT: ADHESIVE HOLDING POWER BECOMES MAXIMUM IN ABOUT 24 HOURS.
LIMIT MOVING OR PUTTING PRESSURE ONTO THE KEYBOARD UNTIL THEN.
MOUNTING SPEAKER
3. Select a convenient location in the engine compartment that is dry and safe from the engines exhaust man-
ifold heat. Always face the speaker in a downward position. This will help prevent water from entering into the
speaker. Using the speakers mounting bracket as a template, mark hole locations (3) and drill using a 1/8 inch
drill bit. Secure speaker with self tapping screws provided (3). Make sure that the speakers opening is not
blocked by any components which could reduce its loudness.
WIRING
4. TWIN BLACK, is connected to the speaker in the
engine compartment. Route wires through fire wall to
speaker. Connect either wire to one of the speaker wires.
Then connect remaining wire to other speaker wire.
5. RED WIRE, is connected to the fuse-block or a under dash
wire that has power (+) 12 volts when the ignition is on.
6. SINGLE BLACK WIRE, is grounded. Secure wire under a
bolt in the dashboard area, make sure that the METAL sur-
face around the bolt is clean of rust and paint to make a good electrical connection.
TESTING
7. Make sure all wires are secured and connections are properly taped.
8. Put the vehicles ignition on to power your JUKE BOX during testing.
9. Turn the JUKE Box’s VOLUME control to the right. The green L.E.D. power indicator will light to show that
the horn is now ON.
OPERATION
A. TO PLAY MUSIC: Press the red button marked SELECT once. The Juke Box will beep and the yellow
orange L.E.D. marked music will be illuminated. Using buttons numbered 1-17 you can now play your
desired musical tune. Use the on/off VOLUME knob to control loudness.
B. TO PLAY PIANO: Press the button marked PIANO, the yellow L.E.D. marked PIANO will be illuminated.
(If L.E.D. does not turn on press the select button then the piano button). Buttons numbered 1-17 can be used
as a piano keyboard using the musical notes above each button. Use the on/off VOLUME knob to control
loudness.
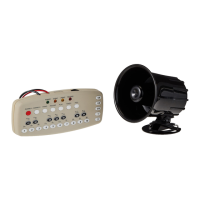
Installation and Operating Instructions for
MODEL 336 JUKE BOX
ELECTRONIC HORN
TWIN BLACK
RED
FUSE
3 AMP
12VOLTS +
GROUND
BLACK