EasyManua.ls Logo

Woodbridge BJ200 User Manual

Woodbridge BJ200
8 pages
To Next Page IconTo Next Page
Page #1 background imageLoading...
Page #1 background image
R
WOODBRIDGE
WOODBRIDGE
WOODBRIDGE
WOODBRIDGE
R
WOODBRIDGE
WOODBRIDGE
WOODBRIDGE
WOODBRIDGE
R
WOODBRIDGE
WOODBRIDGE
WOODBRIDGE
WOODBRIDGE
R
WOODBRIDGE
WOODBRIDGE
WOODBRIDGE
WOODBRIDGE
R
WOODBRIDGE
WOODBRIDGE
WOODBRIDGE
WOODBRIDGE
R
WOODBRIDGE
WOODBRIDGE
WOODBRIDGE
WOODBRIDGE
R
WOODBRIDGE
WOODBRIDGE
WOODBRIDGE
WOODBRIDGE
R
WOODBRIDGE
WOODBRIDGE
WOODBRIDGE
WOODBRIDGE
R
WOODBRIDGE
INSTALLATION AND CARE GUIDE
1
20220811 REV. 1
READ ALL INSTRUCTIONS BEFORE UNPACKING THE PRODUCT
2 PEOPLE ARE REQUIRED TO LIFT AND DURING
ENTIRE INSTALLATION OF THIS PRODUCT
INSTRUCTIONS THAT, IF IGNORED COULD RESULT IN DEATH OR SERIOUS INJURY CAUSED BY INCORRECT HANDLING
OR INSTALLATION OF THE PRODUCT. THESE INSTRUCTIONS MUST BE OBSERVED FOR SAFE INSTALLATION.
This products must be installed by a fully insured and licensed plumber only. Installation of any our product by anyone other
than fully insured and licensed plumber shall void limited warranty. We recommends that such licensed plumber has experience
in the installation of products.
We are not responsible for local code compliance for this product. Building and plumbing codes may vary from state-to-state in
accordance to your location. We are not responsible for providing any compliance certifications.
Under no circumstances we shall not be liable for any incidental damages sustained in connection with this product
Neither manufacture, nor distributor, nor retailer is responsible for water damage or flood caused due to use of this product.
Under no circumstances We shall not be liable for any and all fees, cost of installation/reinstallation/removal, subsequent
damage or transportation in case of the product defect
Customer Service Phone: 562-229-0088. (Monday - Friday 9 AM - 5 PM Pacific Time)
Or Email: help@woodbridgebath.com

(UL1795)



® (IPC)
® (IRC)
® (UPC)
® (NPC)
AIR AND WHIRLPOOL HEATED BATHTUB
BJ200 BJ300
Question and Answer IconNeed help?

Do you have a question about the Woodbridge BJ200 and is the answer not in the manual?

Woodbridge BJ200 Specifications

General IconGeneral
BrandWoodbridge
ModelBJ200
CategoryBathtubs
LanguageEnglish

Summary

Before You Begin

Reading Installation Instructions

Emphasizes reading all instructions carefully to familiarize yourself with required tools, materials, and sequences.

Product Information Updates

States that all information is based on the latest product data and may change without notice.

Product Requirements

Summary of Key Requirements

Overview of essential installation requirements including local codes and level subfloor.

Product Inspection

Instructions to uncrate and inspect the bath for damage before construction begins.

Roughing-In Dimensions

BJ200 Rough-In Diagram

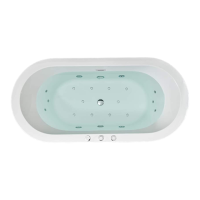
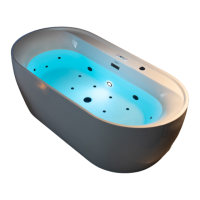
Provides detailed rough-in dimensions for the BJ200 model bathtub.

BJ300 Rough-In Diagram

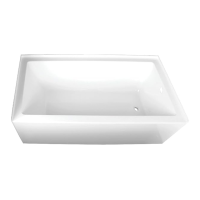
Provides detailed rough-in dimensions for the BJ300 model bathtub.

Installation Requirements

Tools Required for Installation

Lists essential tools needed for the installation process.

Materials Required for Installation

Lists necessary materials such as sealants, adhesives, and putty.

Clearance Requirements

Advises checking rough-in and room dimensions to ensure adequate space for the unit.

Site Requirements

Plumbing Preparation

Details preparing the plumbing according to rough-in dimensions and checking for leaks.

Before Installing Unit

Drain Connection Seal

Emphasizes ensuring a watertight seal on the bath drain connections for leak prevention.

Water Supply and Drain Testing

Guides on testing water supply connections and drain for leaks before unit installation.

Install Bathtub

Professional Installation Requirement

States that the bathtub must be installed by a fully insured and licensed plumber only.

Handling and Inspection

Advises on safe handling of the bathtub and inspecting for any transit damage.

Level Installation

Crucial instruction that the bathtub must be installed level on all top edges.

Support and Access

Suggests using lumber for support to allow bottom access during installation.

Power Supply Connection

Details connecting power supply to the control unit by an authorized electrician.

Trial Run and Leak Check

Instructions for filling, running the pump, and checking for leaks and control functions.

GFCI Protection Requirement

Mandates connecting the unit to a GFCI protected supply circuit for safety.

Electrical Requirements

BJ200 Electrical Diagram

Illustrates electrical connections and components for the BJ200 heated air and whirlpool tub.

BJ300 Electrical Diagram

Illustrates electrical connections and components for the BJ300 heated air and whirlpool tub.

Ventilation Gap Recommendation

Advises leaving a gap for motor/pump ventilation after installation.

Dedicated GFCI Breaker Information

Explains the need for dedicated 120V 15AMP GFCI breakers for pump, blower, and heater.

Warranty Information

Product Warranty Coverage

Details the warranty period and coverage for various Woodbridge bathtub and fixture products.

Warranty Exclusions and Conditions

Lists conditions and actions that will void the product warranty.

Installer Responsibility

Outlines the installer's responsibility for unit inspection and proper installation.

Warranty Claim Procedure

Provides instructions on how to obtain warranty service or replacement parts.

Important Safety Rules

General Bathtub Usage Precautions

Warns about water temperature, intoxication, medications, and electrical device proximity.

Child and Infirm Supervision

Stresses the need for adult supervision for children and infirm individuals using the bathtub.

Care and Cleaning

Routine Cleaning Methods

Advises using mild soap and water for regular cleaning of the acrylic surface.

Tough Spot Cleaning

Provides methods for cleaning tough spots using dish soap or non-chlorine bleach.

Prohibited Cleaning Agents

Warns against using abrasive cleaners, steel wool, or scouring pads on the acrylic surface.

Repair and Maintenance

Surface Shine Restoration

Guides on using polish compounds to maintain the acrylic surface shine.

Scratch Removal Techniques

Details methods for removing scratches using wet sandpaper and polishing compounds.

Related product manuals