To use timer with decorator wall
switch:
Pour utiliser la minuterie avec un
interrupteur mural décoratif :
1 2
3
4
5
Back plate for a
decorator switch
Plaque de propreté
pour interrupteur style
décorateur
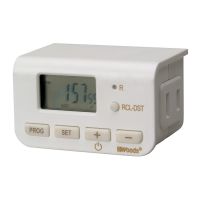
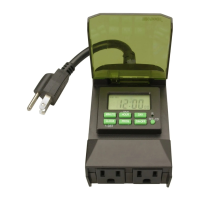
NOTE: When connecting the timer to the wall
switch plate, the timer needs to be in the
“OFF” mode (press the + button to adjust
the mode) and turn the wall switch to the off
position.
Remarque : Lorsque le programmateur
est fixé à la plaque de l’interrupteur, il doit
être en mode « éteint » (OFF) (appuyez sur
le bouton + et sélectionnez le mode), et
l’interrupteur mural doit aussi être éteint.
To use timer with toggle wall switch:
Pour utiliser la minuterie avec un
interrupteur mural à bascule :
Follow steps 3-5 below to
complete installation
Suivez les étapes 3 à 5
ci-dessous pour terminer
l’installation
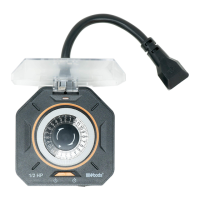
Gently press the wing clips inward to pop out the deco-
rator switch adapter
Appuyez délicatement sur les agrafes pour les rap-
procher et libérer la plaque décorative
Back plate for a toggle
light switch
Plaque arrière pour un
interrupteur à bascule
R
RCL-DST
PROG
SET
R
RCL-DST
PROG
SET
R
RCL-DST
PROG
SET
R
RCL-DST
PROG
SET
R
RCL-DST
PROG
SET
R
RCL-DST
PROG
SET
R
RCL-DST
PROG
SET
R
RCL-DST
PROG
SET
R
RCL-DST
PROG
SET
R
RCL-DST
PROG
SET
R
RCL-DST
PROG
SET
R RCL-DST
PROG SET
R
RCL-DST
PROG
SET
R
RCL-DST
PROG
SET
R
RCL-DST
PROG
SET
R RCL-DST
PROG SET
R
RCL-DST
PROG
SET
R
RCL-DST
PROG
SET
R
RCL-DST
PROG
SET
R
RCL-DST
PROG
SET
R RCL-DST
PROG SET
R
RCL-DST
PROG
SET
R
RCL-DST
PROG
SET
R
RCL-DST
PROG
SET
R
RCL-DST
PROG
SET
R RCL-DST
PROG SET
R
RCL-DST
PROG
SET
R
RCL-DST
PROG
SET
R
RCL-DST
PROG
SET
R
RCL-DST
PROG
SET
R RCL-DST
PROG SET
1a 2
R
RCL-DST
PROG
SET
R
RCL-DST
PROG
SET
R RCL-DST
PROG SET
R
RCL-DST
PROG
SET
R
RCL-DST
PROG
SET
Remove back plate from the timer by
unscrewing the bottom 2 screws
(located below battery cavity).
Retirez la plaque arrière du minuteur en
dévissant les 2 vis de dessous (placées
sous la cavité des piles).
Unscrew the 2 screws from the switch plate on the
wall. Using the 2 long flat-head screws (provided
with this timer), mount the timer back plate to the
wall switch plate (note timer back plate may extend
above the switch plate).
Dévissez les 2 vis de la plaque de l’interrupteur sur
le mur. En utilisant les 2 vis longues à tête plate
(fournies avec ce minuteur), montez la plaque ar-
rière du minuteur sur la plaque de l’interrupteur
mural (notez que la plaque arrière du minuteur peut
s’étendre au-dessus de la plaque de l’interrupteur).
Remove back plate from the timer
by unscrewing the bottom 2 screws
(located below battery cavity).
Retirez la plaque arrière du minuteur
en dévissant les 2 vis de dessous
(placées sous la cavité des piles).
Unscrew the 2 screws from the switch plate on the
wall. Using the 2 long flat-head screws (provided
with this timer), mount the timer back plate to the
wall switch plate (note timer back plate may extend
above the switch plate).
Dévissez les 2 vis de la plaque de l’interrupteur sur
le mur. En utilisant les 2 vis longues à tête plate
(fournies avec ce minuteur), montez la plaque
arrière du minuteur sur la plaque de l’interrupteur
mural (notez que la plaque arrière du minuteur peut
s’étendre au-dessus de la plaque de l’interrupteur).
1b
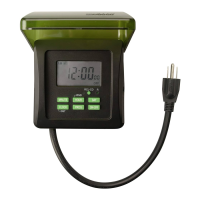
While holding the timer in your hand,
insert (2) AA batteries.
Tout en tenant le minuteur en main,
insérez (2) piles AA.
Fasten the timer to the timer wall
plate by screwing the bottom 2
screws (located below battery
cavity).
Fixez la minuterie sur sa plaque
murale à l’aide des 2 vis du bas
(situées sous le compartiment
des piles).
 Loading...