http://waterheatertimer.org/Programmable.html#59745
IllWoods
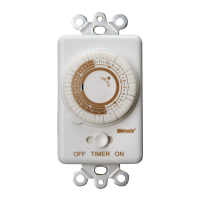
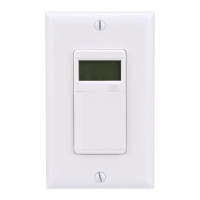
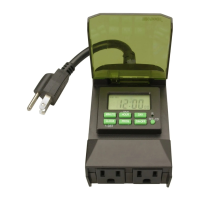
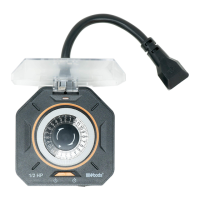
Model 59745 Programmable In Wall Timer
Modile 59745 minuterie programmable dans le mur
Temporizador programable en la pared Modelo 59745
Installation
LIGHT FIXTURE OR LOAD
LUMINAIRE OU CHARGE
LÅMPARAO CARGA
TIMER
MINUTERIE
TEMPORIZADOR
1
2
3
4
5
6
7
8
9
Turn the power OFFat the circuit breakeror removethe fuse
While holding the timer in your hand and using a toothpick,
poke the hole in the arrow plate to gently remove the arrow plate
Liftoff the timer segment dial
Movethe manual switch on the timer plate to the OFFposition
Unscrewthe 2 small screwsto releasethe timer faceplate
To confirm the timer is off, the manual switch control lever
(locatedin the bottomrightcornerof thetimer module)should
be positioned to the far left.
Ensureneutral(white)wire is presentin the junction box If this
wire is not present, additional wiring will be necessarybefore
installation can be completed
Strip 3/8" insulation from each wire, which is required for
installation
Connectthe white wirefrom the timerto thewhite wire(s) in the
junction box. Securethe connection with a wire connector.
WALL
MUR
PARED
o
o
o
o
HOT WIRE
FIL SOUS TENSION
CABLE DE CORRIENTE
Installation
o
o
WHITE(NEUTRAL)
BLANC(NEUTRE)
BLANCO(NEUTRAL)
BLACK(LINE)
NOIR(LIGNE)
NEGRO(LiNEA)
RED(LOAD)
ROUGE(CHARGE)
ROJO(CARGA)
10 Connectthe blackwirefrom the timerto the black(HOT)wire
(previously connected to the switch) and connect the red wire
from the TIMERto the second black wire (previously connected
to the switch)
11. Carefully tuck all wires to provide room for the timer in the
junction box
12. Secure the timer module to the junction boxwith the 2 long
screws (included)
13 Attachthe decoratorwall plateto the timer module(not
included)
14. Attach the timer faceplate to the timer module with the 2 short
screws(included)
15. Placethe timer segment dial onto the timer module and rotate
the dial clockwise for several rotations to ensure it rotates
smoothly. Note: the segment dial will "click" as it rotates when
properlysecured
16 Place the arrow plate with TIMENOWpointing to the lower left
corner and push to insert
17. Reconnectthe electrical power.
Instructions:
1 To set the current time: rotate the dial clockwise until the time
lines up with the TIMENOWarrow Note, PMhours are shaded
2 To program the timer: begin with all segment pins pulled up
Pushthe segment pins down for the periods of time you want the
imer to be ON. Eachsegment pin represents30 minutes:
2 segment pins = 1 hour.
3 To override the timer: slide the switch on bottom of the timer to
the ON position
"ON" - the connected device is switched on permanently
"OFF"- the connected device is switched off permanently
"TIMER"- the connected device follows your programmed
timer settings.
Note: If the timer is not functional, interchange the two black wires
previouslyconnectto switch(see#10 above)
1
2
3
4
5
6
7
8
9
10
11
12
13
14
Coupez le courant au disjoncteur ou retirez Iefusible.
Tenez la minuterie dans Ia main et utilisez un cure-dents,
percez Ie trou dans Ia plaque fléchée pour retirer délicatement
Ia plaque fiéchée
RetirezIe cadran de segments de la minuterie.
DéplacezIlinterrupteur manuel sur Ia plaque de Ia minuterie d
Ia positionOFF(arrét)
DévissezIes2 petitesvis pourdégagerIa plaqueavantde la
minuterie
Pourconfirmer que la minuterie est éteinte, Ie levier de
contrölemanuelde Ilinterrupteur(dansIe coin inférieurdroit
du modulede minuterie)devraitétre placéd la positionIa
plus éloignée d gauche
Assurez-vousque Ie fil neutre(blanc) soit présentdansla botte
de jonction. Slil n'y a pas ce fil, il faudra dlautre cdblage
avant de terminer Ilinstallation
Dénudez9,5 mm (3/8 po) dlisolantde chaquefil requispour
IIinstallation.
Branchezle fil blancde Ia minuterieau(x) fil(s) blanc(s)de la
botte de jonction. FixezIa connexion avec un serre-fils
Branchezle fil noirde Ia minuterieau fil noir (SOUSTENSION)
(déjd branchéd Ilinterrupteur)et branchezIefil rougede Ia
MINUTERIEau secondfil noir (déjdbranchéd Ilinterrupteur)
Cachez bien tous Iesfils pour fournir de Ia place pour Ia
minuterie dans Ia botte de jonction.
Fixezle module de Ia minuterie d Ia botte de jonction avec les
2 longuesvis(incluses)
Installez la plaque murale décorative au module de Ia
minuterie (non inclus)
Fixezla plaque avant de Ia minuterie au module de Ia
minuterieavecIes2 courtesvis (incluses)
www.colemancable.com