Made in China, Hecho en China
999-61448_WC2011_REVB 09/15
FEATURES
TIME SETTING
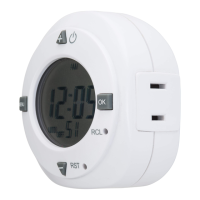
In clock mode, LCD shows AM/PM (12-hour display), hour, minute, second and power display:ON,AUTO ON,OFF,andAUTO OFF.
1. Turns lights/appliances ON and OFF at programmed settings. It is ideal for energy saving and home security.
2. Large LCD shows program setting status and real time.
3. 2 ON/OFF programs per day
4. Manual override
• In clock mode, press to change output to ON, OFF.
• In program and time setting mode, press to change program and time in ascending order.
• Manual override
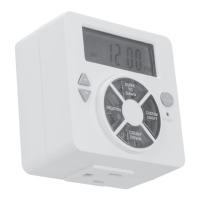
BUTTON FUNCTIONS
DIAGRAM & DESCRIPTIONS
WC2011
Digital Timer
1. In real time display, press for 2 seconds to enter clock setting mode.
2. Press or to adjust the digital number of time.
3. Press to confirm and enter the next setting,
4. Press to exit time setting mode.
PROGRAM SETTING
1. In clock mode, press to enter to program setting mode. “1” shows on the top of the LCD.“ON” shows on the lower left corner of the LCD.
2. Press or to choose”1 ON”, “1 OFF”,”2 ON” or “2 OFF”. “1 ON” means Program 1 start time, “1 OFF” means Program 1 stop time.
3. Press once to enter the time setting mode. When hour display flashes. Press or to adjust hour.
4. Press once and enter minute setting mode. Minute display flashes. Press or to adjust minute.
5. Press once to return to the program group selection. Press“MENU” to exit program mode and return to clock mode.
Press to clear all settings. LCD shows 0:00 /12:00 AM and OFF in the clock mode and shows“— —:— —” in the program mode.
• Press to change function.
• In program mode, press to exit .
• Press to confirm selected setting.
• Press to enter the time setting mode after 2 seconds.
To press the RCL button, use a paper clip or ball point pen.
• In clock mode, press to turn on or off daylight savings time function.
• In program mode, press to cancel or resume the current program setting.
To press the RST button, use a paper clip or ball point pen.
• Clears all settings. After a few seconds, clock mode is restored as 00:00
OPERATION OF BUTTONS
1. Press or to adjust time. Time is adjusted by increasing or reducing from the single-digit of minute or second.
Press or every time,the single-digit of minute will be added or reduced 1. Press the button and hold for more than 2 seconds, it automatically counts by the frequency of 4Hz.
2. If no button is pressed for 20 seconds, the timer will exit programming mode and revert to previous setting.
SUMMER TIME SETTING (DAYLIGHT SAVINGS TIME)
In clock mode, press with a paper clip or ball point pen to turn on and off daylight savings time.
Turn on daylight savings time,LCD shows . Time is adjusted by adding one hour.
Turn off daylight savings time, will disappear and LCD will show standard time.
CONNECTIONS
WARNINGS
The electrical system and the method of connecting this timer to the system must be in accordance with local, state, and national electric codes.
• FOR INDOOR USE ONLY.
• This unit is to be connected to a 125V, 60Hz power
source only.
• Total Capacity: 1000W Resistive, 600W Tungsten
(Lighting). Do not exceed rated capacity.
• The backup batteries will be fully charged after
connected to power for 4 hours.
• Always ensure that the plug of any appliance is fully
inserted into the timer.
• Do not attempt to disassemble unit. There are no
serviceable parts inside.
• RISK OF ELECTRIC SHOCK:
o Keep children away.
o Unplug timer before cleaning.
o Do not use in wet locations.
• If you need to clean the timer, remove from from the
power source and wipe with a dry cloth. Do not
immerse in water or any liquid.
• RISK OF FIRE: Do not use to control appliances that
contain heating elements (Cooking appliances, heaters,
irons, etc…)
• WARNING: Any changes or modifications to this unit
not expressly approved by the party responsible for
compliance could void the user's authority to operate
the equipment.
• NOTE: This equipment has been tested and found to
comply with the limits for Class B digital device,
pursuant to part 15 of the FCC Rules. These limits are
designed to provide reasonable protection against
harmful interference in a residential installation. This
equipment generates, uses and can radiate radio
frequency energy and, if not installed and used in
accordance with the instructions, may cause harmful
interference to radio or television reception, which can
be determined by turning the equipment off and on, the
user is encouraged to try to correct the interference by
one or more of the following measures:-Reorient or
relocate the receiving antenna.-Increase the separation
between the equipment and the receiver.-Connect the
equipment into an outlet on a circuit different from that
to which the receiver is connected.-Consult the dealer
or an experienced radio/TV technician for help.
• PLEASE READ THROUGH THE INSTRUCTIONS PRIOR
TO USE.
1. Preset your desired ON/OFF programs on the timer as
mentioned above.
2. Switch off your electrical appliance.
3. Connect your appliance’s power cord to timer’s socket,
then connect the timer to AC socket to get power.
4. Switch on your electrical appliance.
5. Appliance will then be turned on/off according to your
preset programs unless manual override pressed.
• In program setting and time setting mode, press to change channel and time in
descending order. (Reduce 1 or more).