5
Multi Function Worktable
Original instructions
WX051
PRODUCT SAFETY
SAFETY INSTRUCTIONS
WARNING: When using this product, always follow basic safety precautions. Failure to follow all
instructions listed below may result in personal injury.
Read all instructions before attempting to operate this product. Save these instructions for future reference.
1. Keep work area clear and well lit.
- Cluttered areas and benches invite injuries.
2. Make sure all moving parts are free from interference.
3. Ensure Pegasus is set up on firm, level ground and is stable.
4. Keep other people away.
- Do not let other people, especially children, not involved in the work touch the tool and keep them away from the work area.
5. Be aware of over-balancing. When a large piece is cut from one end of material supported by Pegasus, the
remaining piece may be heavy enough to tip over. Always ensure the work piece is well supported.
6. Check that table latches are securely locked and legs are fully extended, with tray flat before operating Pegasus.
7. The tool must be used only for its intended purpose. Any use other than those mentioned in
these instructions will be considered a case of misuse.
The manufacturer shall not be liable for any damage or injury resulting from misuse.
8. Never stand on this product.
9. Dress properly
- Do not wear loose clothing or jewelry, which can be caught in moving parts.
- Non-skid footwear is recommended when working outdoors.
- Secure long hair, or wear protective hair covering.
10. Use personal protective equipment
- Use safety glasses.
- Use face or dust mask when working operations create or involve dust.
11. Save all warnings and instructions for future reference. Refer to them frequently and use them
to instruct others using Pegasus. If you loan someone Pegasus, loan them these instructions to prevent
misuse of the product and possible injury.
12. Do not use tools in damp or wet locations. Damp or wet conditions prevent appropriate clamping
pressure and grip on the work piece.
13. Ensure the work piece is clamped firmly and the lock is engaged before use.
14. Check damaged parts. Before using the tool, it should be carefully checked to ensure it will operate
properly and perform its intended function.
15. When not in use, tools should be stored in a secure, dry place, out of the reach of children and
unauthorized usage.
16. Have your Pegasus serviced by a qualified repair person.
17. Warning
- The use of any accessory or attachment other than those recommended in this instruction manual may present
a risk of personal injury.
Warning–To reduce the risk of injury,
user must read instruction manual.
Warning
Pinch points
1
2
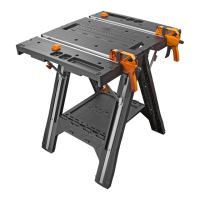
COMPONENT LIST
A. Quick clamps (2 pieces)
B. Clamping dogs (4 pieces)
SYMBOLS
A
B
2
3
76
4
8
10
15
16
18
17
9
11
13
14
12
1
To use Pegasus as a work bench, open the legs
fully and pull the table upward until latches “click”
into place.(Fig. 1)
NOTE:
Before using, check that the table is
horizontal and two latches on the same side lock
securely into the upper hole at the same time.
Push the clamping dogs into the desired holes
on the table. (Fig. 5)
NOTE: Make sure dogs are installed towards the
rear jaw as shown.
Align the Quick Clamps with the slot and insert it
fully. Grip the Quick Clamps handle and put it
into the groove as shown. Once the clamps are
seated, release the handle. (Fig. 2-4)
When working, use clamping dogs and two quick clamps for multiple clamping options. (Fig. 6-9)
Quick clamps can be used independently if
desired. (Fig. 10)
If desired, multiple units can be locked together side by side or end to end with the enclosed joiners. (Fig. 13-14)
To fold Pegasus for storage:
• Press both latches and collapse the table. (Fig. 16)
• Lift the tool tray in the centre to allow the legs to fold. (Fig. 17)
WARNING:
Keep fingers away from moving joints to avoid pinching.
Press
Use the recesses and tool tray for storage. (Fig. 11)
If necessary, power strips can be attached using zip ties (zip ties and power strips are not included). (Fig. 12)
To carry Pegasus safely, only transport when
folded, hold the table vertically and carry close to
the body. (Fig. 18)
To use Pegasus as a sawhorse, open the legs fully
until the tool tray is flat. It is compatible with our
clamping sawhorse (not supplied). (Fig. 15)
1
2
Press
Click
ENEN
ENEN
01 02
03 04