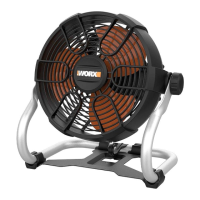
20V Jobsite Fan EN
9
OPERATION INSTRUCTION
WARNING: Do not let your carelessness for
acquaintance with the tool make you injured.
WARNING: Never make use of attachments or
accessories which are not recommended by
manufacture for it may hurt you seriously.
INSTALLING AND REMOVING THE BATTERY
PACK (SEE FIGURE A1, A2)
1. Ensure that the switch (8) is closed.
2. Installing and removing the battery pack as the
picture has shown.
WARNING: Remember to remove battery pack
or adaptor all the time when adjusting, cleaning
or leaving unused for it could protect you away from
accidents which may hurt you to a certain degree.
INSTALLING AND REMOVING THE AC
ADAPTOR (SEE FIGURE B)
1. Ensure that the switch (8) is closed.
2. Insert the round hole end of the adaptor into the fan
as the figure has revealed
3. Link the plug end of the adaptor to the power
supply.
4. Guarantee that the adaptor is firm and safe when
you start to use.
CHARGING THE BATTERY PACK (SEE FIGURE
C AND FIGURE D)
1. Charging through the charger.
2. Or install the battery pack to the fan and link fan to
AC adaptor.
Charging indicator light will turn flashing green
which means that it is charging. When battery is full,
the light will stay green without flashing.
STARTING & STOPPING (SEE FIGURE D)
Mode 1: link the jobsite fan to battery pack .Push the
switch (8) button to start and stop the fan.
Mode 2: link the jobsite fan to AC adaptor for power
supply. Push the switch (8) button to start and stop
the fan.
Mode 3: link the jobsite fan to AC adaptor
and battery pack simultaneously .Under this
circumstance, the battery pack can be charged while
the fan is in operation. Push the switch (8) button to
start and stop the fan.
WARNING: Make sure that the switch is closed
when the fan is not in use.
CHANGE THE SPEED(SEE FIGURE E)
1. For Speed I, push the Speed adjusting button(6) to
and front light will turn on.
1. For Speed I I, push the Speed adjusting button(6)
to
and front light will turn on.
HANGING THE FAN AND ADJUSTING HEAD
(SEE FIGURE F)
1. Put up the hook through the groove
2. Take advantage of hook to hang the fan
3. Adjusting the head, different angles can be made
(0-360 degrees).
WARNING
1. It is inadvisable to hang the fan in the
following ways that it will impede fan’s operation and
contribute to cord’s damages.
2. When hanging , be careful in case it drops down
which will hurt you.
MAINTENANCE AND
SERVICE
WARNING: Always remove or disconnect
battery pack before adjusting, cleaning,
servicing or transporting the blower vacuum.
1) CLEANING AND MAINTENANCe
1. Must wear eye protection. If not , the object may
get into your eyes which may hurt you.
2. Always take off battery pack and adaptor when
maintaining the product in order to refrain from the
injury.
3. Do not put the finger, sticks or other similar objects
into the fan in case of the injury or product’s damage.
4. Never let chemicals touch the plastic parts. Or
else, the plastic parts will be damaged, causing
irreversible personal injury
5. Never try to damage any part of the battery pack
and keep it away from children. The battery should
be recycled and treated correctly.
Not obey the warning above, serious consequence
will be made, such as fire.
2) STORAGE
Store in a secure, dry place out of the reach of
children.
Do not place other objects on the product. Employ
only the same replacements for it may contribute
to the damage of product when using other
replacements.
Not recommend using the fan in the wet place
outside the door.
MAINTAIN TOOLS WITH
CARE
Remove the plug from the socket before
carrying out any adjustment, servicing or
maintenance.
Your tool requires no additional lubrication or
maintenance. Never use water or chemical cleaners
to clean your charger. Wipe clean with a dry cloth.
Always store your charger in a dry place.
For battery tools:
The ambient temperature range for the use and
storage of tool and battery is 0
o
C-45
o
C-.
The recommended ambient temperature range for
the charging system during charging is 0
o
C--40
o
C.
 Loading...