7
TAKING THE BUMPER BAR OFF
Push in the buttons of the bumper bar locks and slide its end out of the mounting holes.
The bumper bar may be tilted, when undone only from single side.
ADJUSTING OF HARNESS
Use the regulation underneath the shoulder pads.
REGULATION OF THE HEIGHT OF THE SAFETY HARNESS
The height of the safety harness can be adjusted depending on the age of the child.
Position 1 - When the child starts to sit unaided (around 6 months)
Position 2 and 3 - When the shoulders of the child will be at the middle or high holes level.
ATTACHING THE COVER
To attach the foot cover put it under the bumper bar and attach to Velcro (a) and snap (b).
BUCKLE
To unfasten the buckle, press the buttons and pull the fastening part out of the casing.
To fasten the buckle, insert the fastening part into the casing until it has engaged.
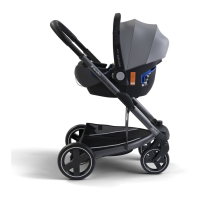
MOUNTING THE CAR SEAT
Special adapters are needed in order to mount the baby car seat. Place the adapters in
mounting seats of the frame and attach the car seat by catching it on the adapters.
Attention: Ensure proper fitting of the armchair before using it.
REMOVING THE CAR SEAT
In order to take the car seat off, push in the unlocking pushbuttons on both its sides,
while simultaneously pulling it out of mounting seats. Remove adapters by pushing in the
unlocking pushbutton.
MOUNTING OF CARRYCOT
Special adapters are needed in order to mount the carrycot. Place the adapters in mo-
unting carrycot of the frame and attach the carrycot by catching it on the adapters.
DISMOUNTING OF CARRYCOT
To take the carrycot off, push in the buttons unlocking the catches (a) and pull it out
from mounting seats (b). Remove adapters by pushing in the unlocking pushbutton.
MOSQUITO NET
The mosquito net is in the pocket under the footrest (a). Place it over the footrest and
the hood (b) and then fasten the straps round the frame bars as shown in Figure (c)
LED LIGHTS
The stroller frame features LED lights. The ON button is located on the stroller frame as
shown in the picture below. The batteries are located on the bottom of the footrest. In
order to install the batteries LR 44, unscrew the screw shown in the picture and take off
the casing.
ATTACHING X-BAG NURSERY BAG AND X-MUG HOLDER
X-Mug and X-Bag nursery bag can be attached to the frame using the holders shown in
the picture.
WARNINGS AND POINT OF ATTENTION
Keep these instructions for future reference.
Having conducted required tests Deltim declares that the stroller complies with all the
requirements of AS/NZS 2088:2000 standard. ATTENTION: Do not use any other addi-
18
19
20
21
22
23
24
25
26
27
28
!
ENGLISH
 Loading...