EasyManua.ls Logo

X Rocker CERBERUS GAMING OTTOMAN BED User Manual

X Rocker CERBERUS GAMING OTTOMAN BED
7 pages
To Next Page IconTo Next Page
Page #1 background imageLoading...
Page #1 background image
CERBERUS GAMING OTTOMAN BED
PLEASE read this leaflet prior to assembly to familiarise yourself with the various stages of construction.
Carefully open the pack supplied and check the contents against the parts and fitting check list. Do not destroy
any of the packing until you are certain that you have all the necessary part for assembly.
CAUTION: There are small components used in the construction of this unit. These loose items should be kept
away from young children while assembling your unit to avoid danger of choking hazards.
COLOUR: RED/BLACK, BLUE/BLACK
SIZE : SINGLE 3',SMALL DOUBLE 4',DOUBLE 4'6''
ASSEMBLY INSTRUCTION
IMPORTANT :
Please reading through this leaflet and then follow the simple step-by-step instruction
Please keep fittings out of children reach.
Please ensure products place on flat & soft surface.
Please ensure you have the right tools, Do Not use power tools to assembly this products.
Please ensure a clean, dry and spacious area for assembly, due to the size of this product we
recommend that it is assembled in the room intended for use.
Please retain these instruction for future reference.
WARNINGS
Ensure products is fully assembled and secured as illustrated before use.
Ensure the legs remain in contact with the ground at all time.
Ensure all screws or bolts are tightened and inspect regularly.
Do Not stand or jump on the product.
Do Not use this product if parts are missing, damage or worn.
Do Not expose this product to dripping or splashing, rain or areas with heavy moisture.
Do Not place the product under direct sunlight, open flames such as candles,heat or radiators.
Keep away from temperatures over 35
.
Do Not use scourer, abrasivers or chemical cleaners, only clean with sponge wipe and warm soapy
water.
Page 1 of 7
Do Not let children play with the mechanism.
Question and Answer IconNeed help?

Do you have a question about the X Rocker CERBERUS GAMING OTTOMAN BED and is the answer not in the manual?

X Rocker CERBERUS GAMING OTTOMAN BED Specifications

General IconGeneral
BrandX Rocker
ModelCERBERUS GAMING OTTOMAN BED
CategoryIndoor Furnishing
LanguageEnglish

Summary

Assembly Instructions Overview

Important Assembly Notes

Key advice for a smooth assembly process, including checking parts, using flat surfaces, and retaining instructions.

Safety Warnings for Use

Critical safety precautions for product assembly and use, covering securing components and child safety.

Parts and Fittings Identification

List of Bed Components

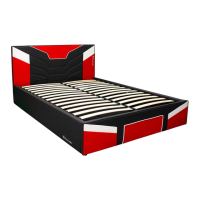
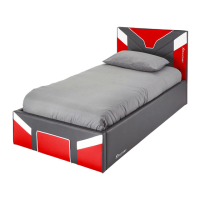
Detailed listing of all individual parts required for assembling the gaming ottoman bed.

Required Hardware and Tools

Identification of all screws, bolts, washers, and tools needed for the assembly process.

Step-by-Step Assembly Guide

Step 1: Attaching Components to Headboard

Instructions for connecting parts 1, 2, 10, and 12 using screws (E) and bolts (B) with Allen key (H).

Step 2: Securing Side Rails

Attaching side rails (3) to the bed frame using bolts (B) and Allen key (H) for structural integrity.

Step 3: Reinforcing Frame Corners

Using metal corner plates (17) with bolts (C) and washers (D) secured by Allen key (F) for frame stability.

Step 4: Installing Support Bar

Connecting the horizontal support bar (11) using bolts (B) and Allen key (H) to the side rails.

Step 5: Attaching Non-Woven Fabric

Securing the non-woven fabric (13) using screws (E) to the bed frame for a finished look.

Step 6: Installing Frame Rails

Fixing horizontal frame rails (7, 8) and center support (4) using bolts (A) and Allen key (H).

Step 7: Securing Long Frame Rails

Fastening long frame rails (5, 6) using bolts (A) and Allen key (H) to the side rails and headboard.

Step 8: Activating Ottoman Mechanism

Securing the pneumatic lifting mechanisms using flange nuts with a spanner (G), avoiding over-tightening.

Step 9: Attaching Support Strap

Connecting the support strap (16) to the bed frame to secure the mattress and ottoman mechanism.

Step 10: Placing Slats and Caps

Installing slats (14) with center slat caps (I) and end slat caps (J) for mattress support.

Related product manuals