EasyManua.ls Logo

XILO STAX - User Manual

XILO STAX
2 pages
Print Icon
To Next Page IconTo Next Page
Loading...
WARNINGS Please read this user manual before use.
The user needs to have the relevant professional knowledge when installing or operating the VTX
Product, any improper use may cause potential danger. Please ensure that you have the necessary skills
required to operate radio equipment or operate under the guidance of a professional. Read this manual
carefully before attempting to install The user accepts responsibility for any personal injury and property
damage caused by ignoring the following statements or violating the operating regulations.
Do not touch the VTX when in use as it will get hot and can cause burns, please mount in a way to
ensure adequate airflow to provide cooling, Follow the wiring diagram to ensure the correct cable and
plug fitments, It is important to install the antenna correctly before powering up the VTX to avoid any
damage to the precision components inside, Do not disassemble, repair or modify this product person-
ally. Contact your dealer for technical support if you have any questions or problems with the product.
Follow all local radio regulations, a HAM license is required for some channels and power levels, you
may need to notify the local radio regulatory agency before using some frequencies. Ensure you abide
by all local laws and regulations for drones and transmitting power and some frequencies. It is strictly
forbidden to fly in no-fly zones such as Airports, Military Facilities or overcrowded areas.
Specifications
Feature
WIRING DIAGRAM
LOCK-ON TECH eliminates frequency drift. All channel power calibration .
●No frequency sweep, no interference. ●7-36V 6S HV input ,Dual power filter.
POWER LEVEL: PIT-25mW-100mW-200mW-600mW
INPUT VOLTAGE: DC 7-36V (6S LIPO )
VIDEO FORMAT CVBS PAL/NTSC
DIMENSIONS: H 36.5mm* W 36.5mm* D 5.2mm
EXTERNAL CONTROL: SMARTAUDIO
CHANNEL: 37CH(US)
OUTPUT VOLTAGE: DC 5V (Max 600mA)
AUDIO: 6.5M MONO (SUPPORT RUSH AGC MIC)
WEIGHT:4.5g (WITHOUT CABLE)
(TBS authorized commercial)
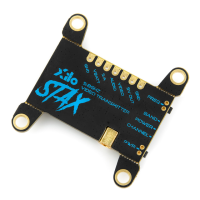
Short Press FREQUENCY BUTTON to change the channel, Long Press to change Band.
Short Press POWER BUTTON
to change the power level, Long Press to turn PIT MODE ON/OFF
You must connect the antenna before powering on the unit!
5v output is to power the camera only, Do not connect to a power inputor
battery supply, this will cause damage to the VTX!
For the best video image, always try to keep video signal cables away from
components such as an ESC that can cause electrical interference.
7-36V DC-IN
VIDEO-IN
GND
GND
SMARTAUDIO
5V-OUT
MIC-IN
CONNECT TO FC OSD
NO OSD
BATTERY OR 7V+ BEC
BATTERY OR 7V+ BEC
FC UART TX
CAMERA
OSD VIDEO OUT
XILO STAX 5.8GHz FPV Video Transmitter
USER MANUAL
MICROPHONE
Question and Answer IconNeed help?

Do you have a question about the XILO STAX and is the answer not in the manual?

Summary

Safety Warnings

User Responsibility and Precautions

Crucial safety advice, operational knowledge, and user responsibility for VTX use.

Product Specifications

Features and Operation

Physical Layout and Button Functions

Identifies physical components and explains button operations for channel and power settings.

Wiring and Connectivity

Wiring Diagram and Connection Options

Details connections for FC OSD/No OSD, camera, and microphone, with visual aid.

Critical Wiring Precautions

Essential notes on antenna installation, 5V output, and interference management.

Overview

The XILO STAX 5.8GHz FPV Video Transmitter is a compact and feature-rich device designed for FPV (First Person View) applications, enabling wireless video transmission from a drone or other remote-controlled vehicle to a receiver. It incorporates "LOCK-ON TECH" to eliminate frequency drift and provides all-channel power calibration for stable and reliable video feeds. The device is designed to operate without frequency sweep or interference, ensuring a clean signal.

Important Technical Specifications:

  • Input Voltage: The VTX operates on a wide input voltage range of DC 7-36V, making it compatible with up to 6S LiPo batteries. It features dual power filters to ensure clean power delivery.
  • Output Voltage: It provides a DC 5V output with a maximum current of 600mA, primarily intended for powering a camera.
  • Power Levels: The transmitter offers multiple selectable power levels: PIT mode, 25mW, 100mW, 200mW, and 600mW. Note that certain higher power levels may require a HAM license to operate legally and might only be available on special request, with the US version not including all channels.
  • Channels: It supports 37 channels (US version) across various bands including Band A, Band B, Band E, Band F, and Raceband.
  • Video Format: Compatible with both CVBS PAL/NTSC video formats.
  • Audio: Includes 6.5M MONO audio with support for RUSH AGC MIC.
  • Dimensions: The unit is compact, measuring H 36.5mm x W 36.5mm x D 5.2mm.
  • Weight: Weighs 4.5g without the cable.
  • External Control: Features SmartAudio for external control, which is a TBS authorized commercial protocol.

Usage Features:

The XILO STAX VTX is designed for ease of use and integration into FPV systems.

  • Physical Controls:
    • Band/Channel Button: A short press changes the channel, while a long press changes the band.
    • Power Level Button: A short press changes the power level, and a long press turns PIT MODE ON/OFF.
  • SmartAudio Integration: The VTX incorporates the official licensed TBS SmartAudio protocol, allowing for quick and convenient parameter adjustments via the OSD (On-Screen Display) or radio control when connected to a Flight Controller (FC) or CF receiver.
    • Connection: Connect the SmartAudio port of the VTX to a spare UART-TX on the Flight Controller.
    • BetaFlight Configuration: In the BetaFlight configurator, navigate to the Ports Tab, select "TBS SmartAudio" from the Peripherals dropdown menu, and save settings.
    • OSD Menu Access: To access the OSD menu, turn on your radio control, set the THR (throttle) to middle, YAW left, and PITCH up.
    • VTX SA Menu: Within the OSD menu, select "FEATURES" then "VTX SA" to set the VTX to its working state.
    • Mode Configuration: In the CONFIG menu, setting the VTX to "RACE" mode will automatically boot it up in PIT mode. Setting it to "FREE" mode will allow it to transmit normally after booting up. Switching between these modes requires disconnecting and reconnecting power for the setting to take effect.
    • OSD Menu Options: The SmartAudio VTX top menu (Band/Channel mode) provides options for:
      • Device status
      • Band selection
      • Channel selection
      • Frequency of selected band and channel (read-only)
      • RF power selection
      • Commencing current selection
      • Configuration menu
  • Power Level Indication: The power LED indicator flashes when the VTX is in PIT mode. A long press of the power button exits PIT mode and activates the current power level. The LED color indicates the selected power level: Green for 25mW, Yellow for 100mW, Red for 200mW, and Purple for 600mW.
  • Channel and Band Indication: The device uses a combination of LED indicators (LED OFF, LED FLASH, LED ON) to visually represent the selected channel and band.

Maintenance Features:

  • Antenna Connection: It is crucial to connect the antenna before powering on the unit to prevent damage to the precision components inside.
  • Cooling: The VTX can get hot during operation, so it must be mounted in a way that ensures adequate airflow for cooling to prevent burns.
  • Wiring Diagram: A clear wiring diagram is provided to ensure correct cable and plug fitments.
  • 5V Output Usage: The 5V output is specifically for powering the camera only. It should not be connected to a power input or battery supply, as this will cause damage to the VTX.
  • Signal Integrity: For the best video image, it is recommended to keep video signal cables away from components that can cause electrical interference, such as an ESC (Electronic Speed Controller).
  • Breakaway Tabs: The physical design includes breakaway tabs, which might be used for mounting or to reduce the footprint if certain parts are not needed.

Warnings and Important Considerations:

  • Professional Knowledge: Users should possess relevant professional knowledge for installing and operating the VTX. Improper use can lead to potential danger.
  • Local Regulations: Adherence to all local radio regulations is mandatory. A HAM license may be required for certain channels and power levels. Users must notify local radio regulatory agencies before using some frequencies and abide by all laws and regulations for drones and transmitting power.
  • No-Fly Zones: It is strictly forbidden to fly in no-fly zones such as airports, military facilities, or overcrowded areas.
  • No Disassembly/Modification: Users should not disassemble, repair, or modify the product personally. Technical support should be sought from the dealer for any questions or problems.
  • Responsibility: The user accepts responsibility for any personal injury and property damage resulting from ignoring the provided statements or violating operating regulations.

XILO STAX Specifications

General IconGeneral
BrandXILO
ModelSTAX
CategoryTransmitter
LanguageEnglish

Related product manuals