Do you have a question about the Xtreme Power 75036-XP and is the answer not in the manual?
Read all safety warnings and instructions. Failure to follow may result in injury or fire.
Operator must use common sense and caution. Understand all instructions before operating.
Cleaner for in-ground/above-ground pools, its features, and requirements.
Cleaner for inground pools, its features, and requirements.
Install the seal over the foot pad, ensuring correct orientation and seating.
Fit the adapter onto the cleaner's body as per the diagram.
Connect the roller bumper strap to the main body and swivel head.
Connect hose sections and attach weights to neutralize buoyancy.
General steps for installing the cleaner in various pool types.
Step-by-step guide for connecting cleaner to skimmer via hose cone and regulator valve.
Steps to take after installation for initial cleaner setup and checks.
Guide to determining and adjusting hose length for optimal pool coverage.
How to adjust hose weights for proper cleaner balance and pool floor contact.
Using an eyeball diverter to manage return line flow for better cleaner performance.
Step-by-step instructions to install the eyeball diverter in the return line.
Overview of troubleshooting common issues with the pool cleaner.
Checks for debris, pump basket, flapper, and pump/filter capacity.
Checks return line flow, hose length, and hose balance.
Checks return line flow, regulator valve, hose length, balance, and float mechanism.
Checks swivel, return line flow, and hose kinks for repetitive patterns.
Instructions for clearing debris from the cleaner's flapper for proper movement.
Manufacturer disclaims liability for pool conditions and cleaner wear.
Turn off pump and suction before cleaning or maintaining the cleaner.
Stop the pump before swimming to prevent entrapment by cleaner or hose.
Possible causes and resolutions for the cleaner's hose getting tangled.
Possible causes and resolutions for the cleaner moving slowly.
Possible causes and resolutions for the cleaner failing to move at all.
List of parts with reference numbers, part numbers, descriptions, and quantities.
Manufacturer's disclaimer and recommendation for certified technicians for repairs.
Instructions to record product serial number or purchase month/year.
Contact details for customer service regarding questions, problems, or missing parts.
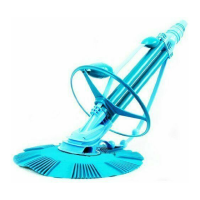
The XtremePower Automatic Suction Swimming Pool Vacuum Cleaner, available in models 75036-XP and 75037-XP, is designed to provide efficient and convenient cleaning for both in-ground and above-ground swimming pools. This device operates by utilizing the existing filtration system of your pool, eliminating the need for additional electricity or complex tools. Its primary function is to vacuum various types of debris from the pool floor, ensuring a clean and enjoyable swimming environment.
The cleaner's design emphasizes ease of use and maintenance. It features a powerful suction system capable of picking up a wide range of debris, from fine dirt and bugs to larger pebbles and twigs. This robust suction capability is achieved without the need for wheels that can jam, gears that can break, or diaphragms that require frequent replacement, contributing to its reliability and low maintenance profile. The smart design allows for quick and easy access to internal components for maintenance, often in a matter of seconds.
For optimal performance, the cleaner requires a pool pump with a minimum capacity, typically a 3/4 HP swimming pool pump or 1600 GHP for the 75036-XP model, and at least a 1 HP swimming pool pump or 1600 GHP for the 75037-XP model. It is designed to attach seamlessly to all standard filtration systems, making it a versatile addition to most pool setups.
Installation involves several key steps to ensure proper operation. First, the pleated seal must be correctly attached to the main body, ensuring it lies flat against the pool floor and can rotate freely. The adapter and roller bumper strap are then secured, followed by the attachment of the dive float restrictor. A crucial part of the setup is assembling the hose sections and attaching hose weights. The number of hose sections and weights needed depends on the pool's dimensions and depth, ensuring the hose remains balanced in the water and the cleaner can reach all areas. The hose is connected to the pool's vacuum connection, typically through the skimmer, using an automatic regulator valve that balances water flow for maximum safety and performance.
Once installed, adjustments are necessary to fine-tune the cleaner's operation. The hose length must be checked with the pump running, ensuring it is long enough to reach the furthest point of the pool plus one extra section. Hose balance is critical; the cleaner's seal should rest flat on the pool floor with the diver tubes at a 45° angle. Hose weights can be adjusted inch by inch to achieve this balance, especially in pools with varying depths. The return line water flow can also impact the cleaner's movement, and an eyeball diverter is included to redirect this flow, preventing interference and ensuring comprehensive cleaning coverage. Different diverter positions can be experimented with to optimize the cleaner's path, directing flow along the pool side, downward, or against the hose to steer the cleaner away from obstructions like stairs and ladders.
Maintenance is straightforward and focuses on preventing common issues. Regular visual inspections are recommended to ensure the flapper, a key internal component, moves freely and is not obstructed by debris. If debris clogs the flapper, it can be jiggled out or, if necessary, the flapper can be removed for thorough cleaning. The foot pad should also be checked periodically for excessive wear, indicating a need for replacement. Proper storage of the hose is important; it should be laid flat, not coiled, to prevent kinks and maintain its shape, which is crucial for the cleaner's movement. Swapping hose sections every three months is also advised to prevent them from sticking together.
Troubleshooting guidance addresses common operational problems. If the cleaner is not moving or pulsating, checks include ensuring all main drain and suction lines are closed except for the cleaner's line, inspecting the filter and pump basket for debris, checking the cleaner's flapper for obstructions, and verifying that the pool pump and filter system are adequately sized. If the cleaner stays in one end of the pool, adjusting the return line water flow with the eyeball diverter, checking hose length, and ensuring proper hose balance are key steps. For issues with the cleaner staying on the main drain, confirming the drain is closed and the grate is installed, and consulting a pool professional if the drain is not flush with the pool floor, are recommended. Air bubbles entering the pool at the return line suggest an air leak, requiring checks of the hose, vacuum connection, and pump basket lid for looseness or damage. If the cleaner pulls air or remains at the water's surface, verifying the dive float mechanism and restrictor are operating freely, ensuring the automatic regulator valve is clear, and checking the water level are important. Repetitive cleaning patterns can often be resolved by checking the cleaner's swivel for free movement, redirecting return line water flow, and ensuring the hose is not bent or kinked.
The XtremePower Automatic Suction Swimming Pool Vacuum Cleaner is designed to be a preventative maintenance tool, keeping the pool clean between major cleanings. It is not intended to be the first cleaning after pool construction or at the beginning of the season, and the pool should be free of large debris, algae, and structural issues before its initial use. The manufacturer emphasizes that the cleaner is a passive product and does not cause wear or damage to pool surfaces; rather, pool conditions like water chemistry and structural integrity can affect the cleaner's performance and longevity.
| Model Number | 75036-XP |
|---|---|
| Brand | Xtreme Power |
| Power Source | Electric |
| Material | Plastic |
| Color | Blue |
| Type | Automatic |
| Pool Type | In-Ground |