WARNING : Risk of fire. Do not aim the bulbs at a combustible surface
within 3 ft. (1m)
ATTENTION: Keep the sensor at least 2” (51 mm) away from the lamps.
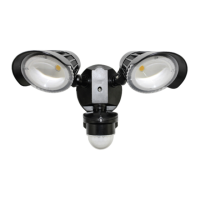
1. MOUNTING AND WIRING THE LIGHT
Note:Donotmountontheground,recommendedinstallationheightis6½feetto10feet
**Beforeyoubeginmakesurethatyourpoweristurnedoffatyourcircuitbreakerbox**
1.Installthecrossbar(E)tothejunctionboxandsecurewiththe(2)mountingscrews(I).
2.OnthecrossbarlocateGND,attachthegroundwire(G)withthegroundingScrew(F)
to the cross bar.
3.Useawirenut(H)toconnectthegroundwire(G)tothehousegroundwire(typicallycopper).
Forproperconnection,placewirenutoverwiresandtwistclockwiseuntiltight.
4.Connectsupplywireswithwirenuts(H)asshowninthegureabove.
•BlacksupplywireconnectstotheBlackpowersupplywire(Live)
•WhiteproductwireconnectstotheWhitesupplywire(Neutral)
5.Youmayusetheoptionalgasket(D)atthistime.
6.Installthelightxture(A)tothecrossbar(E).Usesiliconsealant(notincluded)aroundtheperimeter
of the light to seal for moisture.
7.Screwinthestainlesssteelscrew(C)toholdxtureinplace.
Insertplasticscrewcover(B)intoscrewhole.
8.Turnonyourelectricityaftertheinstallhasbeencompleted.
9.Turnonpowerswitch.(Ifpowerswitchisnoton,thelightwillnotcycleonoroff)
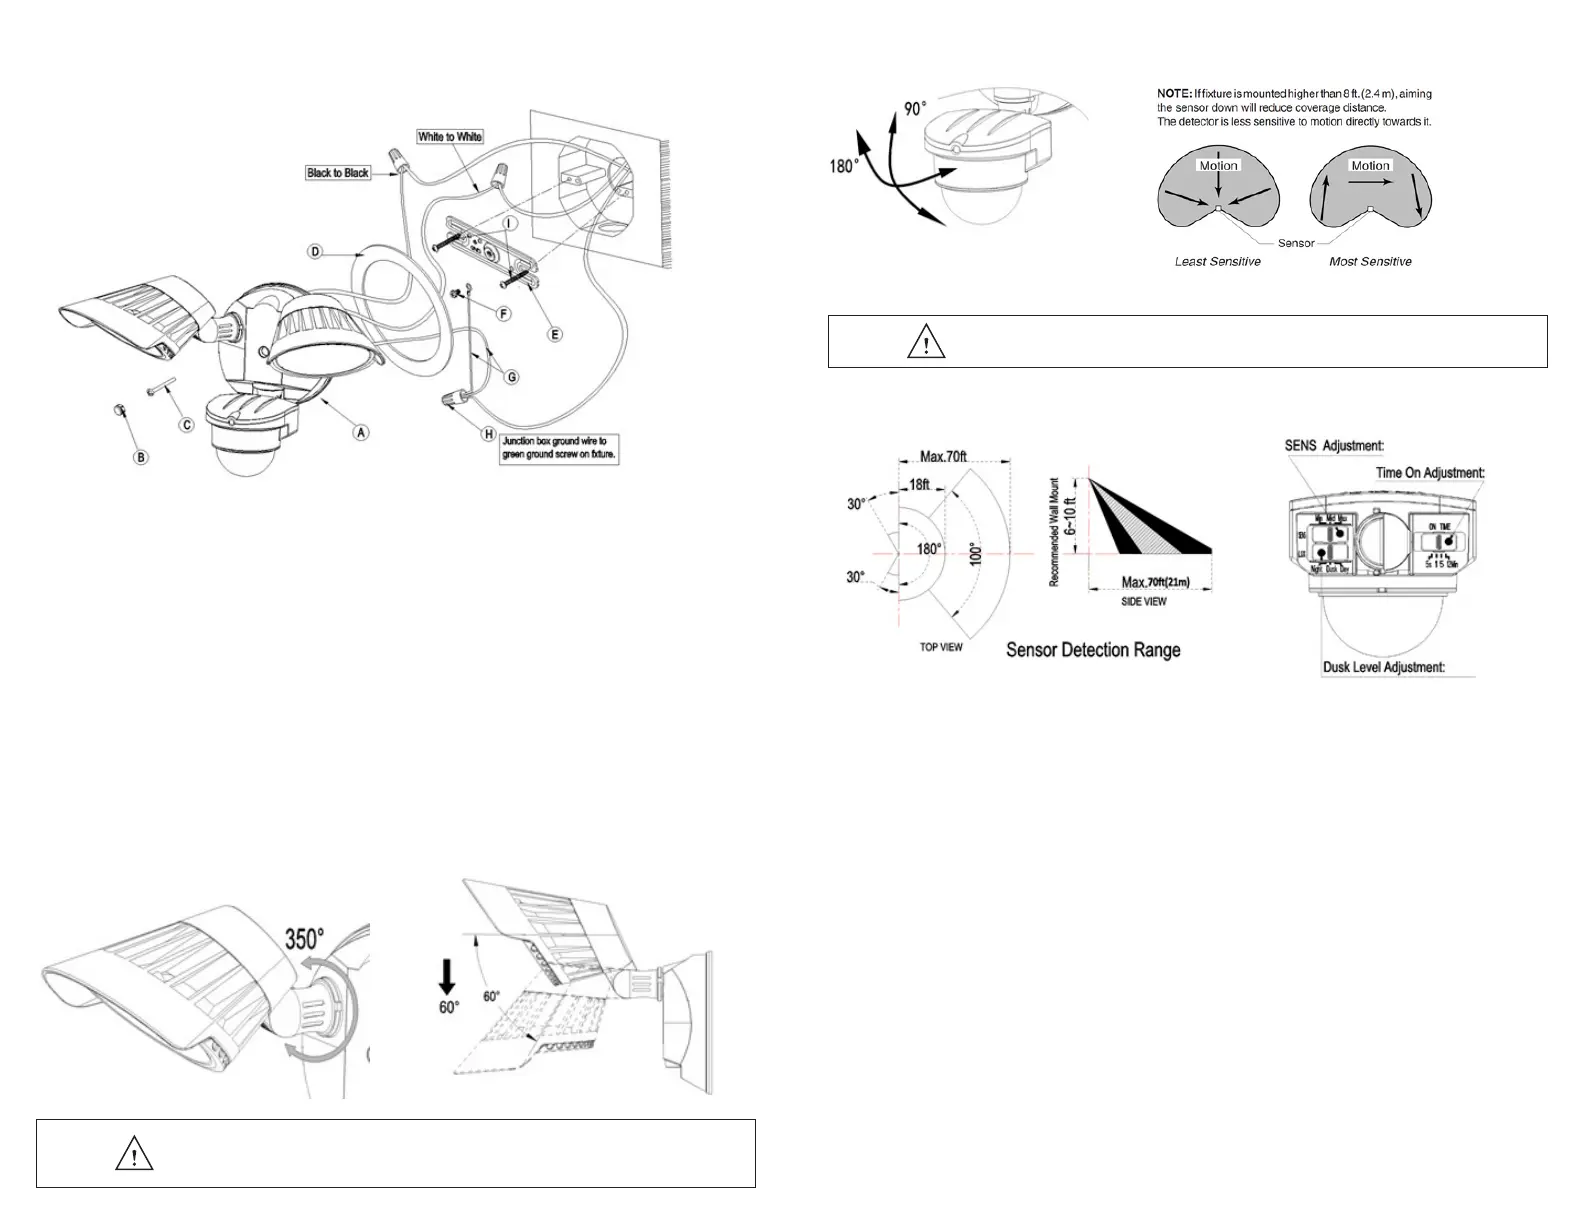
2. ADJUSTING YOUR LIGHT HEADS
Yourlightheadscanbeadjustedbyturningtheindividuallightheadtodesiredposition.Youcanalsoadjustyourlighthead
up and down to your desired position.
3. ADJUSTING YOUR MOTION SENSOR
Yoursensorheadcanbeadjustedbyturningtheindividualupanddowntoyourdetectiondistance.
INSTALLATION
Note:Mountthexturehigherthan8ft.(2.4m),aimingthesensordownwillreducecoveragedistance.
4. SETTING THE MOTION SENSOR
SENSOR ADJUSTMENTS
**Youmustadjustthemotionsensoronthelighttothedesiredarea
beforeyoucanadjustthetimeandLUXsettings**
TIME SETTING
TheTIMEsettingcontrolshowlongtheunitremainsilluminatedfollowingactivationandafterallmotionceases.
Theminimumtime(slideswitch)isapprox.5seconds,themaximumtime(slideswitch)isapproximately12minutes.
Settheslideswitchtocontroltothedesiredsettingbetweentheselimits.
LUX SETTINGS
TheLUXslideswitchknobcontroldeterminesthelevelofdarknessrequiredfortheunittostartoperating.
Thesettingisbestachievedbytheprocedurebelow:
• Settheslideswitchknobtothe“Night”positiononbehalfofsensorstoworkonlyatnight(about:0-20lux)
• Settheslideswitchknobtothe“Dusk”positiononbehalfofsensorsintheenvironmentintothetwilightstate
canwork(about:0-200lux)
• Settheslideswitchknobtothe“Day”positiononbehalfofsensorsintheenvironmentonbehalfofthestatecanwork
duringtheday(about:0-2000lux)
SENS SETTINGS
TheSENSslideswitchknobcontrol:
Settheslideswitchknobtothe“Min”position.Thesensorislowsensitivitysetting.
Settheslideswitchknobtothe“Mid”position.Thesensorisgenerallysensitivitysetting.
Settheslideswitchknobtothe“Max”position.Thesensorishighsensitivitysetting.
 Loading...