Do you have a question about the Yale HSA6010 and is the answer not in the manual?
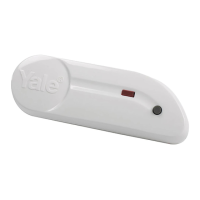
Red LED indicates door contact state.
Used for testing radio performance and learning-in.
Provides access to the inside of the door contact.
Spring loaded switch protects contact from removal.
Pull out tab to activate the battery.
Actuates the sensor.
Punch through panels for screw fixing holes.
Lists relevant EN standards for compliance.
Specifies operating temperature and humidity limits.
Details the radio frequency and modulation.
Type, life, and activation rate of the battery.
Instructions for fixing the device using screws.
Steps for mounting the device using adhesive pads.
| Brand | Yale |
|---|---|
| Model | HSA6010 |
| Category | Accessories |
| Language | English |